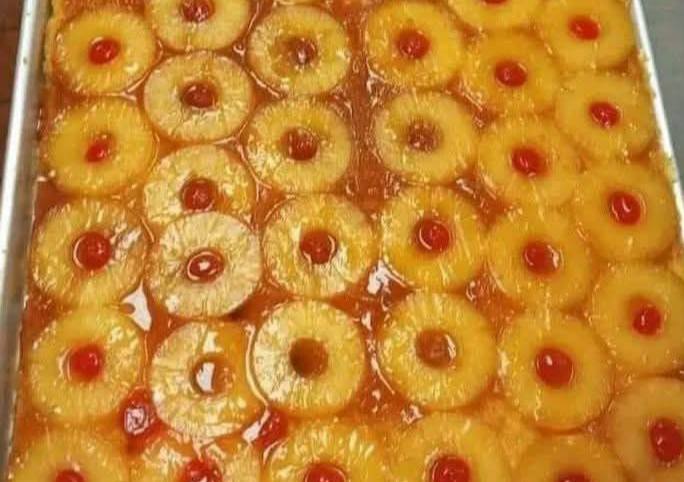
Few desserts possess the power to transport an entire generation back to a specific moment in time quite like the classic Pineapple Upside-Down Cake. If you walked into a suburban kitchen during the mid-century era, there was an incredibly high chance this golden, caramelized masterpiece was cooling on the counter. It was the undisputed king of church potlucks, family reunions, and casual Sunday dinners.
Yet, for many modern home cooks, attempting to recreate this vintage gem results in a frustrating paradox. We chase the memory of a light, springy sponge saturated with buttery brown sugar, but instead, we end up with a soggy, dense mess on the bottom and a bone-dry cake on top. Or worse, half of the beautifully arranged fruit stays stubbornly glued to the pan when flipped.
A truly great Pineapple Upside-Down Cake shouldn’t require a leap of faith when you invert the pan. The solution lies in understanding the science of moisture balance between the fruit juices, the caramel topping, and the structure of the cake batter underneath. By mastering a few foundational baking techniques, you can easily replicate the exact texture and deeply caramelized flavor that made this dessert a mid-century icon.
My Journey with a Mid-Century Icon
Growing up, my grandmother’s rectangular aluminum baking pan was practically a sacred object, reserved almost exclusively for sheet-pan pineapple upside-down cakes. I still remember standing on a kitchen chair, carefully placing a bright red maraschino cherry into the center of each pineapple ring, treating it like a high-stakes art project. The aroma that filled her house—a heavy, intoxicating mix of melting butter, unrefined brown sugar, and toasted tropical fruit—is a sensory memory that hasn’t faded.
When I transitioned into professional recipe development and advanced culinary writing, I realized that many nostalgic recipes suffered from a reliance on overly processed box mixes and imitation flavorings that lacked depth. I set out to honor my grandmother’s legacy while refining the technique for a modern scratch-baking environment.
Through dozens of test batches, I discovered that a standard cake flour batter is often too delicate to handle the heavy moisture of canned pineapples. By switching to a meticulously creamed all-purpose flour base enriched with a touch of sour cream, I found the ultimate structural sweet spot. It creates a cake dense enough to hold the fruit but light enough to absorb the rich, buttery glaze without turning to mush.
Recipe Overview
- Prep Time: 25 minutes
- Cook Time: 40–45 minutes
- Total Time: 1 hour 10 minutes
- Yield: 24 servings (9×13-inch sheet pan)
- Difficulty: Intermediate
Ingredients You’ll Need
For the Caramel Fruit Topping
- Unsalted Butter: $\frac{1}{2}$ cup (1 stick), melted
- Light Brown Sugar: 1 cup, firmly packed
- Pineapple Rings: 2 cans (20 oz each) in 100% juice (reserve $\frac{1}{4}$ cup juice for the batter)
- Maraschino Cherries: 1 jar (approx. 16–20 cherries), stems removed and blotted completely dry
For the Cake Batter
- All-Purpose Flour: $2\frac{1}{2}$ cups, spooned and leveled
- Baking Powder: $2\frac{1}{2}$ teaspoons
- Fine Sea Salt: $\frac{1}{2}$ teaspoon
- Unsalted Butter: $\frac{3}{4}$ cup (1.5 sticks), room temperature
- Granulated Sugar: $1\frac{1}{2}$ cups
- Large Eggs: 3, room temperature
- Pure Vanilla Extract: 2 teaspoons
- Sour Cream: $\frac{1}{2}$ cup, room temperature
- Reserved Pineapple Juice: $\frac{1}{4}$ cup
Step-by-Step Instructions
Step 1: Prep the Fruit and Pan
Before turning on the oven, open your pineapple cans and drain them thoroughly in a colander. Take several paper towels and gently press down on the pineapple rings to remove excess surface moisture. Do the exact same thing with your maraschino cherries.
Why this matters: Excess water is the absolute enemy of a clean flip. If the fruit carries too much liquid into the pan, it dilutes the sugar and butter, turning your caramel into a runny syrup that soaks directly into the cake, creating a gummy layer.
Preheat your conventional oven to 350°F (175°C).
Step 2: Build the Caramel Foundation
Pour the $\frac{1}{2}$ cup of melted butter directly into the bottom of an ungreased 9×13-inch metal baking pan. Use a pastry brush to ensure the butter lightly coats the lower half-inch of the pan’s sides. Evenly sprinkle the packed light brown sugar over the melted butter. Use your fingers to press it down gently into a uniform, flat layer.
Step 3: Arrange the Mosaic
Place the dried pineapple rings on top of the brown sugar layer. In a standard 9×13 pan, you can typically fit three rows of five rings, plus partial pieces along the gaps if you want maximum coverage. Place one dried maraschino cherry in the center of every pineapple ring. If you have extra cherries, you can place them in the small diamond-shaped spaces between the rings. Set the pan aside.
Step 4: Sift the Dry Ingredients
In a medium mixing bowl, whisk together the all-purpose flour, baking powder, and sea salt. Sifting or vigorously whisking ensures that the leavening agent is completely distributed throughout the flour, preventing uneven rising or large air pockets in your finished cake.
Step 5: Cream the Butter and Sugar
In a stand mixer fitted with the paddle attachment, beat the $\frac{3}{4}$ cup of room-temperature butter and $1\frac{1}{2}$ cups of granulated sugar on medium-high speed for a full 4 to 5 minutes.
Micro-Explanation: Do not rush this step. Creaming forces the sugar crystals through the solid fat, creating millions of microscopic air pockets. This mechanical aeration is what gives a scratch-made cake its light, velvet-like crumb structure. The mixture should look pale yellow and remarkably fluffy.
Step 6: Emulsify the Wet Ingredients
Reduce the mixer speed to medium. Add the eggs one at a time, allowing each egg to fully incorporate before sliding in the next. Once the eggs are integrated, mix in the vanilla extract. If the mixture looks slightly curdled at this stage, don’t panic—it will smooth out as soon as the flour is added.
Step 7: Alternating Additions
In a small bowl, whisk together the sour cream and the $\frac{1}{4}$ cup of reserved pineapple juice. With your mixer on low speed, add one-third of the dry ingredient mixture to the butter setup. Follow with half of the sour cream mixture. Repeat with another third of the flour, the remaining liquid, and finish with the final third of the flour. Mix only until the last streaks of flour disappear. Over-mixing at this stage develops gluten, turning a tender cake tough and rubbery.
Step 8: Spread and Bake
Carefully spoon the thick batter over the arranged pineapple and cherries. Use an offset spatula to gently spread the batter to the edges of the pan, taking extra care not to displace the fruit underneath.
Bake at 350°F (175°C) for 40 to 45 minutes. The cake is done when the top is deeply golden brown, the edges start pulling away from the sides of the pan, and a toothpick inserted into the exact center of the cake comes out clean or with a few moist crumbs attached.
Step 9: The Moment of Truth (The Flip)
Remove the pan from the oven and let it sit on a wire cooling rack for exactly 10 minutes. While it rests, run a thin butter knife along the inside perimeter of the pan to loosen any caramelized sugar.
Place a large, flat serving platter, cutting board, or rimmed baking sheet upside down over the top of the cake pan. Wearing heavy oven mitts, firmly grip both the baking pan and the platter together. In one swift, confident motion, invert the entire unit 180 degrees.
Leave the inverted pan resting on top of the platter for 2 full minutes. This allows the hot caramel syrup to cascade down over the cake completely. Gently tap the bottom of the pan a few times, then slowly lift the pan straight up. If any pineapple rings got left behind, simply slide them off the pan with a fork and place them back onto their designated spot on the cake. Let the cake cool for at least 20 minutes before slicing.
Common Mistakes & How to Avoid Them
- Using a Glass Baking Dish: Glass retains heat much longer than metal, which causes the exterior edges and the sugar topping to scorch before the interior cake batter cooks through. Always opt for a light-colored aluminum baking pan for even heat distribution.
- Flipping Too Early or Too Late: If you flip the cake immediately out of the oven, the molten caramel will run off everywhere, leaving your cake soggy and the topping sparse. If you wait longer than 10-12 minutes, the cooling sugar will solidify, gluing the fruit permanently to the bottom of your pan.
- Skipping the Fruit Drying Process: Canned fruit holds onto a staggering amount of liquid. Skipping the paper towel blotting process results in an overly wet caramel layer that prevents the cake batter from cooking properly underneath the fruit.
Ingredient Substitutions & Variations
- The Cast Iron Skillet Method: If you want a round cake with beautifully rustic, crispy edges, you can scale the batter down by one-third and bake this directly in a seasoned 10-inch cast iron skillet.
- Spiced Rum Twist: For a more complex, adult flavor profile, replace the reserved pineapple juice in the batter with 2 tablespoons of dark spiced rum and 2 tablespoons of whole milk.
- Fresh vs. Canned Pineapple: While fresh pineapple sounds like an upgrade, canned pineapple is actually preferred here. Canned pineapple is perfectly uniform in thickness and contains an enzyme profile that won’t interfere with the cake’s setting process. If using fresh, slice it thin and poach it lightly in simple syrup first.
Pro Tips for the Perfect Bake
- The Temperature Check: Because the fruit layer makes it hard to gauge doneness by touch, use an instant-read digital food thermometer. Insert it into the center of the cake; it should read between 205°F and 210°F (96°C to 99°C).
- Deepen the Color: If you prefer a highly pronounced molasses flavor, substitute the light brown sugar with dark brown sugar for the fruit foundation.
- Clean Slices: For perfectly clean cuts that look beautiful on a plate, wipe your chef’s knife down with a damp warm cloth between every single slice.
Frequently Asked Questions
Can I make this cake ahead of time?
Yes. This cake actually tastes even better a few hours after baking, as the pineapple juices and caramel continue to meld with the crumb. You can easily make it the morning of your event. Keep it at room temperature until ready to serve.
How do I store leftovers?
Because of the high moisture content from the fruit, leftovers should be wrapped tightly in plastic wrap or stored in an airtight container in the refrigerator for up to 3 to 4 days. Bring it back to room temperature or warm it slightly in the microwave for 10 seconds before eating.
Why did my cake turn out soggy in the middle?
This is almost always caused by under-baking or failing to blot the liquid from the pineapple rings. Ensure your oven temperature is accurate using an oven thermometer, and rely on a toothpick test rather than just looking at the top crust color.