🛒 Ingredients
This recipe makes approximately 6–8 individual dessert cups, depending on the size of your containers.
For the cheesecake filling
- 1 package (3.4 oz / 96 g) instant cheesecake pudding mix
- 1 package (8 oz / 225 g) cream cheese, softened
- 1 cup (240 ml) cold milk
- 1 cup (240 ml) heavy whipping cream, cold
- 1/3 cup (40 g) powdered sugar, or to taste
- 1 teaspoon vanilla extract
- 1/3 cup (80 g) caramel sauce
- 1/4 teaspoon fine sea salt, or to taste
- 1/2 cup (70 g) crushed toffee or caramel candy pieces
For the cookie crust
- 1 1/2 cups (150 g) crushed graham crackers or digestive biscuits
- 5 tablespoons (70 g) melted butter
- 1 tablespoon brown sugar, optional
- A small pinch of salt
For the topping
- 1/3 cup (80 g) caramel sauce
- 1/2 cup (70 g) toffee bits or crushed caramel candies
- 2 tablespoons chopped pecans or peanuts, optional
- A small pinch of flaky sea salt
- Extra whipped cream, optional
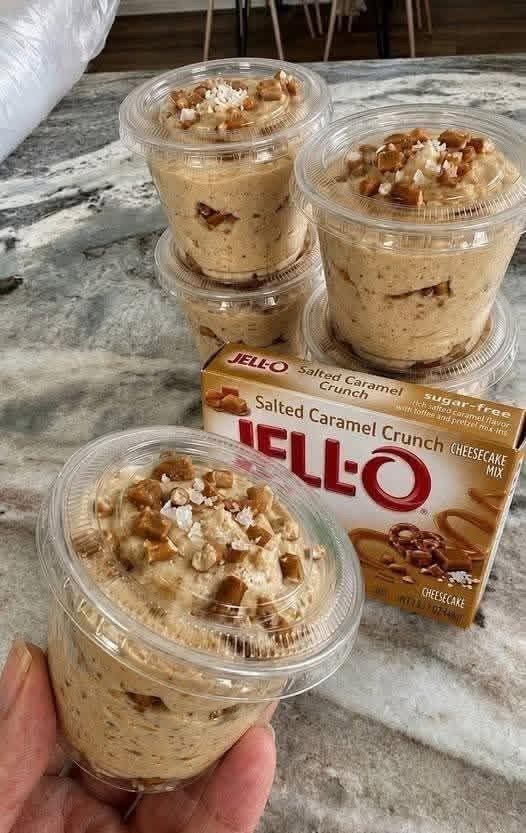
Helpful tip: For a dessert closer to the packaged mix in the photo, you can substitute the cheesecake pudding mixture with a prepared salted caramel cheesecake dessert mix. Follow the package directions for the liquid quantities, then fold in the crunchy pieces.
👩🍳 Instructions
Step 1: Prepare the cookie crust
Start by preparing the crunchy base for your dessert cups. Place the graham crackers or digestive biscuits in a food processor and pulse until they become fine crumbs. If you do not have a food processor, put the biscuits in a sealed bag and crush them with a rolling pin.
Transfer the crumbs to a medium mixing bowl. Add the melted butter, brown sugar if using, and a small pinch of salt. Stir everything together until the crumbs are evenly coated and resemble damp sand.
Divide the mixture between six to eight clear dessert cups. Add approximately two tablespoons to each cup, depending on the size of your containers. Press the crumbs gently into the bottom using the back of a spoon.
You do not need to pack the crust too tightly. A lightly pressed crust gives the dessert a pleasant buttery crunch and makes it easier to scoop with a spoon.
Place the cups in the refrigerator while you prepare the cheesecake filling. Chilling the crust helps the butter firm up and keeps the layers neat.
Step 2: Make the cream cheese mixture
Take the softened cream cheese and place it in a large mixing bowl. Using a hand mixer, beat it for about two minutes until it becomes smooth and creamy.
Scrape down the sides of the bowl occasionally to remove any lumps. Softened cream cheese is important because cold cream cheese can leave small pieces throughout the filling.
Add the powdered sugar and vanilla extract. Beat again until the mixture is smooth and evenly combined.
Next, add the caramel sauce and fine sea salt. Mix until the filling develops a light golden caramel color.
Taste the mixture and adjust the salt if necessary. Salted caramel should have a pleasant balance between sweet and salty, rather than tasting strongly of salt.
If your caramel sauce is already salted, start with a smaller amount of added salt and adjust gradually.
Step 3: Prepare the cheesecake pudding
In a separate bowl, whisk the instant cheesecake pudding mix with the cold milk according to the package’s directions. If the package specifies a different quantity of milk, follow that amount.
Whisk for approximately two minutes, or until the mixture begins to thicken. Let it stand briefly so it can develop a creamy consistency.
Add the prepared pudding to the cream cheese mixture. Beat on low speed until everything is combined and smooth.
Avoid overmixing once the filling is combined. The goal is a thick, creamy mixture that holds its shape in the cups while remaining soft enough to spoon easily.
If the filling seems too thick, add a tablespoon of cold milk at a time. If it seems too loose, refrigerate it for 10–15 minutes before proceeding.
Step 4: Whip the heavy cream
Pour the cold heavy whipping cream into a clean mixing bowl. Make sure both the cream and bowl are cold, as this helps the cream whip more efficiently.
Beat the cream with an electric mixer until medium-stiff peaks form. This usually takes about three to five minutes, depending on the mixer.
When you lift the beaters, the cream should hold its shape while the tips curl slightly. Do not continue beating until the cream becomes grainy or starts turning into butter.
Gently fold the whipped cream into the cheesecake mixture using a spatula. Add it in two or three portions, folding slowly from the bottom of the bowl toward the top.
This technique keeps the mixture light and airy, creating a fluffy cheesecake mousse instead of a dense filling.
Continue folding just until no large white streaks remain.
Step 5: Add the caramel crunch
Now comes the part that gives these dessert cups their signature texture.
Measure out the crushed toffee or caramel candy pieces. Make sure the pieces are small enough to fit comfortably into each spoonful, but leave some slightly larger pieces for extra crunch.
Gently fold about half of the pieces into the cheesecake filling. Distribute them evenly without stirring too aggressively.
For an even richer flavor, you can add one or two tablespoons of additional caramel sauce and swirl it lightly through the filling. Do not mix it completely if you want visible caramel ribbons.
Keep the remaining crunchy pieces for the topping.
Important: If you want the candy to stay crunchy, assemble the cups as close to serving time as practical. Moisture from the cheesecake filling can soften toffee pieces after several hours.
Step 6: Fill the dessert cups
Remove the chilled cookie crusts from the refrigerator.
Spoon the cheesecake mixture into each cup, filling them approximately three-quarters full. For a cleaner presentation, transfer the filling into a piping bag or a large zip-top bag with one corner snipped off.
Pipe the filling in smooth layers, moving the bag in a circular motion. This creates an attractive swirl and helps prevent air pockets.
Gently tap each cup against the counter to settle the filling, but avoid pressing too hard.
If you are using cups with lids, leave a little space at the top so the topping does not stick to the lid.
Once all the cups are filled, smooth the tops with the back of a spoon.
Step 7: Add the caramel topping
Drizzle a little caramel sauce over each cup. You can spread it gently across the surface or leave it in decorative ribbons.
Sprinkle the reserved toffee or caramel candy pieces over the top. Add chopped pecans or peanuts if desired for an extra nutty crunch.
For a more decorative finish, add a small swirl of whipped cream and another light drizzle of caramel sauce.
Finish with a tiny pinch of flaky sea salt. This final touch enhances the caramel flavor and gives the dessert a more sophisticated taste.
Try to distribute the toppings evenly so every cup has a combination of creamy cheesecake, caramel, and crunchy pieces.
Step 8: Chill before serving
Place the dessert cups in the refrigerator for at least two to four hours. This allows the filling to become firmer and gives the flavors time to blend.
For the best texture, cover the cups with lids or plastic wrap once the filling is cold. Keep them refrigerated until you are ready to serve.
If you are preparing them for a party, you can make the crust and filling in advance. Add the crunchy topping shortly before serving to help preserve its texture.
When ready to enjoy, serve the cups directly from the refrigerator. The filling should be cool, creamy, and thick enough to hold its shape on a spoon.
⏱️ Recipe Information
Preparation time
25 minutes
Chilling time
2–4 hours
Cooking method
No-bake dessert
Servings
6–8 dessert cups
Difficulty
Easy
💡 Tips for Perfect Salted Caramel Cheesecake Cups
Use room-temperature cream cheese. This is one of the most important steps. Soft cream cheese blends smoothly with the other ingredients and prevents lumps from forming.
Keep the whipping cream cold. Cold cream whips more easily and creates a lighter filling. If your kitchen is warm, chill the mixing bowl and beaters before starting.
Choose the right caramel sauce. A thick caramel dessert sauce gives the filling a stronger flavor and helps create attractive ribbons. Very thin caramel syrup may make the filling too loose if you add too much.
Control the sweetness. Caramel sauce, pudding mix, and toffee pieces are already sweet. Start with less powdered sugar if you prefer a dessert that is not overly sweet.
Make the cups look professional. Clear plastic cups are ideal because they show the layers. Keep the sides clean while filling them, and finish with a generous but balanced topping.
Preserve the crunch. Toffee bits soften as they absorb moisture. For the best contrast, keep some pieces aside and add them immediately before serving.
Try different crusts. Graham crackers, digestive biscuits, vanilla wafers, and shortbread cookies all work well. Chocolate cookie crumbs can also be used for a richer variation.
🍫 Delicious Variations
- Chocolate caramel cups: Add a thin layer of melted chocolate or chocolate ganache between the crust and cheesecake filling.
- Pecan caramel cheesecake: Fold chopped toasted pecans into the filling and sprinkle more on top.
- Coffee caramel cups: Add a small amount of dissolved instant espresso to the cream cheese mixture for a subtle coffee flavor.
- Extra-salty caramel: Finish each cup with a few flakes of sea salt and use salted caramel sauce.
- Mini party desserts: Divide the recipe into 10–12 smaller cups for birthdays, celebrations, or dessert tables.
- Sugar-free version: Use suitable sugar-free pudding mix, caramel sauce, and crunchy toppings. Check the product labels and adjust the recipe according to the package instructions.
🧊 Storage Instructions
Store the cheesecake cups in airtight containers in the refrigerator for up to three days for the best quality. Keep them chilled because the filling contains dairy products.
For the freshest texture, add the final toffee topping shortly before serving. The filling may remain creamy during storage, but the crunchy pieces can soften over time.
Freezing is possible, but the texture of the whipped cream filling may change after thawing. If you decide to freeze them, use freezer-safe containers and thaw them overnight in the refrigerator. Add fresh caramel crunch after thawing.
Do not leave these dessert cups at room temperature for more than two hours, or one hour in very hot conditions. Return leftovers to the refrigerator promptly.
🍮 Serving Suggestions
Serve these Salted Caramel Crunch Cheesecake Cups after a family dinner, at a birthday party, or alongside coffee or tea. Their individual portions make them convenient for gatherings because there is no need to slice a cake or serve dessert onto plates.
For an attractive dessert table, arrange the cups on a tray and garnish each one with caramel drizzle, crunchy toffee pieces, and a small pinch of flaky salt. You can also add tiny labels with the dessert name for parties or bake sales.
The combination of buttery crumbs, fluffy cheesecake filling, smooth caramel, and crunchy candy makes every bite rich and satisfying.
Final result: A creamy, fluffy, sweet-and-salty cheesecake dessert with a buttery cookie base and caramel crunch in every cup — an easy no-bake treat that looks beautiful and tastes indulgent! 🍮🤎