🛒 Ingredients
For the soft chocolate center
- 2 cups (250 g) all-purpose flour
- ½ cup (50 g) unsweetened cocoa powder
- 1 teaspoon baking powder
- ½ teaspoon baking soda
- ¼ teaspoon salt
- 2 large eggs
- ¾ cup (150 g) granulated sugar
- ½ cup (120 ml) vegetable oil
- 1 teaspoon vanilla extract
- ¾ cup (180 ml) milk
- ½ cup (120 ml) hot water or hot coffee
- ½ cup (100 g) chocolate chips, optional
For the chocolate coating
- 14 oz (400 g) milk chocolate or semi-sweet chocolate
- 2 tablespoons coconut oil or unsalted butter
- 1 teaspoon vanilla extract, optional
Optional decorations
- White chocolate
- Chopped hazelnuts
- Chopped almonds
- Shredded coconut
- Chocolate sprinkles
- A pinch of flaky sea salt
⸻
👩🍳 Step 1: Prepare the Chocolate Cake Base
Start by preheating your oven to 350°F (175°C). Line a rectangular baking pan, approximately 9 × 13 inches (23 × 33 cm), with parchment paper. Leave a little parchment hanging over the sides so you can easily lift the cake from the pan later.
In a large mixing bowl, combine the flour, cocoa powder, baking powder, baking soda, and salt.
Whisk everything together very well. This step is important because cocoa powder can sometimes form small lumps, and you want the dry ingredients evenly distributed throughout the cake.
In another large bowl, whisk together the eggs and sugar for about 1–2 minutes. You don’t need to whip them until extremely fluffy; simply mix until the sugar begins to dissolve and the mixture becomes slightly lighter.
Add the vegetable oil and vanilla extract. Whisk again until everything is completely combined.
Pour in the milk and mix gently.
Now gradually add the dry ingredients to the wet mixture. Stir just until you no longer see large streaks of flour.
Finally, slowly pour in the hot water or hot coffee while mixing.
The batter will become fairly thin. Don’t worry—that’s exactly what you want. The hot liquid helps hydrate the cocoa and creates a softer, more tender chocolate cake.
If you’re using chocolate chips, fold them into the batter at this point.
⸻
🍰 Step 2: Bake the Chocolate Base
Pour the batter into the prepared baking pan.
Gently tap the pan on the counter a couple of times to remove large air bubbles.
Place it in the preheated oven and bake for approximately 20–28 minutes, depending on the size and depth of your pan.
Start checking around the 20-minute mark.
Insert a toothpick into the center. It should come out with a few moist crumbs attached, but it shouldn’t have a lot of wet batter.
Be careful not to overbake the cake.
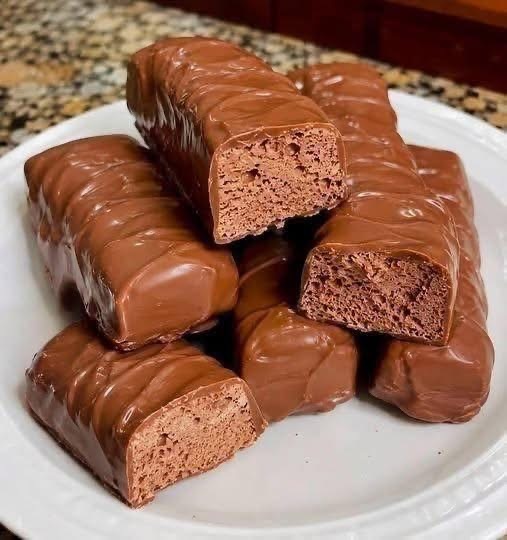
For these chocolate bars, you want the center to remain soft and slightly moist. If you bake it too long, the cake can become dry and crumbly, which makes it more difficult to create the smooth texture seen in the picture.
Once baked, remove the pan from the oven and allow the cake to cool completely.
⸻
🔪 Step 3: Cut the Cake Into Bars
When the cake is completely cool, carefully lift it from the pan using the parchment paper.
Place it on a large cutting board.
For the shape shown in the picture, cut the cake into thick rectangular pieces.
You can make them approximately:
1 × 4 inches (2.5 × 10 cm)
or slightly larger if you prefer.
Try to make the pieces similar in size so they look neat once coated with chocolate.
If you want very clean edges, place the cake in the refrigerator for about 20–30 minutes before cutting.
Use a sharp knife and wipe it clean between cuts.
Don’t throw away any small leftover pieces. They can be used to make chocolate cake truffles, layered desserts, or simply enjoyed with coffee.
⸻
🍫 Step 4: Prepare the Chocolate Coating
Now it’s time for the part that gives these treats their beautiful appearance.
Break the chocolate into small pieces and place it in a heatproof bowl.
Add the coconut oil or butter.
Melt the chocolate using a double boiler by placing the bowl over a saucepan containing a small amount of gently simmering water.
Make sure the bottom of the bowl doesn’t touch the water.
Stir continuously and gently until the chocolate becomes completely smooth.
You can also melt the chocolate in the microwave. Heat it in 20-second intervals, stirring well after each interval. Continue until almost completely melted, then stir until the remaining pieces disappear.
Don’t overheat the chocolate.
If you are using milk chocolate, it will give you a sweet, creamy coating similar to the chocolate appearance in the picture. Semi-sweet chocolate will produce a richer and slightly less sweet result.
Once melted, stir in the vanilla extract if desired.
⸻
🍫 Step 5: Coat the Chocolate Bars
Place a wire rack over a baking sheet lined with parchment paper.
Using two forks, carefully pick up one chocolate cake bar and place it into the melted chocolate.
Turn it gently so that all sides are covered.
Lift the bar out of the chocolate and allow the excess chocolate to drip back into the bowl.
Place the coated bar on the wire rack.
Repeat with the remaining pieces.
For a thicker chocolate shell, allow the first coating to set for several minutes and then dip each bar into the chocolate again.
This second coating is especially useful if you want the bars to look thick and generously covered, like the treats in the photograph.
⸻
✨ Step 6: Create the Decorative Lines
The bars in the picture have attractive wavy lines across the chocolate coating.
You can easily recreate this effect at home.
After coating the bars, allow the chocolate to sit for a few minutes until it becomes slightly thicker but is still soft.
Take a fork and gently drag it across the top of each bar.
Move the fork in a slight wave or zigzag pattern.
Don’t press too deeply. You only want to create a decorative pattern in the chocolate surface.
Alternatively, place a small amount of melted chocolate into a piping bag or small plastic bag with the corner trimmed.
Drizzle thin lines across the bars.
For an extra pretty finish, you can drizzle a little melted white chocolate over the top.
⸻
❄️ Step 7: Chill the Bars
Transfer the chocolate-coated bars to the refrigerator.
Chill them for approximately 30–45 minutes, or until the chocolate coating is completely firm.
Once set, remove them from the refrigerator and let them sit at room temperature for about 5–10 minutes before serving.
This allows the chocolate center to soften slightly and gives you a better texture.
⸻
🍫 What Makes These Bars So Good?
The combination of textures is what makes this recipe special.
The outside becomes firm and chocolatey while the inside remains soft and tender.
The cocoa gives the cake a deep chocolate flavor, while the milk chocolate coating adds sweetness and richness.
Using hot coffee instead of hot water is another great trick. You won’t necessarily taste the coffee, but it can make the chocolate flavor taste deeper and more intense.
If you’re making these for children, milk chocolate is usually a great choice. For adults who prefer a richer dessert, try using dark chocolate with around 50–60% cocoa.
⸻
💡 Helpful Tips for Perfect Chocolate Bars
Don’t overbake the cake
This is probably the most important tip.
A few extra minutes in the oven can make a big difference. Since the bars are meant to have a soft center, remove the cake when a toothpick comes out with a few moist crumbs.
Let the cake cool completely
Never coat warm cake with melted chocolate.
Warm cake can cause the chocolate to melt unevenly and become difficult to work with.
Use good-quality chocolate
Since chocolate makes up a large part of the finished dessert, its flavor matters.
A good milk chocolate will give you a smooth, creamy coating, while semi-sweet or dark chocolate creates a more sophisticated flavor.
Chill before cutting
If your cake is too soft to cut neatly, refrigerate it for 20–30 minutes.
A slightly chilled cake is much easier to cut into clean rectangular pieces.
Make the coating thicker
If you want a thick chocolate shell, dip the bars twice.
Allow the first layer to partially set before applying the second layer.
⸻
🌰 Delicious Variations
There are many ways to change this recipe depending on what you have at home.
Hazelnut Chocolate Bars
Add ½ cup of finely chopped toasted hazelnuts to the cake batter. You can also sprinkle crushed hazelnuts over the chocolate coating before it sets.
Coconut Chocolate Bars
Add ½ cup of shredded coconut to the cake batter and sprinkle additional coconut over the freshly coated bars.
Peanut Butter Version
Spread a very thin layer of creamy peanut butter over the cooled cake before cutting it into bars.
Then coat everything in chocolate.
The combination of peanut butter, soft chocolate cake, and milk chocolate is incredibly delicious.
Dark Chocolate Version
Replace the milk chocolate coating with dark chocolate.
This gives the bars a deeper cocoa flavor and reduces the overall sweetness.
Coffee Chocolate Bars
Use strong hot coffee instead of water in the cake batter.
This creates an especially rich chocolate flavor.
⸻
🧊 Storage
Store the finished chocolate bars in an airtight container.
At room temperature, they can generally be kept for about 2 days, provided your kitchen isn’t very warm.
For longer storage, keep them refrigerated for up to 5 days.
Place parchment paper between layers so the chocolate coating doesn’t stick to the bars above it.
You can also freeze the finished bars.
Wrap each one individually in plastic wrap or parchment paper, then place them in a freezer-safe container.
They can be frozen for approximately 1–2 months.
To serve, transfer them to the refrigerator and allow them to thaw slowly.
⸻
🍽️ Serving Ideas
These chocolate bars are delicious straight from the refrigerator, but they’re even better when allowed to sit at room temperature for several minutes.
Serve them alongside:
- ☕ Coffee
- 🥛 Cold milk
- 🍵 Tea
- 🍓 Fresh strawberries
- 🍌 Banana slices
- 🍨 Vanilla ice cream
- 🍫 Extra chocolate sauce
For a dessert platter, arrange several bars on a large white plate and sprinkle a little powdered sugar around them. You can also add strawberries or raspberries for a beautiful contrast.
⸻
📝 Quick Recipe Summary
Prep Time: 25 minutes
Bake Time: 20–28 minutes
Cooling Time: 30–45 minutes
Chocolate Setting Time: 30–45 minutes
Total Time: Approximately 2 hours
Yield: About 12–16 chocolate bars
Ingredients
Cake:
- 2 cups flour
- ½ cup cocoa powder
- 1 teaspoon baking powder
- ½ teaspoon baking soda
- ¼ teaspoon salt
- 2 eggs
- ¾ cup sugar
- ½ cup vegetable oil
- 1 teaspoon vanilla
- ¾ cup milk
- ½ cup hot water or coffee
- ½ cup chocolate chips, optional
Coating:
- 14 oz milk or semi-sweet chocolate
- 2 tablespoons coconut oil or butter
Instructions
- Preheat the oven to 350°F (175°C).
- Line a rectangular baking pan with parchment paper.
- Mix the flour, cocoa, baking powder, baking soda, and salt.
- Whisk the eggs and sugar together.
- Add oil, vanilla, and milk.
- Combine the wet and dry ingredients.
- Add hot water or coffee and mix until smooth.
- Bake for 20–28 minutes.
- Cool completely.
- Cut into rectangular bars.
- Melt the chocolate with coconut oil or butter.
- Dip each bar into the chocolate.
- Create decorative lines with a fork if desired.
- Refrigerate until the coating is firm.
- Serve and enjoy!