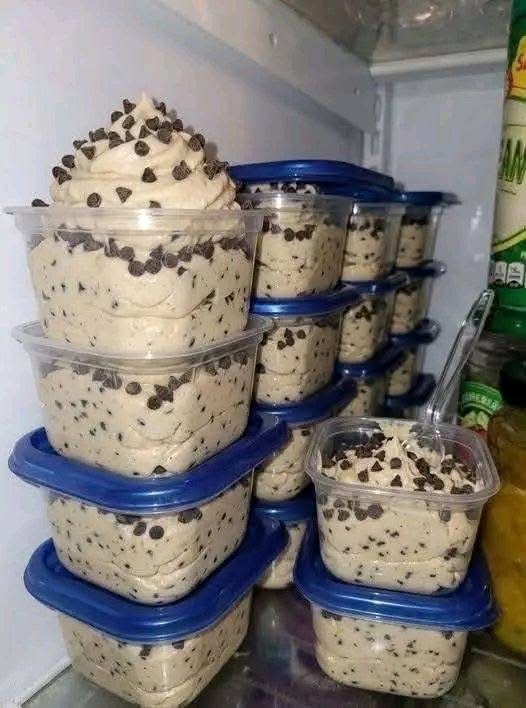
The dessert in the picture looks like creamy chocolate chip cookie dough, portioned into small plastic containers and topped with extra chocolate chips. It is rich, soft, buttery, and packed with little chocolate pieces in every bite. The good news is that you can make a very similar version at home—and because this recipe is designed to be eaten as cookie dough, it contains no raw eggs and uses heat-treated flour for better food safety.
This recipe makes a large batch, perfect for storing in individual containers, serving at parties, or keeping in the refrigerator whenever you want a quick sweet treat.
🛒 Ingredients
For the cookie dough
- 2 ½ cups (315 g) all-purpose flour
- 1 cup (225 g) unsalted butter, softened
- ¾ cup (150 g) brown sugar, packed
- ½ cup (100 g) granulated sugar
- 2 teaspoons vanilla extract
- ½ teaspoon salt
- ¼ cup (60 ml) milk
- 1 ½ cups (255 g) mini chocolate chips
- ½ cup (85 g) regular chocolate chips, for mixing or decorating
- 2 tablespoons heavy cream, optional, for an extra creamy texture
Optional additions
- ½ cup chopped walnuts or pecans
- 2 tablespoons cocoa powder for a chocolate version
- ½ teaspoon cinnamon
- ¼ cup mini chocolate candies
- A pinch of flaky sea salt for topping
👩🍳 Step 1: Heat-Treat the Flour
Because traditional flour is not considered ready-to-eat, the first step is to heat-treat it before making edible cookie dough.
Spread the 2 ½ cups of flour evenly on a baking sheet. Place it in a preheated oven at 350°F (175°C) for about 5–7 minutes.
For extra caution, use a food thermometer and make sure the flour reaches 165°F (74°C) throughout. Stir the flour once during heating so it warms evenly.
Remove it from the oven and let it cool completely before continuing.
This step is particularly important for a recipe that will be eaten without baking. Do not simply assume that raw flour is safe because the finished dough looks clean or fresh.
🧈 Step 2: Prepare the Butter
Place the softened butter in a large mixing bowl.
The butter should be soft enough to press easily with a spoon or finger, but it shouldn’t be completely melted. Softened butter gives the cookie dough its thick, smooth texture.
Add the brown sugar and granulated sugar.
Using an electric mixer, beat the butter and sugars together for approximately 2–3 minutes. You want the mixture to become lighter, smoother, and creamy.
If you don’t have an electric mixer, you can mix everything by hand using a sturdy wooden spoon or spatula. It will simply require a little more effort.
The combination of brown sugar and white sugar is important. Brown sugar gives the dough a deeper caramel-like flavor and helps create that classic chocolate-chip-cookie taste, while white sugar adds sweetness.
🍦 Step 3: Add the Vanilla and Milk
Add:
- 2 teaspoons vanilla extract
- ¼ cup milk
- ½ teaspoon salt
Mix until everything is well combined.
At this stage, the mixture may look slightly loose or creamy. That’s completely normal.
Vanilla is especially important because there is no egg in this recipe. It gives the dough the familiar flavor associated with freshly baked chocolate chip cookies.
The small amount of salt also helps balance the sweetness. If you’re using salted butter, you can reduce the added salt to about ¼ teaspoon.
🌾 Step 4: Add the Cooled Flour
Once your heat-treated flour has completely cooled, add it gradually to the butter mixture.
Don’t add all of the flour at once. Add about one-third, mix, then add another third, and continue until everything is incorporated.
Mix on low speed if you’re using an electric mixer.
The dough will gradually become thick and creamy.
If the dough becomes too dry or crumbly, don’t worry. Add one tablespoon of milk at a time until you reach the consistency you want.
The ideal texture should be:
Soft + thick + creamy + scoopable
You don’t want it to be runny like cake batter, but you also don’t want it to be so dry that it breaks apart.
🍫 Step 5: Add the Chocolate Chips
Now comes the best part!
Add approximately 1 ½ cups of mini chocolate chips.
Fold them into the dough using a spatula.
Mini chocolate chips work especially well because they spread throughout the entire mixture, giving you chocolate in almost every bite.
For an appearance similar to the picture, reserve some additional chocolate chips for the top.
You can also use a combination of semi-sweet and milk chocolate chips. If you prefer a less sweet dessert, use dark chocolate chips.
🥄 Step 6: Adjust the Texture
Take a small spoonful and taste the dough.
If it seems too thick, add a little milk or cream.
If it seems too soft, place it in the refrigerator for 20–30 minutes.
If you want an especially rich, creamy texture similar to the containers shown in the picture, add 1–2 tablespoons of heavy cream and mix thoroughly.
Be careful not to add too much liquid. A little goes a long way.
The finished dough should hold its shape when scooped.
🧁 Step 7: Portion the Cookie Dough
You can serve the cookie dough in several different ways.
For the look shown in the image, use small food-safe containers with lids.
Spoon the cookie dough into each container and gently press it down with the back of a spoon.
Don’t pack it extremely tightly. Keep it light and creamy.
Add a small mound of dough on top if you want a decorative appearance.
Then sprinkle extra chocolate chips over the surface.
For an attractive homemade presentation, you can add:
- Mini chocolate chips
- A few larger chocolate chunks
- A tiny pinch of flaky sea salt
- Crushed cookies
- Chocolate shavings
The result will look especially appealing when served in individual portions.
❄️ Step 8: Chill the Dough
Place the containers in the refrigerator for approximately 30 minutes.
Chilling helps the butter firm up and allows the flavors to develop.
After chilling, the cookie dough will have a thicker, more scoopable consistency.
You can eat it directly with a spoon, serve it alongside ice cream, or use it as a filling for other desserts.
🍨 Delicious Ways to Serve It
This chocolate chip cookie dough is much more versatile than it might seem.
Cookie Dough Ice Cream
Scoop vanilla ice cream into a bowl and add small pieces of cookie dough.
Drizzle with chocolate sauce and sprinkle with mini chocolate chips.
Brownie Topping
Place small pieces of chilled cookie dough over completely cooled brownies.
The combination of fudgy chocolate brownie and creamy cookie dough is delicious.
Dessert Cups
Layer cookie dough with whipped cream and chocolate pudding in small transparent cups.
Finish with chocolate chips on top.
Milkshake
Blend a few spoonfuls of cookie dough with vanilla ice cream and milk.
Don’t blend it completely smooth—leaving a few tiny pieces creates a great texture.
Chocolate Chip Cookie Dough Sandwiches
Spread a thin layer of cookie dough between two cookies.
You can dip the edges in melted chocolate and add extra chocolate chips.
💡 Tips for Perfect Cookie Dough
Use softened butter
Cold butter won’t combine easily with the sugar, while melted butter can make the finished dough too soft.
Room-temperature butter is ideal.
Don’t skip the flour safety step
Since this dough is intended to be eaten without baking, use heat-treated flour rather than ordinary raw flour.
Don’t add eggs
Traditional cookie dough contains eggs, but this recipe is specifically designed as edible cookie dough, so eggs aren’t necessary.
Choose good chocolate
Chocolate chips are one of the main ingredients, so their flavor makes a noticeable difference.
Semi-sweet chocolate gives a classic balance, while dark chocolate provides a richer flavor.
Don’t overdo the milk
Start with the amount listed in the recipe and add more only if necessary. Too much liquid can make the dough thin.
Chill before serving
The dough becomes firmer and more flavorful after chilling.
🧊 How to Store It
Keep the cookie dough in clean, food-safe airtight containers in the refrigerator.
For best quality, enjoy it within about 3–4 days.
You can also freeze it.
To freeze, divide the dough into small portions and place them in airtight freezer-safe containers or bags. Freeze for up to approximately 2–3 months for best quality.
When you’re ready to eat it, transfer a portion to the refrigerator and allow it to thaw.
You can also freeze small scoops individually and enjoy them as little frozen cookie-dough bites.
Remember that homemade edible dough contains dairy and should not be left sitting at room temperature for extended periods.
🍪 Easy Chocolate Cookie Dough Variation
If you’re a serious chocolate lover, turn this recipe into a double-chocolate version.
Replace ¼ cup of the flour with ¼ cup unsweetened cocoa powder.
Then add an extra ¼–½ cup of chocolate chips.
You can use a mixture of milk chocolate and dark chocolate chips.
The result is a deep chocolate-colored cookie dough with a rich cocoa flavor and plenty of chocolate pieces.
❤️ Final Result
You should end up with a thick, creamy, buttery chocolate chip cookie dough filled with mini chocolate chips, very similar in appearance to the dessert shown in the photo.
For the most attractive presentation, fill individual containers, smooth the surface with a spoon, then add a generous sprinkle of chocolate chips on top. Keep the containers refrigerated until you’re ready to serve.
This recipe is also excellent for preparing ahead of time. You can make a large batch, divide it into individual portions, close the containers with lids, and keep them chilled. That makes it convenient for parties, dessert tables, family treats, or even homemade gift portions.
Yield: about 8–10 small dessert containers
Preparation time: 20 minutes
Chilling time: 30 minutes
Total time: about 50 minutes
Difficulty: Easy
The key to getting that irresistible texture is the balance between soft butter, brown sugar, cooled heat-treated flour, milk, vanilla, and plenty of chocolate chips. Once you make it this way, you’ll have a rich edible cookie dough that is creamy enough to eat with a spoon while still being thick enough to scoop and portion beautifully.