🍫 Ingredients
For the chocolate cookie crumb base
- 250 g chocolate sandwich cookies or chocolate biscuits
- 60 g unsalted butter, melted
- 1 tablespoon unsweetened cocoa powder, optional
- Pinch of salt
For the homemade caramel swirl
- 150 g granulated sugar
- 45 g unsalted butter
- 100 ml heavy cream, warmed
- 1 teaspoon vanilla extract
- ¼ teaspoon salt
You can use prepared caramel sauce if you prefer a quicker version.
For the chocolate milk mousse
- 200 g milk chocolate, finely chopped
- 100 ml heavy cream
- 250 ml cold heavy cream
- 30 g powdered sugar
- 1 teaspoon vanilla extract
- 1 tablespoon unsweetened cocoa powder
- Pinch of salt
For the chocolate topping
- 200 ml cold heavy cream
- 25 g powdered sugar
- 1 tablespoon cocoa powder
- ½ teaspoon vanilla extract
For decoration
- Chocolate curls
- Chocolate pearls or chocolate chips
- A drizzle of caramel sauce
- Chocolate cookie crumbs
- Small pieces of chocolate, optional
👩🍳 Step-by-Step Instructions
Step 1: Prepare the chocolate cookie base
Start by making the crunchy chocolate layer that will sit at the bottom of each dessert jar.
Place the chocolate cookies into a food processor and pulse until they become fine crumbs. You don’t necessarily need to turn them into a completely smooth powder. A few slightly larger pieces will give the base a pleasant texture.
If you don’t have a food processor, put the cookies into a strong zip-top bag and crush them using a rolling pin, bottle, or the bottom of a heavy saucepan.
Transfer the crumbs to a bowl and add the melted butter.
Mix thoroughly until all the crumbs are lightly coated with butter. The mixture should resemble wet sand and hold together when pressed between your fingers.
For an even deeper chocolate flavor, add a tablespoon of unsweetened cocoa powder and a small pinch of salt.
Step 2: Fill the jars
For this recipe, small glass dessert jars are ideal.
Add approximately 2–3 tablespoons of the chocolate cookie mixture to the bottom of each jar.
Press the crumbs gently with the back of a spoon.
Don’t compact them too aggressively because you still want the cookie layer to have some texture. A firm but slightly crumbly base is perfect.
Once all the jars have their cookie base, place them in the refrigerator while you prepare the caramel and chocolate mousse.
🍯 Step 3: Make the caramel sauce
Homemade caramel gives this dessert its signature flavor.
Place the granulated sugar in a medium heavy-bottomed saucepan over medium heat.
Allow the sugar to melt slowly.
At first, it may begin melting around the edges. You can gently swirl the pan to encourage even melting, but avoid constantly stirring with a spoon.
Continue heating until the sugar becomes a beautiful amber-golden color.
Watch it carefully because caramel can go from perfectly golden to burnt very quickly.
Once the sugar reaches the desired color, carefully add the butter.
The mixture will bubble vigorously, so keep your hands and face away from the steam.
Stir until the butter is completely incorporated.
Next, slowly pour in the warm heavy cream while stirring continuously.
Again, expect vigorous bubbling.
Continue stirring until you have a smooth, glossy caramel sauce.
Remove the saucepan from the heat and stir in the vanilla extract and salt.
Allow the caramel to cool for several minutes.
It should still be pourable but no longer extremely hot.
Important caramel tip
If your caramel becomes too thick as it cools, gently warm it again with a tablespoon or two of cream.
If it becomes too thin, allow it to cool longer. Caramel naturally thickens as its temperature decreases.
🍫 Step 4: Make the chocolate milk mixture
Now it’s time to create the smooth chocolate component.
Place the chopped milk chocolate in a heatproof bowl.
Heat 100 ml of heavy cream in a small saucepan until it is hot and steaming, but don’t let it boil aggressively.
Pour the hot cream over the chopped chocolate.
Let it sit for approximately 2 minutes.
Then gently stir from the center outward until the chocolate melts completely and becomes smooth and glossy.
This is essentially a chocolate ganache.
Add the cocoa powder, vanilla extract, and a tiny pinch of salt.
Mix well.
Allow the chocolate mixture to cool until it reaches room temperature.
It should not be hot when combined with whipped cream.
🥛 Step 5: Whip the cream
Pour the cold heavy cream into a large mixing bowl.
Add the powdered sugar.
Using an electric mixer, whip the cream until it reaches soft-to-medium peaks.
You want the cream to be fluffy and stable but not over-whipped.
When you lift the beaters, the cream should form a peak that holds its shape but still looks smooth.
Now add a small amount of the whipped cream to the cooled chocolate mixture and gently fold it in.
This loosens the chocolate mixture.
Then add the remaining whipped cream in two or three additions.
Use a spatula and fold gently.
Avoid vigorous stirring because you don’t want to knock all the air out of the whipped cream.
You should end up with a light, creamy chocolate mousse with a rich milk-chocolate flavor.
🍫 Step 6: Create the caramel swirl
Now comes the fun part.
Take the chilled dessert jars out of the refrigerator.
Spoon or pipe a layer of chocolate mousse over the cookie base.
Don’t fill the jars completely yet.
Add approximately 1–2 teaspoons of caramel sauce over the chocolate mousse.
You can drizzle the caramel around the inside edge of the jar as well as across the center.
Then add another layer of chocolate mousse.
Use a spoon, piping bag, or disposable pastry bag.
A piping bag will give you a cleaner and more professional appearance.
🍯 Step 7: Make the caramel marble effect
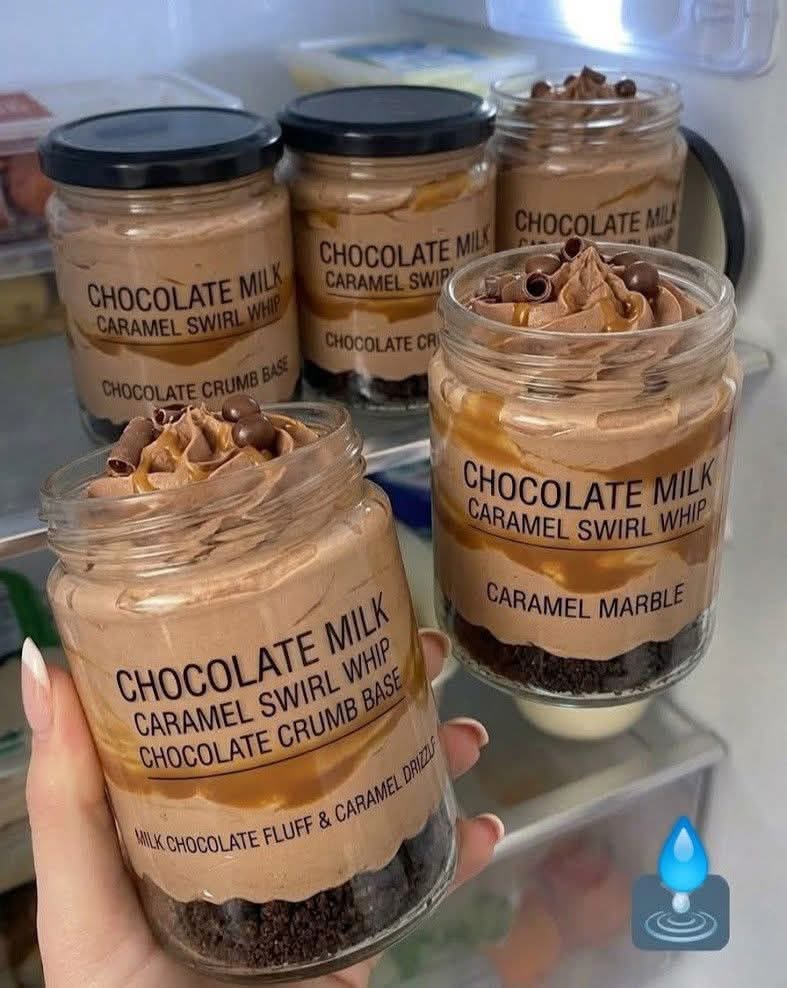
For the beautiful caramel-swirl appearance shown in the photo, add a little caramel sauce to the surface of the chocolate mousse.
Take a toothpick or the tip of a small skewer.
Gently drag it through the caramel in a few circular motions.
Don’t overmix it.
The goal is to create visible ribbons of caramel rather than completely combining the caramel and chocolate.
This creates that attractive caramel marble effect.
🍫 Step 8: Prepare the chocolate whipped topping
In a clean bowl, combine:
- 200 ml cold heavy cream
- 25 g powdered sugar
- 1 tablespoon cocoa powder
- ½ teaspoon vanilla extract
Whip everything together until the mixture forms firm but smooth peaks.
Transfer the chocolate whipped cream into a piping bag fitted with a star tip.
Pipe a decorative swirl on top of each jar.
You can make a simple rosette, a tall spiral, or several small peaks.
There’s no need for perfection—the homemade appearance is part of the charm.
✨ Step 9: Decorate the dessert cups
Now decorate the tops.
Drizzle a small amount of caramel over the chocolate whipped cream.
Add a few chocolate curls.
Scatter some chocolate pearls, mini chocolate chips, or crushed chocolate cookies around the top.
For an especially attractive finish, add a tiny pinch of chocolate cookie crumbs around one side of the whipped cream.
The contrast between the dark chocolate crumbs, caramel ribbons, and light brown chocolate cream creates a beautiful presentation.
❄️ Step 10: Chill before serving
Place the finished jars in the refrigerator.
For the best texture, chill them for at least 2–4 hours.
If you have time, preparing them the day before is even better.
The cookie base will soften slightly from the surrounding cream while still retaining some texture, and the chocolate mousse will become firmer and richer.
Keep the jars covered if you’re storing them overnight.
🍫 How to Serve
These chocolate caramel dessert cups are best served cold.
Take them directly from the refrigerator and serve with a small dessert spoon.
The ideal spoonful should reach all the way to the bottom so you get:
chocolate mousse + caramel + cookie crumbs + whipped topping
in the same bite.
That’s what makes the dessert so satisfying.
For an elegant dinner party, place each jar on a small dessert plate and decorate the plate with a thin caramel drizzle or a few chocolate crumbs.
💡 Tips for Perfect Chocolate Caramel Dessert Cups
1. Use good-quality chocolate
Because chocolate is one of the main ingredients, its flavor makes a noticeable difference.
Milk chocolate creates a sweet and creamy result, while dark chocolate produces a more intense and less sweet dessert.
You can even use a combination of milk and dark chocolate.
2. Don’t over-whip the cream
Over-whipped cream can become grainy and eventually turn into butter.
Stop whipping as soon as the cream reaches the desired consistency.
3. Let the chocolate cool
Never mix very hot chocolate ganache directly with whipped cream.
The heat can melt the whipped cream and make your mousse thin.
The chocolate should be cooled to room temperature but remain soft and creamy.
4. Be careful with caramel
Hot caramel is extremely hot and can cause serious burns.
Always add the cream slowly and carefully.
Keep children away from the stove during caramel preparation.
5. Don’t add too much caramel
Caramel is delicious, but it is also very sweet.
A few ribbons throughout the dessert are enough to give you that beautiful flavor without overwhelming the chocolate.
🔄 Easy Variations
Dark Chocolate Caramel Cups
Replace the milk chocolate with 60–70% dark chocolate.
This creates a more sophisticated dessert with a deeper cocoa flavor.
You may also want to reduce the amount of caramel slightly.
Salted Caramel Chocolate Cups
Add an extra small pinch of flaky sea salt to the caramel.
Finish each dessert with a few flakes of sea salt.
The salty-sweet combination with chocolate is absolutely delicious.
Peanut Butter Chocolate Cups
Add a thin layer of smooth peanut butter between the cookie crumbs and chocolate mousse.
You can also mix a tablespoon of peanut butter into the chocolate mousse.
Espresso Chocolate Cups
Add 1 teaspoon of instant espresso powder to the melted chocolate.
Coffee intensifies the chocolate flavor without necessarily making the dessert taste strongly of coffee.
Nutella-Style Chocolate Cups
Add a few tablespoons of hazelnut chocolate spread to the chocolate ganache before folding it into the whipped cream.
Finish with chopped toasted hazelnuts.
🧊 Storage
These dessert jars can be stored in the refrigerator for approximately 3–4 days when properly covered.
Keep them cold at all times because they contain dairy and whipped cream.
If you’re preparing them for a party, you can make the cookie base, caramel, and chocolate mousse ahead of time.
For the freshest appearance, pipe the whipped topping and add the decorations shortly before serving.
I don’t recommend freezing the completed desserts because the whipped cream and mousse can change texture after thawing.
📋 Quick Recipe Summary
Prep time: 35–45 minutes
Chilling time: 2–4 hours
Servings: 6–8 individual jars
Difficulty: Easy to intermediate
Best served: Cold
Main layers:
- 🍪 Chocolate cookie crumb base
- 🍫 Creamy milk chocolate mousse
- 🍯 Homemade caramel swirl
- 🍫 Chocolate whipped cream
- ✨ Chocolate curls and pearls
❤️ Final Thoughts
These Chocolate Milk Caramel Swirl Dessert Cups are the perfect example of how a simple combination of ingredients can create something that looks like it came from a professional dessert shop.
The crunchy chocolate cookie base provides the foundation, the silky milk-chocolate mousse brings richness, and the buttery caramel creates those irresistible sweet ribbons throughout the dessert. The final chocolate whipped cream makes every jar look luxurious, while chocolate curls and pearls add the finishing touch.
They’re also incredibly convenient because each person gets their own individual dessert. There’s no cake to slice, no messy serving process, and no need to worry about creating perfect portions.
For the prettiest presentation, use clear glass jars so that every layer is visible. When guests can see the dark cookie crumbs, creamy chocolate mousse, golden caramel, and chocolate topping before taking their first bite, the dessert becomes just as appealing visually as it is delicious.