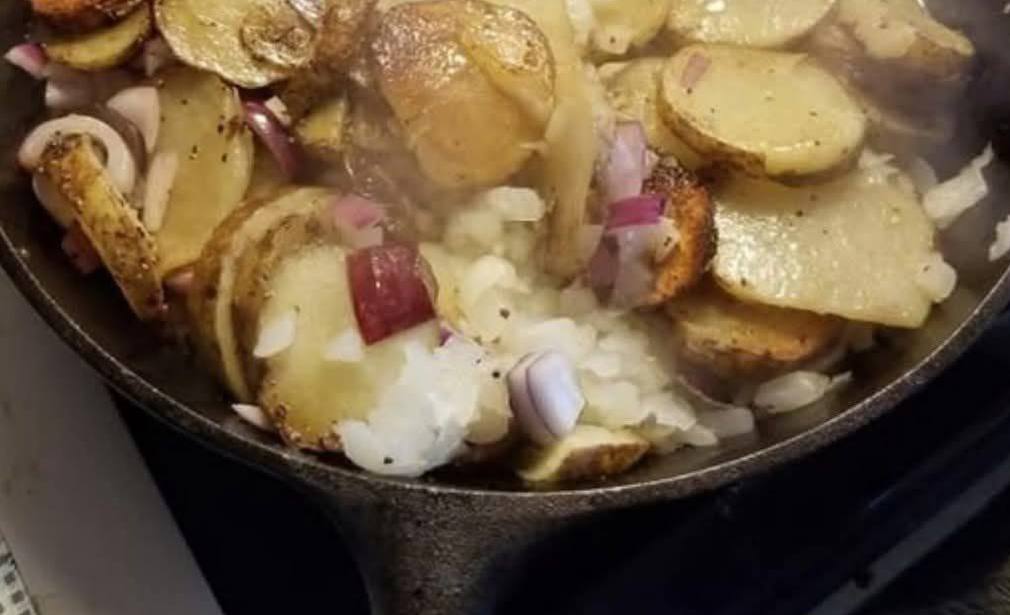
There is an intoxicating magic that happens when thin, skin-on potato rounds meet a screaming hot cast iron skillet. For generations, this exact dish has been the backbone of weekend family breakfasts, rustic camping trips, and quick weeknight dinners. It is a deceptively simple plate, yet it carries a profound sensory weight. The sharp hiss of the spuds hitting the oil, the sweet, sharp aroma of onions softening in the rendered fat, and the visual beauty of deeply browned, lace-edged potato coins tell you everything you need to know: comfort is served.
However, any home cook who has attempted to fry sliced potato rounds knows that simplicity can be a mask for frustration. Because rounds have a larger surface area than cubed potatoes, they are prone to structural failure. Too often, a well-intentioned cook ends up with a chaotic scramble of broken, mushy potato fragments, or a pan where half the slices are welded to the iron while the onions turn to bitter charcoal.
Achieving diner-style perfection—where every single potato round maintains its shape, boasting a shattered-glass crispy exterior and a steaming, fluffy interior—requires a small shift in technique. By mastering heat retention, managing surface starches, and layering your ingredients with precision, you can transform these basic pantry staples into a flawless masterclass of texture and flavor.
The Geometry of the Perfect Potato Coin
During my early years as a kitchen enthusiast, I treated all fried potatoes the same. I assumed that whether they were diced, shredded, or sliced into coins, the cooking physics didn’t change. I was wrong. Slicing potatoes into thin rounds introduces a unique culinary challenge: they stack. When raw potato slices lay flat against one another in a hot pan, they trap steam between the layers, causing the starch to turn gummy before the heat can crisp the surface.
Through countless breakfast shifts and recipe testing cycles, I learned the value of the “sear-and-steam” cadence when dealing with rustic potato rounds. Keeping the skins on isn’t just a stylistic choice for a farmhouse look; that thin band of skin acts as a structural exoskeleton, preventing the delicate edges of the rounds from fraying and breaking apart when you flip them.
Additionally, the image of mixed red and white onions isn’t just for color—the varying sugar content in different onion varieties provides a multi-layered sweetness that balances the rich, earthy depth of the seasoned spuds. When you cook them right, the onions jam up against the crispy edges of the potato coins, creating the ultimate savory bite.
Recipe Overview
- Prep Time: 15 minutes
- Cook Time: 30 minutes
- Total Time: 45 minutes
- Yield: 4–6 servings
- Difficulty: Intermediate
Ingredients You’ll Need
The Star Elements
- Russet or Yukon Gold Potatoes: 2.5 lbs (approx. 5 medium potatoes), washed thoroughly, skins left on, sliced into 1/4-inch thick rounds
- Yellow or White Onion: 1 medium, chopped
- Red Onion: 1/2 medium, chopped (for a pop of color and sharp sweetness)
The Cooking Fats and Aromatics
- High-Smoke Point Vegetable or Avocado Oil: 3 tablespoons
- Unsalted Butter: 2 tablespoons
- Garlic Powder: 1 teaspoon
- Onion Powder: 1/2 teaspoon
- Coarse Kosher Salt and Freshly Cracked Black Pepper: To taste
- Smoked Paprika: 1/2 teaspoon (optional, for color and warmth)
Step-by-Step Instructions
Step 1: Slice and Soaking Ritual
Using a sharp chef’s knife or a mandoline, slice your cleaned, skin-on potatoes into uniform rounds exactly 1/4-inch thick. Immediately submerge the slices into a large bowl filled with ice-cold water. Let them sit for 10 to 15 minutes, then agitate them gently with your hands. The water will turn cloudy.
Why this matters: Rinsing away the surface starch is doubly important for potato rounds. If left untreated, the starch acts like glue, causing the individual coins to stick to each other and the pan, which makes flipping them without tearing them apart virtually impossible.
Step 2: The Critical Drying Phase
Drain the potato rounds into a colander. Spread them out in a single layer across a clean, absorbent kitchen towel or several layers of paper towels. Pat the tops completely dry with another towel. Let them air-dry for 5 minutes before cooking.
Pro Tip: If you put damp potato rounds into hot oil, the water will instantly drop the oil temperature and create a barrier of steam. You cannot achieve a golden-brown crunch in a steaming environment. Dry food equals fried food.
Step 3: Tempering the Cast Iron
Place a heavy 12-inch cast iron skillet over medium-high heat. Add 2 tablespoons of the high-smoke point oil and 1 tablespoon of the butter. Let the pan heat until the butter is fully melted, foaming, and just beginning to turn quiet. Swirl the pan to ensure the entire bottom and lower sides are well-coated.
Step 4: The Initial Sear
Add the dried potato rounds to the skillet. They should hiss loudly upon entry. Using a wide spatula, gently toss them once to ensure every slice gets coated in the hot fat, then arrange them as flatly as possible. Let them cook entirely undisturbed for 5 to 6 minutes.
Step 5: The Steam Trap Technique
Reduce the heat to medium. Place a large lid or a baking sheet tightly over the cast iron skillet and let the potatoes cook for 7 to 8 minutes.
- Micro-Explanation: This dual-action step uses the potatoes’ internal moisture to cook the centers until they are tender and pillowy. Because the bottom layer is pinned against the hot iron, it continues to develop a deep, rigid crust while the upper layers soften through trapped steam.
Step 6: The Delicate Turn
Remove the lid. Using a thin, flexible metal spatula (like a fish spatula), carefully slide under the potatoes and flip them over in sections. You should see a gorgeous, mottled golden-brown crust on the underside. Add the remaining 1 tablespoon of oil and 1 tablespoon of butter around the edges of the pan.
Step 7: Introduce the Onion Medley
Scatter the chopped white and red onions evenly over the top of the potatoes. Sprinkle the garlic powder, onion powder, smoked paprika, coarse salt, and black pepper across the entire pan. Leave the lid off from this point forward.
Step 8: Final Crisp and Caramelization
Cook for an additional 10 to 12 minutes, turning the mixture gently every 3 to 4 minutes. As you turn them, the onions will fall to the bottom of the pan, softening and caramelizing against the hot iron while the remaining uncooked surfaces of the potato rounds crisp up. The dish is finished when the onions are sweet and translucent with charred edges, and the potatoes are crispy on the outside and tender throughout. Serve straight from the skillet.
Common Mistakes & How to Avoid Them
- Slicing the Rounds Too Thin: If you slice the potatoes as thin as potato chips, they will dissolve into mush or burn instantly during the steaming phase. Maintain a strict 1/4-inch thickness to give the coins a substantive, fluffy center.
- Stirring Continuously: Constant agitation breaks down the delicate, softened structures of the potato rounds, turning your beautiful side dish into a mashed hash. Trust the pan; let the spuds sit long enough to release naturally from the iron before flipping.
- Adding Onions Too Early: Onions cook significantly faster than raw potatoes. If you toss them into the skillet at the start, they will burn to a bitter black soot long before the potatoes are cooked through to the center.
Ingredient Substitutions & Variations
- The Bacon Grease Foundation: For an unforgettably savory heritage flavor, substitute the vegetable oil entirely with rendered bacon fat.
- Cheesy Skillet Finish: During the last 2 minutes of cooking, scatter a cup of shredded sharp cheddar or Swiss cheese over the top, place the lid back on for 60 seconds, and let it melt into a gooey blanket.
- The Herb Infusion: Toss in fresh chopped rosemary or thyme during the final 5 minutes of frying to introduce an elegant, earthy aroma to the dish.
Pro Tips for Skillet Masters
- The Metal Spatula Advantage: Ditch plastic or silicone spatulas for this recipe. A thin, offset metal spatula is essential for getting underneath the caramelized starch layer without tearing the crispy crust off your potato coins.
- Dealing with Sticking: If the potatoes feel tightly stuck to the bottom of the pan early on, do not force them. As the crust fully develops and solidifies, it will naturally release itself from the seasoned cast iron surface.
Frequently Asked Questions
Can I use sweet potatoes for this recipe?
Yes, but be aware that sweet potatoes contain significantly more sugar and less starch than white potatoes. They will brown and soften much faster, so you will need to lower your stove temperature slightly to prevent scorching.
Why do my potatoes look gray before cooking?
When raw, cut potatoes are exposed to oxygen, an enzymatic reaction causes them to turn a dull gray or brown color. This is completely harmless and can be entirely avoided by keeping your sliced rounds submerged in cold water until the moment they go into the frying pan.
What is the best way to reheat leftovers?
Avoid the microwave, which will make the potato coins rubbery and wet. Instead, re-crisp your leftover potatoes and onions in a dry skillet over medium heat for 5 to 7 minutes, tossing occasionally until heated through.