Why You’ll Love This Recipe
- Beautiful bakery-style presentation
- Flaky, buttery pastry
- Rich vanilla custard
- Fresh apple flavor
- Easy to prepare
- Perfect for special occasions
- Freezer-friendly
Ingredients
For the Pastry
- 2 sheets puff pastry, thawed
- 1 egg
- 1 tablespoon water
For the Vanilla Custard
- 2 cups whole milk
- 4 egg yolks
- ½ cup granulated sugar
- 3 tablespoons cornstarch
- 1 teaspoon vanilla extract
- 2 tablespoons butter
For the Apple Topping
- 2 medium apples
- 1 tablespoon lemon juice
- 2 tablespoons sugar
- ½ teaspoon cinnamon
Finishing
- Powdered sugar for dusting
- Optional apricot jam glaze
Equipment Needed
- Baking sheets
- Parchment paper
- Saucepan
- Whisk
- Sharp knife
- Pastry brush
Step 1: Prepare the Custard
In a saucepan heat milk until warm but not boiling.
In a separate bowl whisk together:
- Egg yolks
- Sugar
- Cornstarch
Slowly pour warm milk into the egg mixture while whisking continuously.
Return mixture to the saucepan.
Cook over medium heat.
Whisk constantly until thickened.
Remove from heat.
Stir in:
- Vanilla extract
- Butter
Transfer to a bowl.
Cover with plastic wrap touching the surface.
Refrigerate until completely cool.
Step 2: Prepare the Apples
Wash and core the apples.
Slice very thinly.
Place in a bowl with:
- Lemon juice
- Sugar
- Cinnamon
Mix gently.
Allow to sit for 10 minutes.
This enhances flavor and prevents browning.
Step 3: Prepare the Puff Pastry
Preheat oven to:
400°F (200°C)
Line baking sheets with parchment paper.
Roll puff pastry slightly.
Cut into circles or squares approximately 4 inches wide.
Place on baking sheet.
Step 4: Create a Border
Using a knife, lightly score a border around each pastry.
Do not cut all the way through.
This allows the edges to rise while the center remains flat.
Step 5: Dock the Centers
Use a fork to prick the middle sections.
This prevents excessive puffing.
Step 6: Fill with Custard
Place a spoonful of chilled custard into each pastry center.
Spread evenly, leaving the border exposed.
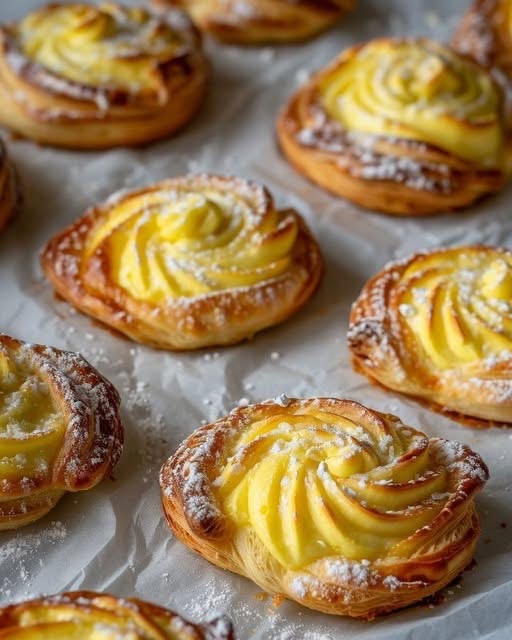
Step 7: Arrange the Apples
Fan the apple slices over the custard.
Arrange them in overlapping circles to create a flower or rose effect.
This decorative pattern gives the pastries their elegant appearance.
Step 8: Egg Wash
Whisk together:
- Egg
- Water
Brush only the pastry edges.
This creates a shiny golden finish.
Step 9: Bake
Bake for:
18–22 minutes
The pastries should become:
- Deep golden brown
- Crispy
- Puff beautifully around the edges
The apples should be tender.
Step 10: Cool Slightly
Allow pastries to cool for 10 minutes.
The custard will continue setting as they cool.
Step 11: Optional Apricot Glaze
Warm 2 tablespoons apricot jam.
Brush lightly over the apples.
This adds shine and professional bakery appeal.
Step 12: Finish
Dust generously with powdered sugar.
Serve slightly warm or at room temperature.
What Makes These Danishes Special?
The secret lies in balancing three textures:
Puff Pastry
Light and flaky.
Vanilla Custard
Smooth and creamy.
Apples
Tender and naturally sweet.
Together they create an irresistible dessert.
Best Apples to Use
Excellent choices include:
- Honeycrisp
- Gala
- Fuji
- Pink Lady
- Braeburn
These varieties maintain their shape during baking.
Flavor Variations
Pear Danish
Substitute pears for apples.
Almond Apple Danish
Add almond extract to the custard.
Caramel Apple Danish
Drizzle caramel sauce before serving.
Berry Custard Danish
Use fresh berries instead of apples.
Cinnamon Roll Danish
Add extra cinnamon sugar topping.
Serving Suggestions
Serve with:
- Coffee
- Espresso
- Tea
- Hot chocolate
- Vanilla ice cream
Perfect for brunches and holiday gatherings.
Storage
Store in an airtight container.
Refrigerate up to:
3 days
Reheating
Warm in a 300°F (150°C) oven for 5–7 minutes.
This restores crispness.
Avoid microwaving, which softens the pastry.
Freezing Instructions
Freeze baked pastries for up to:
2 months
Thaw overnight and reheat before serving.
Tips for Success
Keep Pastry Cold
Cold puff pastry creates better layers.
Use Thin Apple Slices
Thin slices become tender and flexible.
Chill Custard
Warm custard can soften the pastry.
Don’t Overfill
Too much filling may overflow during baking.
Nutritional Information (Approximate)
Per pastry:
- Calories: 320
- Carbohydrates: 35g
- Protein: 5g
- Fat: 18g
- Fiber: 2g
Why This Recipe Works
The buttery puff pastry rises into delicate layers while the creamy vanilla custard provides richness and the apples contribute freshness and natural sweetness. The result is a pastry that looks elegant enough for a bakery display but is simple enough to make in a home kitchen.
Final Thoughts
These Apple Custard Puff Pastry Danishes are the perfect blend of elegance and comfort. Their golden flaky crust, silky vanilla custard, and beautifully arranged apple slices create a dessert that is both visually stunning and incredibly delicious.