Introduction
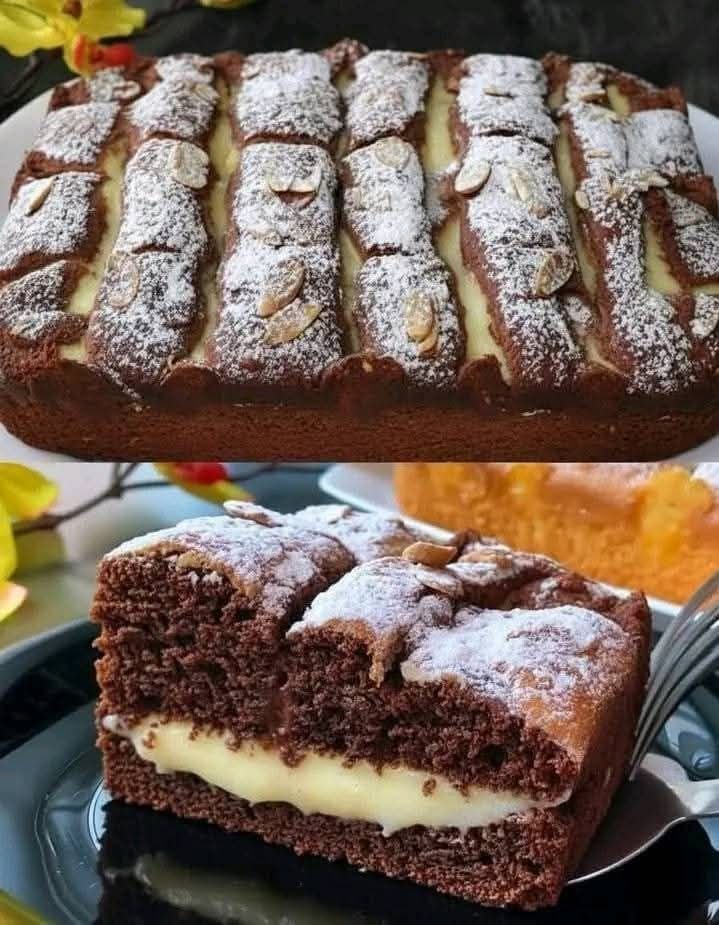
“Crown of Cocoa, Almond Snow, and Cream” is an elegant dessert that combines rich chocolate cake, delicate almond sweetness, and silky cream filling. The name reflects the visual beauty of the finished dessert: a chocolate “crown” layered with fluffy cream and topped with a light almond “snow” made from powdered sugar and toasted almond flakes.
This cake is perfect for celebrations, holidays, or any moment when you want a dessert that looks impressive yet feels comforting and indulgent. The cocoa cake layers provide a moist and tender base with deep chocolate flavor. The cream filling offers a smooth and slightly sweet contrast, while the almond topping adds texture, fragrance, and visual charm.
Although it looks sophisticated, this dessert is surprisingly approachable for home bakers. With careful preparation and simple ingredients, you can create a stunning centerpiece dessert that will delight family and guests alike.
This detailed recipe will guide you step-by-step through preparing the cocoa cake layers, making the cream filling, assembling the crown-shaped dessert, and finishing it with almond snow.
Ingredients
For the Cocoa Cake Layers
2 cups all-purpose flour
¾ cup unsweetened cocoa powder
2 cups granulated sugar
2 teaspoons baking powder
1½ teaspoons baking soda
1 teaspoon salt
2 large eggs (room temperature)
1 cup whole milk
½ cup vegetable oil or melted butter
2 teaspoons vanilla extract
1 cup hot coffee or hot water
For the Cream Filling
2 cups heavy whipping cream
½ cup powdered sugar
1 teaspoon vanilla extract
4 ounces cream cheese (softened)
2 tablespoons honey (optional for flavor depth)
For the Almond Snow Topping
1 cup sliced almonds
½ cup powdered sugar
1 tablespoon granulated sugar
1 tablespoon butter
¼ teaspoon almond extract
Pinch of salt
Optional Garnish
Chocolate curls
Extra whipped cream
Dusting of cocoa powder
Whole almonds or shaved chocolate
Equipment Needed
Two 8-inch round cake pans
Mixing bowls
Electric mixer or whisk
Rubber spatula
Cooling rack
Cake knife or serrated knife
Small skillet (for almonds)
Offset spatula for frosting
Step 1: Preparing the Cocoa Cake Batter
Begin by preheating your oven to 350°F (175°C). Grease two round cake pans and line the bottoms with parchment paper to ensure the cakes release easily.
In a large mixing bowl, sift together:
- flour
- cocoa powder
- baking powder
- baking soda
- salt
Sifting removes lumps and helps the dry ingredients combine evenly. Cocoa powder in particular tends to clump, so this step is important for a smooth batter.
In a separate bowl, whisk together the sugar and eggs until the mixture becomes pale and slightly thickened. Add the milk, vegetable oil, and vanilla extract. Mix until fully combined.
Gradually add the dry ingredients to the wet ingredients while mixing gently. The batter will start to thicken.
Finally, slowly pour in hot coffee or hot water while stirring. This step may seem unusual, but hot liquid helps bloom the cocoa powder and enhances the chocolate flavor. The batter will become thin—this is normal and helps produce a moist cake.
Mix until smooth and lump-free.
Step 2: Baking the Chocolate Crown Layers
Divide the batter evenly between the prepared cake pans.
Place the pans in the preheated oven and bake for 30–35 minutes, or until a toothpick inserted in the center comes out clean.
While baking, the kitchen will fill with a rich chocolate aroma that signals the deep cocoa flavor developing in the cake.
Once baked, remove the cakes from the oven and allow them to cool in the pans for about 10 minutes.
Carefully turn them out onto cooling racks and let them cool completely before assembling the dessert. If the cakes are still warm, the cream filling may melt.
Step 3: Preparing the Almond Snow
The almond snow topping provides both texture and visual beauty.
Place a small skillet over medium heat and add the butter. Once melted, add the sliced almonds and sprinkle with granulated sugar and a pinch of salt.
Toast the almonds gently, stirring frequently. They will begin to turn golden and fragrant.
Add the almond extract and continue cooking for another minute until the sugar lightly caramelizes and coats the almonds.
Remove the almonds from the pan and spread them on parchment paper to cool completely. Once cooled, they will become crisp and lightly sweet.
Set them aside for the final topping.
Step 4: Making the Cream Filling
In a chilled mixing bowl, combine the heavy whipping cream, powdered sugar, and vanilla extract.
Using an electric mixer, whip the mixture until soft peaks begin to form.
In a separate bowl, beat the softened cream cheese until smooth and creamy. This step ensures the cream filling has a slight tang and stable texture.
Fold the whipped cream gently into the cream cheese mixture. Add honey if desired for subtle sweetness and depth.
Continue folding until smooth and fluffy. Be careful not to overmix, as you want to preserve the airy texture.
Place the cream filling in the refrigerator for about 20 minutes to firm up slightly before assembling the cake.
Step 5: Creating the Crown Shape
Once the cakes have completely cooled, use a serrated knife to level the tops if needed. This ensures the layers stack evenly.
To create the “crown” appearance, you may optionally cut a small circular indentation in the center of the top cake layer or decorate the top with piped cream peaks that resemble a crown.
Place the first cake layer on a serving plate.
Spread a generous layer of cream filling evenly across the top using an offset spatula.
Place the second cake layer on top, gently pressing it down to secure the filling.
Step 6: Frosting with Cream
Spread the remaining cream filling over the top of the cake.
You can either leave the sides slightly exposed for a rustic appearance or cover the entire cake with a thin layer of cream.
Using the back of a spoon or spatula, create soft peaks and swirls in the cream to give the cake an elegant, cloud-like appearance.
This creamy topping represents the soft “snow” base beneath the almonds.
Step 7: Adding the Almond Snow
Now comes the most beautiful step.
Take the cooled toasted almonds and sprinkle them generously over the top of the cake. Allow some pieces to fall naturally along the sides.
Dust the entire cake lightly with powdered sugar using a fine sieve. This creates the visual effect of snow falling over the chocolate crown.
The contrast between dark cocoa cake, white cream, and golden almonds makes the dessert visually stunning.
Step 8: Optional Decorative Touches
For a more luxurious presentation, consider adding:
- Chocolate curls placed around the edges
- Small dollops of whipped cream piped like crown points
- A light dusting of cocoa powder
- Shaved dark chocolate for extra richness
These finishing touches enhance both the flavor and appearance of the cake.
Step 9: Chilling and Serving
Place the assembled cake in the refrigerator for 30–60 minutes before serving. Chilling allows the cream filling to set slightly and makes slicing easier.
To serve, use a sharp knife and wipe the blade clean between slices for neat pieces.
Each slice should reveal:
- moist cocoa cake layers
- creamy white filling
- crunchy almond topping
Flavor Profile
This dessert offers a beautiful balance of flavors:
Chocolate richness from the cocoa cake
Light sweetness and tang from the cream filling
Nutty crunch from toasted almonds
Subtle vanilla and almond aromas
The textures also contrast wonderfully—soft cake, airy cream, and crisp almonds.
Storage Tips
Store the cake covered in the refrigerator.
It will stay fresh for 2–3 days.
If making ahead, prepare the cake layers a day in advance and assemble the cake on the day of serving for the best texture.
Variations
You can customize this dessert in several ways:
Mocha Crown
Add espresso powder to the cake batter.
Chocolate Almond Cream
Fold melted dark chocolate into the cream filling.
Berry Crown
Add raspberries or strawberries between the layers.
White Chocolate Snow
Sprinkle grated white chocolate with the almonds.
Final Thoughts
“Crown of Cocoa, Almond Snow, and Cream” is more than just a cake—it is a dessert that feels both luxurious and comforting. The deep chocolate base, silky cream filling, and crisp almond topping come together to create a dessert that looks impressive yet tastes wonderfully balanced.
Whether served at a dinner party, family celebration, or holiday gathering, this cake will surely become a memorable centerpiece.
The beauty of this recipe lies in its harmony: rich cocoa, delicate cream, and snowy almonds forming a dessert worthy of its royal name.