Ingredients You Will Need
Dry Ingredients
- 2 cups (250g) all-purpose flour
- 1½ cups (300g) sugar
- 1 tbsp baking powder
- Pinch of salt
Wet Ingredients
- 3 large eggs
- 1 cup (240ml) milk
- ½ cup (120ml) vegetable oil or melted butter
- 1 tsp vanilla extract
- Optional: zest of 1 lemon or orange
👩🍳 Equipment
- Blender
- Mixing bowl (for dry ingredients)
- Bundt or round cake pan
- Sieve optional for flour
- Oven preheated to 180°C / 350°F
🥣 Step-by-Step Preparation
1. Prepare the Dry Ingredients
Place flour, sugar, baking powder, and salt into a large mixing bowl.
Stir or sift lightly. This prevents clumps and ensures the baking powder distributes evenly throughout the batter.
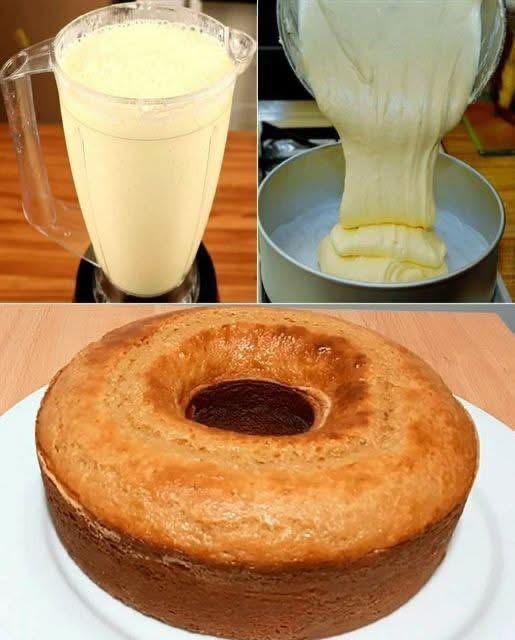
2. Add All Wet Ingredients to the Blender
Into the blender jug, add:
- Eggs
- Milk
- Oil
- Vanilla extract
- Lemon/orange zest (if used)
Blend on medium speed for 30–40 seconds until everything is smooth and combined.
3. Combine Wet and Dry
Pour the blended liquid mixture over the dry ingredients in the bowl.
Use a spatula or whisk to gently mix until just combined.
Do not overmix — tiny lumps are okay. Overmixing activates gluten and can make the cake dense instead of fluffy.
4. Prepare the Mold
Grease your cake pan generously with butter, oil, or cooking spray.
Dust with flour or line the bottom with parchment paper to prevent sticking.
5. Pour the Batter and Tap
Pour the batter into the prepared pan.
Tap the pan lightly on the counter to release trapped air bubbles and help even baking.
6. Bake the Cake
Place your mold in the center of the oven.
Bake for 35–45 minutes, depending on your oven and mold size.
You’ll know the cake is done when:
- The top is golden brown
- It springs back when touched
- A toothpick inserted in the center comes out clean
7. Cooling and Unmolding
Allow the cake to rest at least 10 minutes before unmolding.
Run a knife along the edges if needed, then flip onto a plate.
Let it cool fully for the best texture.
🌟 Tips for a Perfect Blender Cake
Use Room Temperature Ingredients
Cold milk or eggs can cause uneven mixing.
Take ingredients out of the fridge 20 minutes before.
Oil vs Butter
- Oil makes a softer and moister crumb
- Butter adds richer flavor
Both are delicious — choose what you prefer!
Don’t Rush Baking
Opening the oven early deflates cakes.
Wait until at least 30 minutes have passed before peeking.
Choose the Right Mold
Bundt or round tube molds bake evenly and prevent the center from staying raw.
🍽️ Serving Suggestions
Classic Option
Serve plain with tea, coffee, or hot milk.
With a Sweet Touch
Dust with powdered sugar
Or drizzle with:
- Chocolate ganache
- Simple lemon glaze
- Caramel sauce
- Honey
With Fruit
Add sliced strawberries, bananas, or berries on the side for a fresh dessert.
🧁 Variations You Can Try
Chocolate Blender Cake
Replace ½ cup flour with ½ cup cocoa powder.
Marble Cake
Pour half the batter into the mold, mix cocoa into the remaining batter, swirl gently.
Coconut Cake
Replace ¼ cup milk with coconut milk and add ½ cup shredded coconut.
Orange Cake
Replace milk with orange juice
Add zest of two oranges.
🧊 Storage & Freezing
Room Temperature
Keeps 3–4 days in an airtight container.
Refrigerator
Up to 1 week — wrap to prevent drying.
Freezing
Slice it, wrap pieces individually, and freeze up to 2 months.
Defrost at room temperature or microwave 20 seconds.
🧠 Why This Cake Succeeds Every Time
- Blender aeration: Incorporates air without effort.
- Oil-based moisture: Keeps crumb soft and tender for days.
- One-bowl mixing: Reduces errors and cleanup.
- Reliable leavening: Baking powder guarantees lift.
Even beginners or kids can make bakery-level cake following this simple method.
🎉 Conclusion
This blender cake is proof that baking doesn’t have to feel complicated. With everyday ingredients and a single kitchen appliance, you create something warm, fluffy, aromatic, and comforting — the kind of cake that brings families to the table.