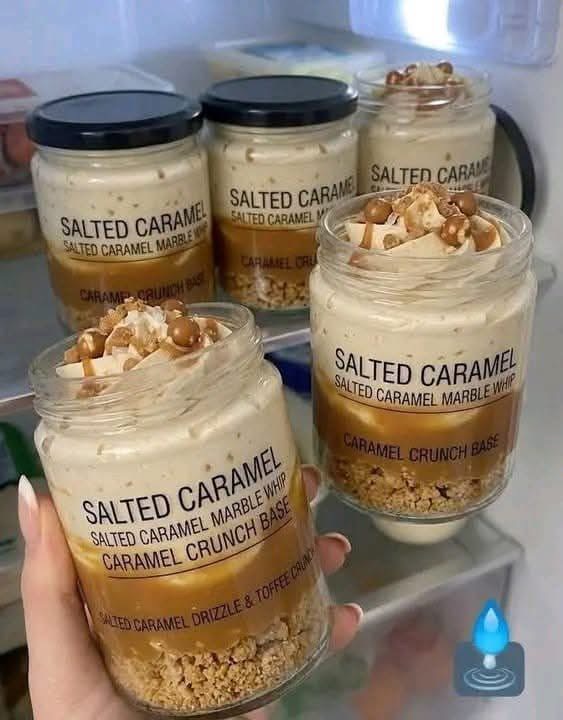
The dessert in your photo looks like a layered salted caramel dessert jar made with a crunchy biscuit base, rich salted caramel sauce, a creamy vanilla-caramel mousse, and a topping of toffee, caramelized nuts, or crushed caramel pieces.
The beautiful part of this dessert is the contrast between the layers: crunchy biscuit at the bottom, silky caramel in the middle, creamy mousse above it, and crunchy caramel pieces on top. It can be prepared in individual jars, making it ideal for parties, dessert tables, cafés, or make-ahead treats.
This recipe makes approximately 6–8 individual dessert jars, depending on the size of your containers.
🧂🍯 Salted Caramel Crunch Dessert Jars
Preparation time
30–40 minutes
Chilling time
At least 3 hours
Servings
6–8 jars
Difficulty
Easy to moderate
Ingredients
For the crunchy biscuit base
- 200 g digestive biscuits, speculoos biscuits, or shortbread cookies
- 60 g unsalted butter, melted
- 1 tablespoon brown sugar
- 1 small pinch of salt
- 2 tablespoons finely chopped roasted almonds or hazelnuts, optional
The biscuits create the crunchy bottom layer visible in the photograph.
You can use digestive biscuits for a mild buttery flavor or speculoos biscuits if you want a stronger caramel and cinnamon taste.
For the homemade salted caramel sauce
- 200 g granulated sugar
- 60 g unsalted butter
- 120 ml heavy cream
- ½ teaspoon fine sea salt
- 1 teaspoon vanilla extract
You can adjust the amount of salt depending on how salty you want the caramel.
For a dessert like the one in the picture, I recommend starting with ½ teaspoon and adding more only after tasting.
For the creamy caramel mousse
- 250 g cream cheese, softened
- 250 ml heavy whipping cream, cold
- 80 g powdered sugar
- 100 g salted caramel sauce
- 1 teaspoon vanilla extract
- 2 tablespoons caramel-flavored instant pudding powder, optional
The pudding powder is optional but useful if you want a particularly thick, stable dessert that holds its shape in the jars.
For the caramel crunch topping
You can make a simple homemade caramel crunch with:
- 80 g granulated sugar
- 50 g roasted peanuts, almonds, or hazelnuts
- 1 small pinch of sea salt
Or, for an easier version:
- Crushed toffee candy
- Caramelized nuts
- Chopped praline
- Caramel popcorn pieces
- Crushed biscuits
🍪 1. Prepare the crunchy base
Begin by placing the biscuits into a food processor.
Pulse until they become fine crumbs.
You don’t want them completely powdered. A few slightly larger pieces will create a better texture.
If you don’t have a food processor, place the biscuits into a sealed bag and crush them using a rolling pin or the bottom of a heavy glass.
Place the crumbs in a bowl.
Add:
- 60 g melted butter
- 1 tablespoon brown sugar
- A pinch of salt
Mix thoroughly.
The mixture should resemble damp sand.
When you squeeze some of it between your fingers, it should hold together slightly.
If it looks extremely dry, add another teaspoon or two of melted butter.
🔥 2. Toast the biscuit mixture
This step is optional, but it makes the base considerably more delicious.
Spread the biscuit mixture onto a baking tray.
Bake at:
175°C / 350°F for approximately 7–10 minutes.
Stir once halfway through.
The crumbs should become slightly darker and smell buttery and toasted.
Remove them from the oven and allow them to cool completely.
Don’t put hot biscuit crumbs directly into your dessert jars because the heat can affect the creamy layer.
🍯 3. Make the salted caramel
Making caramel can look intimidating, but it’s quite straightforward if you pay attention to the temperature.
Place the sugar in a medium, heavy-bottomed saucepan.
Heat over medium heat.
Allow the sugar to melt gradually.
You can gently swirl the pan, but avoid stirring aggressively with a spoon during the initial melting stage.
The sugar will first become wet and lumpy.
Then it will begin melting.
Eventually it will turn golden.
Continue cooking until it reaches a deep amber color.
You want a rich caramel color similar to the sauce visible in your photograph.
Don’t let it become extremely dark because burnt caramel will taste bitter.
🧈 4. Add the butter
Once the sugar reaches a deep amber color, carefully add the butter.
Be extremely careful.
The caramel will bubble vigorously because the butter contains water.
Whisk continuously until the butter is completely incorporated.
Keep your hands and face away from the steam.
🥛 5. Add the cream
Slowly pour the heavy cream into the caramel while whisking.
Again, the mixture will bubble strongly.
Add the cream gradually rather than all at once.
Continue whisking until you have a smooth caramel sauce.
If small pieces of hardened caramel form, don’t worry.
Keep the saucepan over low heat and stir until they dissolve.
🧂 6. Add salt and vanilla
Remove the caramel from the heat.
Add:
- ½ teaspoon sea salt
- 1 teaspoon vanilla extract
Stir well.
Taste a tiny amount after it has cooled slightly.
If you want a stronger salted caramel flavor, add another small pinch of salt.
The finished caramel should be:
sweet + buttery + slightly salty + deeply caramelized.
Allow it to cool until it becomes warm rather than hot.
🍮 7. Make the creamy caramel layer
Place the softened cream cheese in a large mixing bowl.
Beat it until smooth.
Add the powdered sugar gradually.
Continue mixing until there are no lumps.
Add:
- 100 g salted caramel sauce
- 1 teaspoon vanilla
Mix again.
The mixture should become smooth and creamy.
🥛 8. Whip the cream
Pour the cold heavy cream into a separate bowl.
Using an electric mixer, whip it until it reaches medium-stiff peaks.
Don’t over-whip it.
You want a smooth, fluffy whipped cream.
Add approximately one-third of the whipped cream to the cream-cheese mixture.
Fold gently.
Then add the remaining whipped cream.
Continue folding until everything is evenly combined.
Don’t beat aggressively at this stage.
Gentle folding keeps the mousse light and airy.
🍯 9. Create the caramel marble effect
This is the detail that makes the dessert look especially attractive.
Take a few tablespoons of the cooled caramel sauce.
Drizzle it into the caramel mousse.
Don’t completely mix it.
Instead, use a spoon or skewer to make a few gentle swirls.
This creates the marbled caramel appearance visible in the photograph.
If you mix everything completely, you’ll have a uniform caramel-colored mousse.
If you only partially mix it, you’ll get beautiful ribbons of darker caramel throughout the cream.
🫙 10. Assemble the dessert jars
Now comes the fun part.
Place approximately 2–3 tablespoons of biscuit crumbs into the bottom of each jar.
Press them down very lightly.
Don’t compress them too firmly.
You want the base to remain crunchy.
Next, add approximately 1–2 tablespoons of salted caramel sauce.
This creates the glossy caramel layer visible above the biscuit base.
Allow the caramel to spread naturally.
🍮 11. Add the creamy mousse
Transfer the caramel mousse into a piping bag.
If you don’t have a piping bag, use a spoon.
Pipe the mousse into each jar.
Fill the jars approximately three-quarters full.
Try to keep the sides relatively clean so the different layers remain visible.
If you’re using clear jars, you should now be able to see:
Biscuit → caramel → creamy mousse.
For a more dramatic appearance, drizzle a thin line of caramel against the inside wall of the jar before adding the mousse.
This creates caramel streaks through the sides.
🍯 12. Add another caramel drizzle
Once the mousse is in the jar, spoon a small amount of salted caramel over the top.
Use approximately 1 teaspoon per serving.
Don’t cover the entire mousse.
Instead, make thin ribbons across the surface.
This gives the dessert the “salted caramel marble” appearance shown in the photo.
🌰 13. Make the caramel crunch
For a homemade crunchy topping, place 80 g sugar in a clean saucepan.
Heat over medium heat until it melts and turns amber.
Add the roasted nuts.
Quickly stir them into the caramel.
Immediately transfer the mixture onto a sheet of parchment paper.
Allow it to cool completely.
Once hard, break the caramelized nuts into pieces.
For smaller pieces, place them into a sealed bag and gently crush them with a rolling pin.
You now have homemade caramel nut brittle.
✨ 14. Decorate the jars
Place several pieces of caramel brittle on top of each dessert.
You can also add:
- Chopped roasted peanuts
- Hazelnuts
- Almonds
- Toffee pieces
- Crushed digestive biscuits
- Caramel popcorn
- A small drizzle of salted caramel
- A pinch of flaky sea salt
For the closest appearance to the photograph, use large irregular pieces of caramelized nuts and toffee.
Don’t crush everything into a powder.
The contrast between the smooth mousse and chunky topping is part of what makes this dessert attractive.
❄️ 15. Chill the desserts
Place the jars in the refrigerator.
Allow them to chill for at least 3 hours.
Overnight is even better.
The biscuit base will soften slightly from the caramel but should retain some texture.
The mousse will become firmer and easier to eat with a spoon.
If you’re preparing these for a party, you can make them the day before.
However, it’s best to add the crunchy topping relatively close to serving time so it doesn’t absorb moisture and become soft.
🧂 The perfect salted caramel balance
One of the biggest mistakes with salted caramel desserts is using too much salt.
You want the salt to enhance the caramel, not make the dessert taste salty.
A good starting point is:
½ teaspoon sea salt for approximately 300–350 g finished caramel.
If you’re using very salty butter, reduce the additional salt.
Flaky sea salt can also be sprinkled on top immediately before serving.
A tiny amount gives you little bursts of saltiness that work beautifully with the sweet caramel.
🍫 Chocolate version
If you love chocolate and caramel, you can easily modify this recipe.
Add approximately 1 tablespoon cocoa powder to the biscuit crumbs.
Alternatively, add a thin layer of melted dark chocolate between the biscuit and caramel.
You can also sprinkle chopped dark chocolate over the mousse.
The combination of:
chocolate + caramel + salt + roasted nuts
makes an incredibly rich dessert.
🍌 Banana caramel version
For a banana-caramel variation, add a thin layer of sliced banana between the biscuit and mousse.
The layers become:
Biscuit → caramel → banana → caramel mousse → caramel drizzle → nuts.
Use the banana shortly before serving because fresh banana can darken over time.
☕ Coffee caramel version
For a coffee-flavored dessert, dissolve 1 teaspoon instant espresso powder in a teaspoon of hot water.
Allow it to cool.
Mix it into the cream cheese mixture along with the caramel.
You’ll get a salted caramel latte-style dessert.
This works particularly well with a biscuit base made from speculoos cookies.
🥜 Best nuts to use
Different nuts give the dessert slightly different personalities.
Peanuts
Classic, slightly salty, and inexpensive.
Hazelnuts
Rich and sophisticated, especially with chocolate caramel.
Almonds
Crunchy and relatively mild.
Pecans
Buttery and naturally sweet.
Walnuts
Slightly earthy and excellent with salted caramel.
For the dessert in your photograph, roasted peanuts or hazelnuts would be particularly suitable.
🫙 Storage
Keep the finished dessert jars refrigerated.
Because they contain dairy and whipped cream, they should not be left at room temperature for extended periods.
For best texture, consume them within approximately 3–4 days.
Keep the caramel crunch topping separate if you’re preparing the desserts several days ahead.
Add it shortly before serving.
This keeps the topping crisp.
💡 How to make them look professional
If you’re making these for a business or dessert table, presentation makes a huge difference.
Use transparent straight-sided jars.
Before filling them, drizzle caramel randomly along the inside walls.
Add the biscuit layer carefully.
Then add the caramel.
Pipe the mousse in a circular motion.
Finish with another thin caramel drizzle.
Place 2–3 pieces of caramelized nuts or toffee on top.
Finally, add a tiny pinch of flaky sea salt.
The result will have clearly visible layers and a professional bakery-style appearance.
🍮 Final Recipe Card
Salted Caramel Crunch Dessert Cups
Base:
- 200 g biscuits
- 60 g melted butter
- 1 tbsp brown sugar
- Pinch of salt
Salted caramel:
- 200 g sugar
- 60 g butter
- 120 ml heavy cream
- ½ tsp sea salt
- 1 tsp vanilla
Mousse:
- 250 g cream cheese
- 250 ml heavy cream
- 80 g powdered sugar
- 100 g salted caramel
- 1 tsp vanilla
Crunch topping:
- 80 g sugar
- 50 g roasted nuts
- Pinch of salt
Method
- Crush the biscuits.
- Mix with melted butter, brown sugar, and salt.
- Toast for 7–10 minutes if desired.
- Make the salted caramel.
- Allow the caramel to cool.
- Beat cream cheese and powdered sugar.
- Add caramel and vanilla.
- Whip the heavy cream separately.
- Fold the whipped cream into the caramel mixture.
- Create caramel swirls without completely mixing them.
- Add biscuit crumbs to the jars.
- Add salted caramel.
- Pipe in the caramel mousse.
- Drizzle with more caramel.
- Add caramelized nuts or toffee pieces.
- Refrigerate for at least 3 hours.
- Add the crunchy topping just before serving.
The final dessert should give you three major textures: a buttery crunchy biscuit base, a thick glossy salted-caramel layer, and an airy caramel mousse, finished with crisp caramelized nuts or toffee. That combination is what makes the dessert in your photo so appealing.