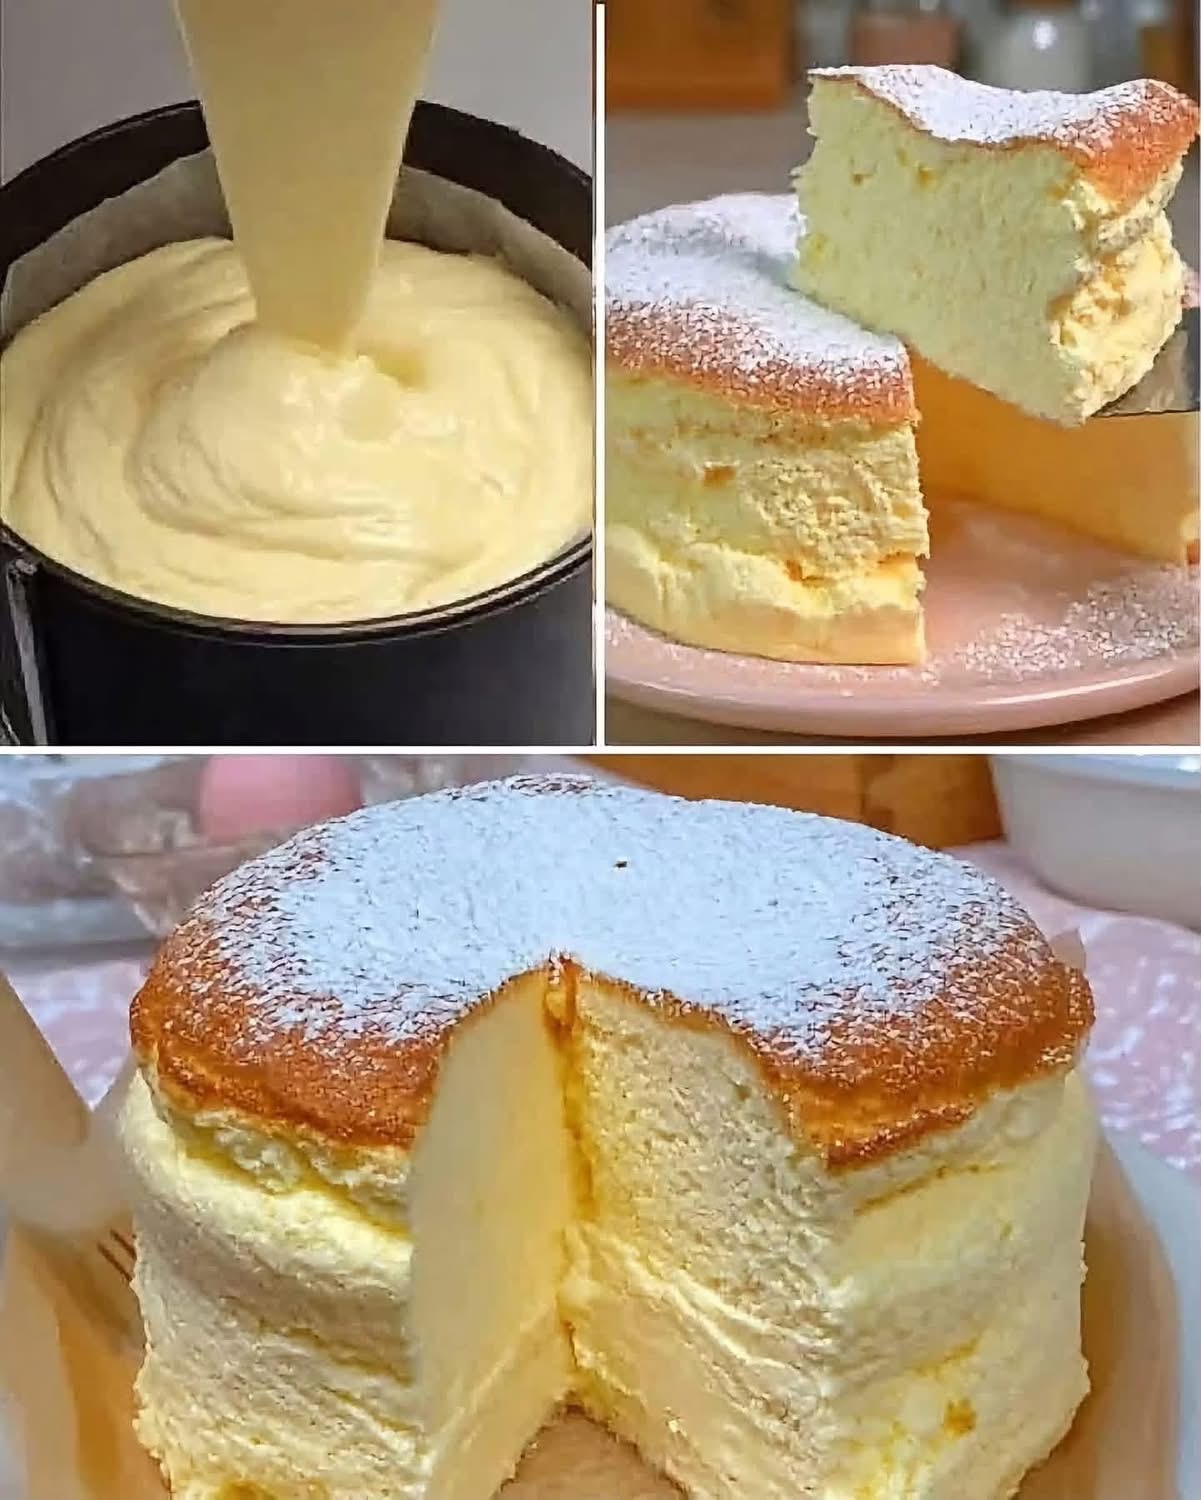
Fluffy Vanilla Sponge Cake – Easy, Soft, and Moist Homemade Cake
If you love light, fluffy cakes with a golden top and a delicate texture, this homemade vanilla sponge cake is a recipe you will want to make again and again. It is soft, airy, and wonderfully tender, with a simple vanilla flavor that pairs perfectly with coffee, tea, or a glass of milk. Finished with a light dusting of powdered sugar, this beautiful cake makes an excellent dessert for family gatherings, weekend baking, afternoon snacks, or special occasions.
The cake in the reference photo has a tall shape, a golden-brown surface, and a pale, fluffy interior. This recipe recreates that style using everyday ingredients such as eggs, sugar, flour, milk, vegetable oil, and vanilla. You do not need complicated equipment or expensive ingredients to make a delicious homemade cake.
The secret to achieving a light texture is to beat the eggs and sugar until thick and pale, fold the flour gently into the mixture, and bake the batter at the correct temperature. With a few simple techniques, you can prepare a cake that looks beautiful, slices easily, and tastes delicious.
Why You Will Love This Vanilla Sponge Cake
There are many reasons to make this easy vanilla cake. First, it uses basic pantry ingredients that are usually easy to find. You can prepare the batter in approximately 20 minutes, making it a convenient choice when you want a homemade dessert without spending hours in the kitchen.
Second, the recipe produces a soft and tender crumb without requiring buttercream, frosting, or complicated decorations. The cake is delicious on its own, and a little powdered sugar is enough to give it an attractive finish.
Another advantage is its versatility. You can enjoy it plain, serve it with fresh fruit, spread a little jam over each slice, or add whipped cream for a more indulgent dessert. You can even cut the cake horizontally and fill it with pastry cream or chocolate spread if you want to transform it into a celebration cake.
Most importantly, this recipe focuses on creating a light and airy texture. Properly beaten eggs help incorporate air into the batter, while gentle folding prevents the mixture from becoming too dense.
Ingredients for Fluffy Vanilla Sponge Cake
This recipe makes approximately 8–10 servings when baked in a round cake pan measuring about 20–22 cm in diameter.
Main ingredients
- 4 large eggs, preferably at room temperature
- 180 g granulated sugar
- 200 g all-purpose flour
- 100 ml whole milk
- 80 ml neutral vegetable oil
- 8 g baking powder
- 1 teaspoon vanilla extract
- 1 small pinch of salt
- Finely grated zest of 1 lemon, optional
- Powdered sugar for decoration
The eggs provide structure and help the cake rise. Sugar sweetens the batter and contributes to its tender texture. Flour gives the cake its structure, while baking powder helps it rise during baking.
Milk adds moisture, and vegetable oil helps keep the crumb soft even after the cake has cooled. Vanilla gives the cake a warm, pleasant aroma, while a little lemon zest adds freshness without overpowering the flavor.
For the best results, measure the ingredients accurately. Too much flour can make the cake heavy, while too much liquid can weaken its structure.
Step-by-Step Instructions
Step 1: Prepare the oven and cake pan
Preheat your oven to 170°C using conventional top-and-bottom heat. Allow the oven to heat fully before placing the cake inside.
Prepare a round cake pan approximately 20 cm in diameter if you want a tall cake similar to the one in the photo. A 22 cm pan will also work, although the cake may be slightly shorter.
Lightly grease the bottom and sides of the pan with vegetable oil or butter. Line the bottom with parchment paper to make removing the cake easier.
If your pan has a removable bottom, check that it is properly assembled before adding the batter.
Preparing the pan before mixing the ingredients is important because the finished batter should go into the oven promptly. Leaving the batter standing for too long can reduce some of the air incorporated during mixing.
Step 2: Beat the eggs and sugar
Crack the eggs into a large, clean mixing bowl. Add the granulated sugar and beat with an electric mixer for approximately 5–8 minutes.
Start at medium speed, then increase the speed as the mixture begins to become foamy. Continue beating until the eggs and sugar become pale yellow, thick, and noticeably increased in volume.
When you lift the beaters, the mixture should fall back into the bowl in ribbons. Those ribbons should remain visible on the surface for a few seconds before disappearing.
This stage is one of the most important parts of the recipe. Beating incorporates air into the eggs, helping the cake develop a light, fluffy texture.
If you stop beating too early, the batter may not contain enough air to produce the desired result. However, you do not need to beat indefinitely. Once the mixture is pale, thick, and forms ribbons, it is ready for the next step.
Add the vanilla extract and optional lemon zest. Mix briefly until evenly distributed.
Step 3: Combine the milk and vegetable oil
In a separate small bowl, combine the milk and vegetable oil.
Pour the mixture gradually into the beaten eggs while mixing on low speed. You can also add it in a thin stream while gently stirring with a whisk.
Mix only until the liquids are incorporated. Avoid prolonged high-speed beating because it can reduce the volume of the egg mixture.
The oil may initially appear separate from the eggs, but gentle mixing will help distribute it throughout the batter.
Using vegetable oil instead of butter makes this cake convenient to prepare and helps maintain a soft texture after cooling.
Step 4: Sift the flour and baking powder
Place the flour, baking powder, and salt in a separate bowl. Sift them together to remove lumps and distribute the baking powder evenly.
Add the dry ingredients to the egg mixture in two or three additions.
Using a flexible spatula, gently fold the flour into the batter. Start at the edge of the bowl, move the spatula down to the bottom, and bring the mixture upward and over itself.
Rotate the bowl as you work, repeating the movement until the flour is incorporated.
Avoid stirring rapidly in circles. Vigorous mixing can knock air out of the batter and develop too much gluten, which may produce a dense or rubbery cake.
Stop folding as soon as no dry flour remains. A few gentle movements are better than unnecessary mixing.
The finished batter should be smooth, light, and thick enough to pour into the prepared cake pan.
Step 5: Pour the batter into the cake pan
Pour the batter into the prepared pan, allowing it to spread naturally.
Use a spatula to level the surface if necessary. Tap the pan very gently against the countertop once to release any large air pockets.
Do not repeatedly bang the pan or stir the batter after pouring it. The air incorporated during mixing helps create the cake’s soft interior, so handle the batter carefully.
Place the pan in the center of the preheated oven.
Step 6: Bake until golden and fluffy
Bake the cake at 170°C for approximately 40–50 minutes. The exact time depends on your oven, the pan material, and the depth of the batter.
Avoid opening the oven door during the first 30 minutes. During this period, the cake is rising and developing its structure. A sudden drop in temperature can cause the center to sink.
After about 40 minutes, check the cake. The surface should be golden brown, and the center should feel gently springy when lightly touched.
Insert a wooden toothpick into the middle of the cake. If it comes out clean or with a few dry crumbs, the cake is ready. If wet batter sticks to it, bake for another five minutes and test again.
If the top becomes too dark before the center is fully cooked, loosely cover the cake with aluminum foil and continue baking.
Once the cake is done, remove it from the oven and place the pan on a heat-resistant surface.
Step 7: Cool the cake correctly
Let the cake rest in the pan for approximately 10–15 minutes. This allows its structure to settle and makes it easier to remove without breaking.
Run a thin knife around the edges if necessary. Carefully remove the cake from the pan and transfer it to a wire rack.
Allow it to cool completely before cutting.
Although the cake may smell wonderful straight from the oven, slicing it while it is still very hot can compress the soft crumb and make the interior appear sticky.
Proper cooling helps the cake finish setting while retaining its delicate texture.
Step 8: Decorate and serve
Once the cake has cooled, place it on a serving plate.
Use a small sieve to dust the top with powdered sugar. This simple decoration creates a beautiful finish without hiding the golden crust.
Cut the cake into eight to ten slices using a sharp serrated knife. Wipe the knife between cuts if you want especially neat slices.
Serve the cake with coffee, tea, milk, or your favorite hot drink. Fresh strawberries, raspberries, sliced peaches, or a spoonful of fruit jam also make excellent accompaniments.
For a more elaborate dessert, serve each slice with a little whipped cream or vanilla ice cream.
Essential Tips for a Soft and Airy Cake
Use room-temperature eggs
Eggs taken directly from the refrigerator may take longer to whip properly. Let them sit at room temperature for approximately 20–30 minutes before beginning.
Room-temperature eggs generally incorporate air more easily, helping the batter become lighter and more voluminous.
Beat the eggs until thick and pale
Do not rush this stage. A properly whipped egg mixture should look much lighter than the original eggs and sugar.
This helps the cake develop a fine crumb without becoming heavy.
Fold the flour gently
Once the flour is added, gentle folding is essential. Too much mixing can deflate the batter, making the cake shorter and denser.
Use a spatula and stop as soon as the ingredients are combined.
Measure the flour accurately
Weighing flour is more reliable than measuring it by volume. If you use a measuring cup, avoid packing the flour tightly into the cup.
Excess flour is a common reason homemade cakes turn out dry.
Check your oven temperature
An oven that is too hot can brown the top before the center is cooked. An oven that is too cool may prevent the cake from rising properly.
Use an oven thermometer if you suspect your oven temperature is inaccurate.
Avoid opening the oven too early
Keep the oven door closed during the initial baking period. Wait until the cake has risen and begun to set before checking it.
Do not remove the cake too soon
A cake that looks golden on the outside may still be undercooked in the center. Always check the middle with a toothpick before removing it from the oven.
Delicious Variations
Lemon Vanilla Sponge Cake
If you enjoy fresh citrus flavors, add the finely grated zest of one lemon to the egg mixture. You can also add a small amount of lemon juice, but avoid adding too much liquid because it can affect the batter’s balance.
The lemon aroma complements vanilla beautifully and gives the cake a refreshing flavor.
Chocolate Sponge Cake
For a chocolate variation, replace approximately 25 g of the flour with unsweetened cocoa powder.
Sift the cocoa powder with the remaining dry ingredients and fold it into the batter gently.
Because cocoa can make cakes slightly drier, measure the ingredients carefully and avoid overbaking.
Orange Sponge Cake
Replace the lemon zest with finely grated orange zest. You can also replace a small portion of the milk with orange juice, although too much juice may alter the cake’s texture.
Orange zest provides a fragrant flavor that pairs especially well with vanilla.
Coconut Vanilla Cake
Add 30–40 g of finely shredded coconut to the dry ingredients. Fold it into the batter gently and bake as directed.
Coconut creates a pleasant texture and adds a subtle tropical flavor.
Sponge Cake with Cream Filling
For a celebration cake, allow the cake to cool completely before slicing it horizontally into two layers.
Spread whipped cream, pastry cream, or a thin layer of fruit jam over the bottom layer. Place the second layer on top and dust with powdered sugar.
If using a perishable cream filling, refrigerate the finished cake and serve it chilled.
Frequently Asked Questions
Why did my sponge cake sink in the middle?
A cake may sink if the oven door is opened too early, the center is underbaked, or the batter loses too much air during mixing. Too much liquid or an inaccurate amount of leavening can also affect the structure.
To reduce the risk, beat the eggs properly, fold the flour gently, use accurate measurements, and make sure the center is fully cooked before removing the cake.
Why is my cake dense instead of fluffy?
Dense cake can result from insufficiently beaten eggs, overmixing after adding flour, excessive flour, or expired baking powder.
For the best result, beat the eggs until pale and thick, sift the dry ingredients, and fold gently.
Can I make this cake without an electric mixer?
Yes, but it requires more effort. A hand whisk can be used to beat the eggs and sugar, although reaching the same volume may take considerably longer.
The batter needs to become pale, thick, and airy. An electric mixer makes this stage much easier and more consistent.
Can I replace vegetable oil with butter?
Yes. Melted butter can replace the oil in a similar quantity by weight, but allow it to cool until lukewarm before adding it.
Butter provides a richer flavor, while oil generally helps the cake remain softer after cooling.
Can I use self-raising flour?
Yes, but reduce or omit the baking powder according to the flour manufacturer’s instructions. Adding too much leavening can cause the cake to rise quickly and then collapse.
Can I prepare the batter in advance?
It is best to bake the batter soon after mixing. The air incorporated during beating gradually escapes, and the baking powder begins reacting after the wet and dry ingredients are combined.
Prepare the pan and measure the ingredients beforehand so you can transfer the finished batter into the oven promptly.
How should I store the cake?
Allow the cake to cool completely before storing it in an airtight container.
At room temperature, it generally keeps well for up to three days in a cool environment. Refrigeration can extend storage to approximately five days, but it may make the crumb slightly firmer.
For longer storage, wrap individual slices and freeze them for up to two months. Thaw at room temperature before serving.
Serving Suggestions
This fluffy vanilla cake is versatile enough for many occasions. For a simple breakfast, serve a slice with tea or coffee. For an afternoon snack, pair it with fresh fruit or yogurt.
If you want a more indulgent dessert, add whipped cream and strawberries. A little homemade jam, honey, or melted chocolate can also complement the vanilla flavor.
For birthdays and celebrations, slice the cake into layers and fill it with pastry cream, whipped cream, or chocolate ganache. You can also decorate the top with fresh berries and a light dusting of powdered sugar.
Because the cake has a delicate flavor, it pairs well with a wide range of toppings without becoming overwhelming.
Final Thoughts
This fluffy vanilla sponge cake is a wonderful example of how simple ingredients can create a beautiful homemade dessert. Its golden crust, soft pale interior, and delicate vanilla aroma make it perfect for everyday baking as well as special occasions.
The recipe does not require complicated techniques, but paying attention to a few important details makes a big difference. Beat the eggs and sugar until thick and pale, fold the flour gently, bake at a moderate temperature, and allow the cake to cool before slicing.
Once you understand these basic techniques, you can adapt the recipe with lemon zest, orange zest, cocoa powder, coconut, or your favorite fillings.
Serve it plain with powdered sugar or turn it into a layered dessert with cream and fruit. However you choose to enjoy it, this homemade vanilla cake is a delicious treat that brings a little sweetness to any day.