There is a specific kind of dessert that doesn’t need flashy garnishes or liquid nitrogen to impress. It’s the kind of cake that sits on a kitchen counter, inviting you to steal “just one more sliver” every time you walk by. The problem with many modern vanilla cakes is that they often prioritize fluffiness over flavor, resulting in a dry, airy crumb that relies entirely on frosting to stay palatable.
The solution? A Classic Vanilla Butter Cake with Buttermilk Sauce. By utilizing the science of buttermilk—both in the batter and the glaze—we create a cake with a dense, tight crumb that remains incredibly moist for days. The warm buttermilk sauce isn’t just a topping; it’s a soak that permeates the cake, turning a simple sponge into a decadent, custard-like experience. This is the recipe that bridges the gap between a humble pound cake and a high-end bakery masterpiece.
Mastery of the Butter-to-Sugar Creaming Method
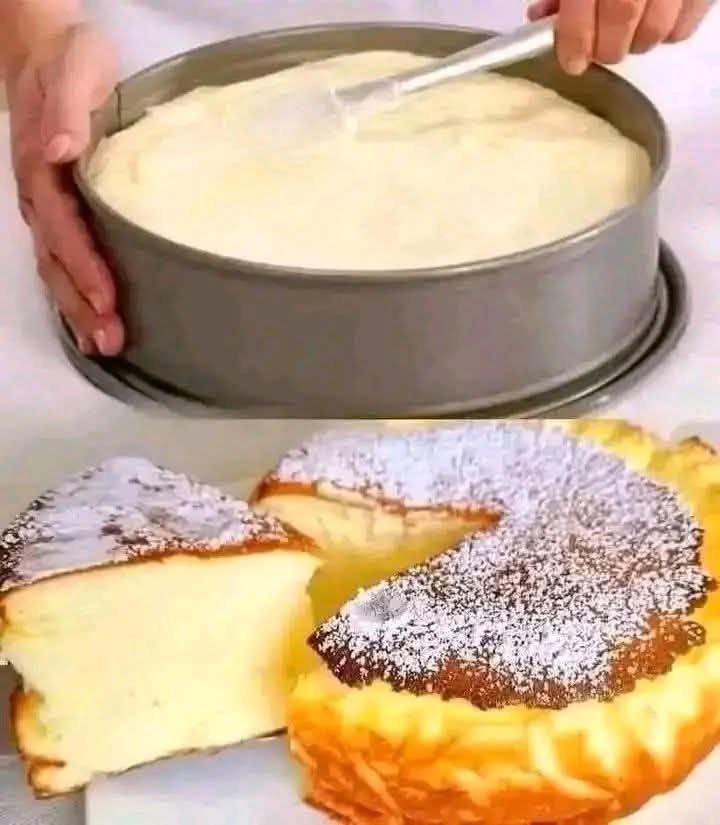
As a culinary strategist with years of experience in high-output kitchens, I’ve seen countless bakers rush the most critical step: the creaming of the butter and sugar. Most people stop once the mixture looks combined. To achieve the texture seen in the provided images—a cake that is structurally sound yet melts on the tongue—you must cream for at least 5 minutes until the mixture is pale, almost white, and doubled in volume.
Through my professional journey, I’ve learned that the temperature of your ingredients is your greatest ally or your worst enemy. Cold eggs will curdle your creamed butter, and cold buttermilk will cause the fat to seize. For this specific cake, every single component must be at room temperature to ensure a perfect emulsion. This attention to detail is what separates a “dry box mix” result from a professional-grade butter cake.
Recipe Overview
- Prep time: 25 minutes
- Cook time: 50–60 minutes
- Total time: 1 hour 25 minutes
- Yields: 1 large 10-inch cake (or springform pan)
- Difficulty: Intermediate (requires precision)
The Ingredients List
For the Vanilla Butter Cake
- 3 cups All-Purpose Flour: Provides the necessary structure.
- 2 cups Granulated Sugar: Essential for both sweetness and tenderness.
- 1 cup Unsalted Butter: Softened to room temperature (approx. 18°C to 21°C).
- 1 cup Buttermilk: The acid reacts with the leavening for a soft crumb.
- 4 Large Eggs: To provide lift and richness.
- 2 tsp Pure Vanilla Extract: Use high-quality extract or vanilla bean paste for those beautiful black flecks.
- 1 tsp Baking Powder & 1/2 tsp Baking Soda: The dual leavening agents.
- 1/2 tsp Salt: To balance the sweetness.
For the Signature Buttermilk Sauce
- 1 cup Granulated Sugar.
- 1/2 cup Buttermilk.
- 1/2 cup Unsalted Butter.
- 1 tbsp Pure Vanilla Extract.
- 1/2 tsp Baking Soda: This creates a slight foam and deepens the golden color.
Step-by-Step Instructions
1. Prepping for Success
Preheat your oven to 325°F (165°C). Grease and flour a 10-inch springform pan or a bundt pan. Micro-Explanation: A lower temperature (325°F vs the standard 350°F) is crucial for butter cakes to ensure the center cooks through before the edges become too dark or dry.
2. The Creaming Phase
In a stand mixer, beat the softened butter and 2 cups of sugar on medium-high for 5 full minutes. Scrape the sides of the bowl frequently. Add the eggs one at a time, beating well after each addition. Finally, stir in the vanilla extract.
3. Alternating the Dry and Wet
In a separate bowl, whisk together the flour, baking powder, baking soda, and salt. With the mixer on low, add 1/3 of the flour mixture, followed by 1/2 of the buttermilk. Repeat, ending with the flour. Micro-Explanation: Ending with the flour prevents the batter from over-developing gluten, which would result in a tough, bread-like texture.
4. The Bake
Pour the thick, creamy batter into the prepared pan and smooth the top with a spatula. Bake for 50–60 minutes, or until a toothpick inserted into the center comes out clean or with just a few moist crumbs attached.
5. Crafting the Buttermilk Sauce
While the cake is in its final 10 minutes of baking, combine the sugar, buttermilk, and butter for the sauce in a small saucepan. Bring to a simmer over medium heat until the sugar is dissolved. Remove from heat and stir in the vanilla and baking soda. The sauce will foam up slightly—this is normal.
6. The “Soak” Technique
This is the most important step. While the cake is still hot and in the pan, poke holes all over the top using a skewer or a fork. Pour about half of the warm buttermilk sauce slowly over the cake, allowing it to disappear into the crumb. Let it rest for 15 minutes before removing it from the pan. Pour the remaining sauce over individual slices when serving.
Common Mistakes & How to Avoid Them
- Over-mixing after adding flour: Once the flour touches the wet ingredients, gluten begins to form. Mix only until just combined to keep the cake tender.
- Using cold ingredients: As mentioned, room temperature is non-negotiable for an emulsion. If you forgot to take your eggs out, place them in a bowl of warm water for 5 minutes.
- Opening the oven door too early: This can cause the center of a heavy butter cake to collapse. Wait until at least the 45-minute mark before checking for doneness.
Ingredient Substitutions & Variations
- The Flour: If you want an even finer, tighter crumb, you can replace the all-purpose flour with cake flour.
- The Sauce: For a “Salted Caramel” twist, add 1/2 tsp of sea salt to the buttermilk sauce.
- The Fruit: This cake serves as an incredible base for seasonal berries. Gently fold in 1 cup of blueberries or raspberries before baking for a “Summer Butter Cake” variation.
Pro Tips Section
- The “Crust” Secret: Sprinkle a little bit of granulated sugar over the greased and floured pan before adding the batter. This creates a thin, sugary “crunch” on the exterior of the cake.
- The Powdered Sugar Finish: As seen in the reference photos, a light dusting of powdered sugar over the cooled cake adds a professional aesthetic without the need for heavy icing.
- The Overnight Perk: This cake actually tastes better the next day. The buttermilk sauce continues to hydrate the crumb, making it even more flavorful and moist after 24 hours.
Optimized FAQ Section
Q: Can I make this in a regular 9×13 baking dish? A: Absolutely. The bake time will likely be shorter (around 35–40 minutes), but the “poke and pour” method with the sauce remains exactly the same.
Q: My buttermilk sauce turned grainy. Why? A: This happens if the sugar wasn’t fully dissolved or if the heat was too high. Ensure you simmer it gently and stir constantly until you can no longer feel sugar granules on the back of your spoon.
Q: Do I need to refrigerate this cake? A: Because of the high sugar and butter content, it is safe at room temperature in an airtight container for 2–3 days. If you keep it longer, refrigerate it, but bring slices back to room temperature before eating to restore the buttery texture.
Conclusion: A Timeless Classic
The Classic Vanilla Butter Cake with Buttermilk Sauce is proof that you don’t need complexity to achieve perfection. It’s a nostalgic, heart-warming dessert that relies on high-quality ingredients and sound technique. Whether you’re serving it at a formal dinner or having a slice with your morning coffee, it never fails to satisfy.