🍞 The Magic of Hands-Off Baking
Achieving that bakery-quality crust and soft, airy interior typically requires intensive kneading and complicated techniques. Not anymore! This Easy No-Knead Dutch Oven Artisan Bread recipe simplifies the process down to three steps: mix, wait, and bake. The magic lies in the long fermentation time, which develops the flavor and gluten structure naturally, and the hot Dutch oven, which traps steam to create that signature thick, crackly crust. This recipe is perfect for beginner bakers and results in a stunning, rustic loaf every single time.
📝 Ingredients You’ll Need
The beauty of this recipe is its simplicity—you only need four basic kitchen staples.
For the Bread:
- 3 cups All-Purpose Flour (or Bread Flour for a chewier texture).
- 1 1/2 teaspoons Salt (Kosher or Sea Salt recommended).
- 1/2 teaspoon Active Dry Yeast or Instant Yeast.
- 1 1/2 cups Warm Water.
Equipment:
- Large mixing bowl.
- Heavy-bottomed pot or Dutch Oven (6 to 7 quart size) with a lid.
🔪 Step-by-Step Instructions
Patience is the most important ingredient in this recipe!
1. Mix the Dough (The No-Knead Part)
- In your large mixing bowl, combine the flour, salt, and yeast. Whisk them together thoroughly.
- Pour the warm water over the dry ingredients.
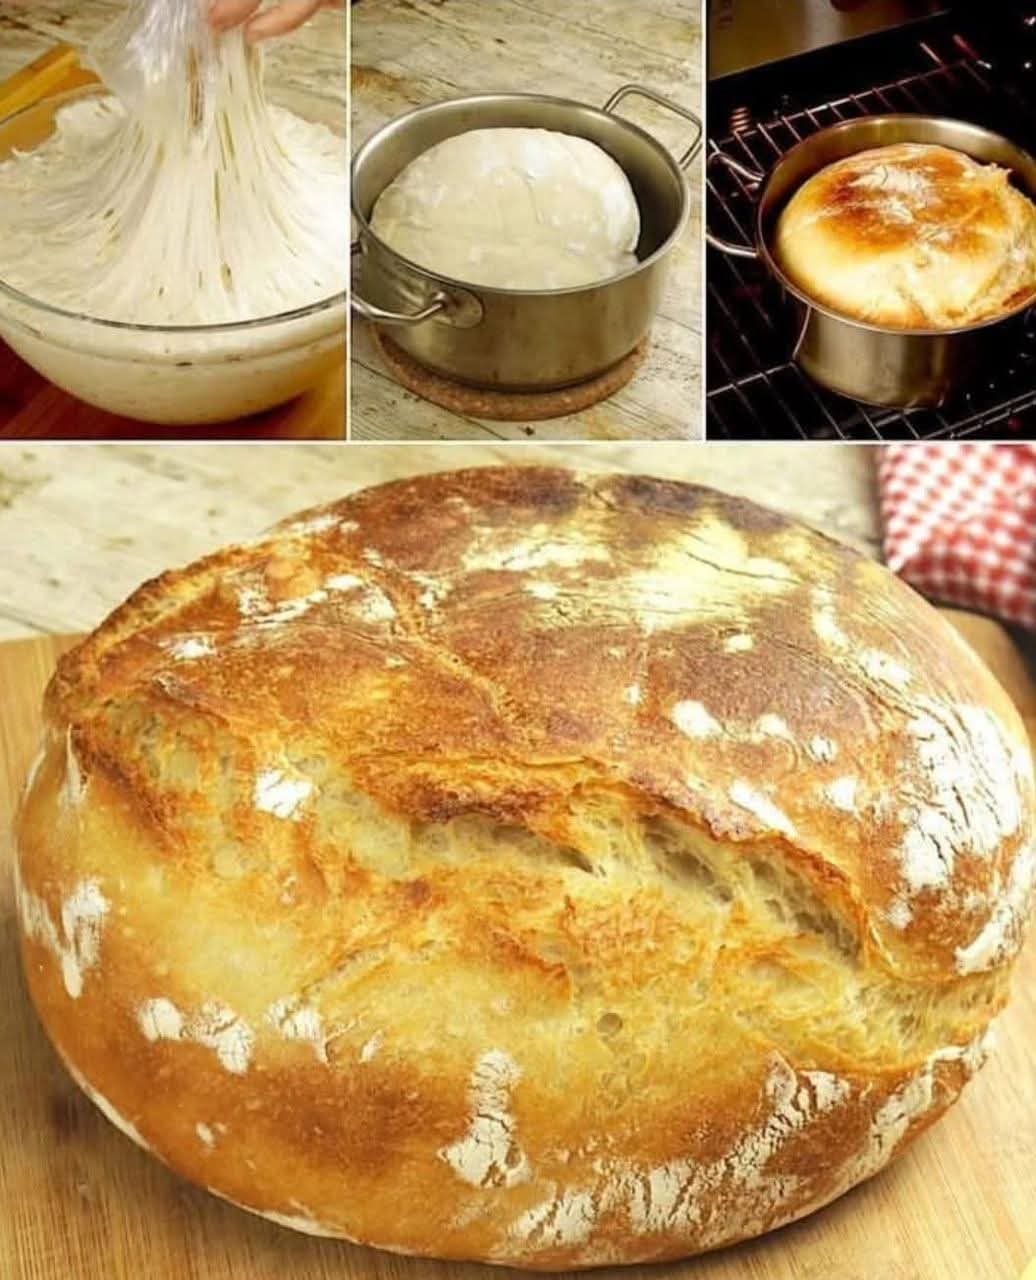
- Use a wooden spoon or spatula to mix the ingredients until a shaggy, sticky dough forms. The dough should be wet and difficult to handle—that is exactly what you want!
- Cover the bowl tightly with plastic wrap.
2. The Long Fermentation (The Wait)
- Leave the covered bowl at room temperature (ideally around 70^\circ\text{F} or 21^\circ\text{C}) for 12 to 18 hours. The longer the fermentation, the deeper the flavor.
- The dough will double in size, become bubbly, and look stretchy and web-like (like the first image). This proves the gluten has developed.
3. Shape and Second Proof
- Lightly flour a work surface and gently scrape the dough out of the bowl.
- Fold the dough over onto itself once or twice to form a rough ball. Do not knead it; handle it as little as possible.
- Generously flour a piece of parchment paper or a clean kitchen towel. Place the dough ball on the parchment/towel.
- Cover the dough loosely and let it rest (second proof) for 30 minutes while the oven preheats.
4. Preheat and Bake in the Dutch Oven
- Place your empty Dutch oven (with the lid on) into the cold oven.
- Preheat the oven to 450^\circ\text{F} (230^\circ\text{C}). The pot must heat up for at least 30 minutes.
- Carefully remove the hot Dutch oven. Lift the dough using the edges of the parchment paper and gently lower it into the preheated pot.
- Cover the pot and return it to the oven. Bake for 30 minutes.
5. Achieve the Golden Crust
- After the initial 30 minutes, carefully remove the lid from the Dutch oven. This allows the steam to escape, which is essential for developing the crisp crust.
- Continue baking for another 15 to 25 minutes, or until the loaf is deeply golden brown and sounds hollow when tapped.
- Carefully remove the bread from the pot and transfer it to a wire rack to cool completely before slicing.
⭐ Pro Tips and Flavor Variations
- Cooling is Crucial: Do not cut the bread until it has cooled for at least an hour. Slicing it while hot releases the steam, resulting in a dense, gummy interior.
- Flour Choice: While all-purpose works, Bread Flour provides a higher protein content, giving the loaf a slightly chewier and more structured crumb.
- Add-ins: For flavor variations, incorporate herbs, grated cheese, or dried fruits after the first fermentation step (before the second proof).
- The Pot: The heavy, covered pot (like a Dutch oven or heavy cast-iron casserole) is non-negotiable, as it traps the steam released by the dough, which is the secret to the ultimate crust.