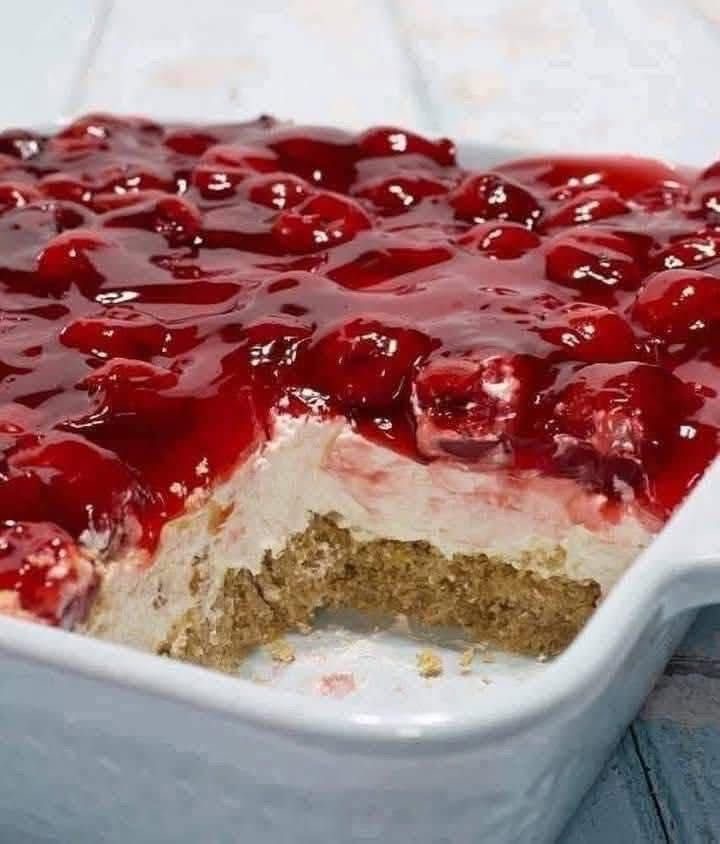
This beautiful No-Bake Cherry Cheesecake Dessert is the kind of classic treat that looks impressive but is surprisingly simple to make. It features a buttery crumb crust, a smooth and creamy cheesecake layer, and a generous topping of glossy cherries in sweet cherry pie filling. The combination of textures is what makes every bite so satisfying: a slightly crisp, buttery base, a rich and silky cream cheese filling, and juicy cherries on top.
It is an excellent dessert for family dinners, holidays, potlucks, birthdays, and summer gatherings because you can prepare it ahead of time and keep it chilled until you are ready to serve. There is no need to turn on the oven, and the recipe uses straightforward ingredients that are easy to find.
Ingredients
For the crust
- 2 ½ cups graham cracker crumbs
- ½ cup unsalted butter, melted
- ¼ cup granulated sugar
- 1 teaspoon vanilla extract
- Pinch of salt
For the creamy cheesecake layer
- 16 ounces cream cheese, softened
- 1 cup powdered sugar
- 1 teaspoon vanilla extract
- 2 cups whipped topping, such as Cool Whip, thawed
- ½ cup sour cream
- 1 tablespoon lemon juice
For the cherry topping
- 2 cans cherry pie filling, approximately 21 ounces each
- 1 teaspoon lemon juice, optional
- ½ teaspoon vanilla extract, optional
Instructions
Prepare the crust
Begin by preparing the crumb crust. If you are using whole graham crackers, crush them into very fine crumbs using a food processor. You can also place the crackers in a resealable bag and crush them with a rolling pin.
Measure 2 ½ cups of crumbs and place them in a large mixing bowl. Add the granulated sugar and a small pinch of salt. Stir everything together until evenly combined.
Pour in the melted butter and vanilla extract. Mix thoroughly until all of the crumbs are moistened. The mixture should resemble damp sand and should hold together when pressed between your fingers.
Lightly grease a 9-by-13-inch baking dish or dessert pan. Transfer the crumb mixture into the dish and spread it evenly across the bottom.
Use the bottom of a measuring cup, drinking glass, or flat spatula to press the crumbs firmly into an even layer. Take your time with this step because a well-packed crust will slice much more neatly later.
Place the crust in the refrigerator while you prepare the cheesecake filling.
Make the cheesecake layer
Place the softened cream cheese in a large mixing bowl. Beat it with an electric mixer until completely smooth and creamy.
It is important that the cream cheese is properly softened before mixing. Cold cream cheese can leave small lumps in the finished filling. Let the cream cheese sit at room temperature for about 30 to 60 minutes before starting.
Add the powdered sugar gradually and continue beating until smooth. Scrape down the sides of the bowl as necessary.
Add the sour cream, vanilla extract, and lemon juice. Beat again until everything is completely incorporated.
The lemon juice adds a subtle brightness that balances the sweetness of the dessert. It does not make the filling taste strongly of lemon; instead, it helps give the cheesecake layer a fresher, more balanced flavor.
Now gently fold in the whipped topping. Use a rubber spatula rather than an electric mixer for this step. Fold slowly from the bottom of the bowl toward the top until the mixture is light, fluffy, and evenly combined.
Avoid overmixing because you want to maintain the airy texture of the whipped topping.
Assemble the dessert
Remove the chilled crust from the refrigerator.
Spoon the cheesecake mixture over the crust and spread it carefully into an even layer. A large offset spatula works especially well, but the back of a spoon will also do the job.
Make sure the cheesecake mixture reaches all four corners of the dish.
Smooth the surface as much as possible. This layer will form the creamy middle of the dessert, so an even surface will also make it easier to distribute the cherry topping.
Once the cheesecake layer is smooth, place the dish back in the refrigerator for about 20 to 30 minutes. This short chilling period helps firm the filling before adding the cherries.
Add the cherry topping
Open the cans of cherry pie filling and spoon the cherries over the chilled cheesecake layer.
Spread them gently so that the entire surface is covered. Be careful not to press down too hard because you do not want the cherries to sink into the creamy layer.
If desired, stir a teaspoon of lemon juice and a little vanilla extract into the cherry pie filling before spreading it over the cheesecake. This is optional, but the small amount of lemon can help balance the sweetness.
For the prettiest appearance, arrange some of the cherries toward the top rather than crushing them while spreading. The glossy red cherry topping creates a beautiful contrast against the white cheesecake layer.
Chill the dessert
Cover the baking dish tightly with plastic wrap or aluminum foil and refrigerate for at least 6 hours.
For the best texture, refrigerate the dessert overnight.
This resting time is important. The crust needs time to firm up, while the cheesecake layer needs enough time to become sliceable. If you cut into the dessert too soon, the filling may be soft and the layers may not hold together as neatly.
When you are ready to serve, remove the dessert from the refrigerator and let it sit for approximately 5 to 10 minutes before slicing.
Use a sharp knife to cut the dessert into squares. For cleaner slices, wipe the knife with a damp cloth between cuts.
Tips for the Best Cherry Cheesecake Dessert
The first important tip is to use softened cream cheese. This makes a tremendous difference in the texture of the filling. If the cream cheese is too cold, it can remain lumpy even after mixing.
Another helpful tip is not to use too much pressure when spreading the cherry topping. The cheesecake layer is soft, especially before it has completely chilled, so gently spread the cherries across the surface.
For a firmer crust, press the graham cracker mixture down firmly. You want the crust compact enough to support the creamy filling when the dessert is cut.
If you prefer a thicker crust, increase the graham cracker crumbs to 3 cups and use about ⅔ cup melted butter.
For an extra creamy cheesecake layer, make sure your whipped topping is fully thawed before folding it into the cream cheese mixture.
Can I Use Fresh Cherries?
Yes, but fresh cherries require a little preparation.
If you want to make a homemade cherry topping, pit approximately 4 cups of fresh cherries. Place them in a saucepan with ½ cup sugar, 2 tablespoons lemon juice, and 2 tablespoons cornstarch mixed with 3 tablespoons water.
Cook over medium heat, stirring frequently, until the cherries release their juices and the mixture becomes thick and glossy.
Allow the topping to cool completely before placing it on the cheesecake layer. Do not add hot cherry topping to the dessert because it can soften or melt the creamy layer.
Frozen cherries can also be used. Thaw them first and drain excess liquid before cooking them into a topping.
That said, canned cherry pie filling is one of the reasons this recipe is so convenient. It provides the familiar sweet cherry flavor and beautiful glossy appearance without requiring additional cooking.
Delicious Variations
Although cherry is a classic choice, this recipe is very easy to customize.
For a strawberry version, replace the cherry pie filling with strawberry pie filling or homemade strawberry sauce.
Blueberry pie filling works beautifully as well. The deep purple-blue topping looks especially attractive against the pale cheesecake layer.
For a mixed berry dessert, combine strawberries, blueberries, raspberries, and blackberries with a homemade berry sauce.
You can also add a thin layer of chocolate ganache between the cheesecake and cherry topping for a chocolate-cherry variation.
Another delicious option is to add finely chopped pecans or walnuts to the graham cracker crust. The nuts provide a little extra crunch and pair wonderfully with the cherries and cream cheese.
For a coconut version, replace part of the graham cracker crumbs with finely shredded sweetened coconut.
How to Store It
This dessert should always be stored in the refrigerator.
Cover the dish tightly with plastic wrap or place individual portions into airtight containers. Properly refrigerated, it is best enjoyed within about 3 to 4 days.
Because the dessert contains cream cheese and whipped topping, do not leave it sitting at room temperature for extended periods.
If you are serving it at a party, keep the dessert chilled until shortly before serving. You can place the serving dish over a larger tray filled with ice if the dessert needs to remain out for a while.
Can You Freeze Cherry Cheesecake Dessert?
Yes, this dessert can be frozen, although the texture of the topping may change slightly after thawing.
For best results, freeze the cheesecake without the cherry topping if you are preparing it far in advance. Wrap the chilled cheesecake layer tightly with plastic wrap and then aluminum foil.
Freeze for up to about one month for the best quality.
When ready to serve, thaw the cheesecake overnight in the refrigerator and add fresh cherry topping before serving.
If you freeze the completed dessert with the cherry topping already added, it can still work, but the cherries may release some liquid as they thaw.
Serving Suggestions
This dessert is delicious straight from the refrigerator, but you can make each serving even more special with a few simple additions.
Add a small spoonful of whipped cream on top of each square and finish with a single cherry.
A light dusting of powdered sugar around the plate can also make the dessert look elegant.
For a richer presentation, drizzle a little chocolate syrup over the plate before adding the cheesecake square.
You can also sprinkle chopped pecans, toasted almonds, or chocolate shavings over individual servings.
Because the dessert has three distinct layers, clear glass serving dishes can also be used if you want to create individual portions. Simply press the crust into the bottom of each dish, add the cheesecake mixture, and finish with cherry topping.
Why This Recipe Is So Popular
There is something especially comforting about the combination of cherries and cheesecake. The richness of the cream cheese filling is balanced by the fruity sweetness of the cherries, while the buttery graham cracker crust provides the perfect foundation.
The recipe is also wonderfully practical. You do not need complicated baking techniques, a water bath, or specialty equipment. An electric mixer, mixing bowls, a spatula, and a refrigerator are essentially all you need.
It is also a great make-ahead dessert. Preparing it the night before means you can focus on everything else when guests arrive.
The finished dessert has the appearance of a traditional layered cheesecake but is much easier to prepare. The bright red cherries on top make it particularly attractive for holidays, summer celebrations, potlucks, and family dinners.
Final Thoughts
This No-Bake Cherry Cheesecake Dessert is a simple, creamy, and satisfying treat that combines everything people love about classic cheesecake without requiring a complicated baking process.
The buttery graham cracker crust provides a slightly crisp foundation, the sweet cream cheese layer is smooth and fluffy, and the cherry topping adds a bright fruity finish. Together, the three layers create a dessert that is rich without being overly heavy and sweet without losing the refreshing flavor of the cherries.
For the best results, give the dessert plenty of time to chill. Overnight refrigeration is ideal because it allows the layers to firm up and the flavors to blend beautifully.
Whether you are making dessert for your family, preparing something for a potluck, or simply craving an easy homemade cheesecake, this recipe is an excellent choice. It is simple enough for beginners, attractive enough for special occasions, and delicious enough that you may find yourself making it again and again.