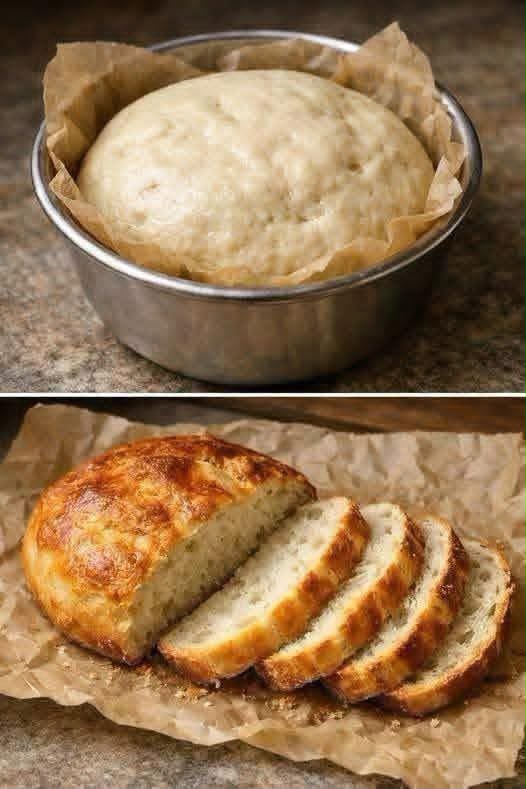
The bread in your photo looks like a simple rustic homemade loaf baked in a small round pan or bowl, with a beautifully golden crust and a soft, tender interior. The dough appears to be very simple—flour, yeast, water, salt, and a little oil—making this a wonderful recipe for beginners.
The secret to getting a loaf with a soft interior and a beautifully browned crust is giving the dough enough time to rise and avoiding adding too much flour. This version requires very little kneading, so you can prepare it with just a bowl, a spoon, and your hands.
Ingredients
For the dough
- 3 cups (375 g) all-purpose flour
- 1 cup + 2 tablespoons (270 ml) warm water
- 2¼ teaspoons (7 g) active dry yeast
- 1 tablespoon sugar or honey
- 1 teaspoon salt
- 2 tablespoons olive oil or vegetable oil
- 1 tablespoon milk powder, optional
For the top
- 1 tablespoon milk
- 1 teaspoon melted butter or olive oil
- Sesame seeds, optional
- A little flour for dusting
Step 1: Activate the Yeast
Pour the warm water into a large mixing bowl.
The water should feel comfortably warm—not hot. Water that is too hot can damage the yeast.
Add the sugar and yeast.
Stir gently and allow the mixture to sit for approximately 5–10 minutes.
You should see a light layer of foam developing on the surface. This indicates that the yeast is active.
If there is no foam after about 10 minutes, your yeast may be inactive, and it’s better to start again with fresh yeast.
Step 2: Make the Dough
Add the flour, salt, and milk powder if using.
Pour in the olive oil.
Mix everything together with a wooden spoon or spatula.
At first, the dough may look rough and sticky. That’s completely normal.
Continue mixing until there are no large pockets of dry flour.
The dough should be soft and slightly sticky, rather than firm.
Don’t immediately add lots of flour.
One of the biggest mistakes when making homemade bread is adding too much flour because sticky dough can feel difficult to work with. A slightly wet dough generally produces a softer, lighter loaf.
Step 3: Rest the Dough
Cover the bowl with plastic wrap, a clean kitchen towel, or a plate.
Leave it in a warm, draft-free place for approximately 60–90 minutes.
The dough should become noticeably larger—ideally close to double its original volume.
The exact rising time depends on the temperature of your kitchen.
If your kitchen is cool, the dough may need closer to 2 hours.
If it’s warm, it may rise much faster.
Don’t rely exclusively on the clock. Look at the dough.
When it has expanded significantly and looks puffy, you’re ready for the next step.
Step 4: Prepare the Baking Pan
The loaf shown in the photo appears to have been baked in a relatively small round container.
You can use:
- A small round cake pan
- A deep oven-safe bowl
- A small Dutch oven
- A 8-inch round baking pan
- A loaf pan for a different shape
Grease the inside lightly with oil or butter.
For a rustic appearance, line the bottom and sides with parchment paper.
Leave some parchment extending above the edges.
This makes removing the bread much easier after baking.
Step 5: Shape the Dough
Once the dough has risen, lightly flour your work surface.
Turn the dough out gently.
Don’t aggressively punch all the air out.
Fold the dough over itself several times.
For example:
Pull one side of the dough upward and fold it toward the center.
Turn the dough and repeat.
Do this approximately 6–8 times.
You don’t need traditional intensive kneading.
The dough should gradually become smoother and more cohesive.
Shape it into a round ball.
Place the dough into your prepared baking pan.
Step 6: Second Rise
Cover the pan loosely.
Let the dough rise again for approximately 30–45 minutes.
This second rise is important because it gives the bread a lighter texture.
The dough should become visibly puffy.
Don’t allow it to rise excessively until it completely collapses.
A properly proofed dough should look soft, rounded, and airy.
Step 7: Prepare the Top
Once the dough has finished its second rise, brush the surface gently with milk.
The milk helps create the golden-brown crust seen in the photograph.
You can also brush the top with a mixture of milk and melted butter.
For a rustic appearance, lightly dust the surface with flour.
You can also sprinkle sesame seeds over the top.
If you’d like a more traditional artisan appearance, make one or two shallow cuts across the top using a sharp knife or bread lame.
Step 8: Bake
Preheat the oven to 375°F (190°C).
Place the bread in the center of the oven.
Bake for approximately 30–40 minutes.
The exact baking time depends on the size and depth of your baking pan.
The loaf should become beautifully golden brown.
If the top is browning too quickly, loosely cover it with aluminum foil during the final part of baking.
The bread is done when:
- The crust is golden brown.
- The loaf sounds hollow when tapped.
- The internal temperature is approximately 190–200°F (88–93°C).
Step 9: Add a Soft, Buttery Finish
As soon as the bread comes out of the oven, brush the top lightly with melted butter.
This gives the crust a beautiful shine and makes it slightly softer.
If you prefer a crispier crust, skip the butter and allow the loaf to cool uncovered.
Step 10: Let It Cool
This step requires patience!
Remove the bread from the pan and place it on a wire rack.
Allow it to cool for at least 30–45 minutes before slicing.
Bread continues cooking internally as it cools.
If you slice it immediately, the steam can escape and the interior may become slightly gummy.
Once cooled, use a serrated bread knife to slice it.
You should have a golden crust and a soft, fluffy center similar to the bread shown in your photograph.
🥖 Why This Bread Is So Soft
The combination of water, oil, and proper fermentation creates a tender crumb.
The oil helps keep the bread soft.
The small amount of sugar gives the yeast something to work with while also contributing to browning.
The relatively high hydration keeps the dough moist.
And the second rise gives the yeast additional time to create air pockets.
The result is a loaf that is soft enough for sandwiches but sturdy enough to serve alongside soups and stews.
Tips for Perfect Homemade Bread
Don’t use boiling water
The water should be warm, not hot.
Very hot water can kill the yeast.
Don’t add too much flour
Sticky dough isn’t necessarily bad dough.
If you keep adding flour until the dough feels dry and easy to handle, your finished bread can become dense.
Give the dough time
Bread needs fermentation.
If the dough hasn’t risen sufficiently, don’t rush it into the oven.
Don’t skip the second rise
The second rise contributes significantly to the soft texture.
Preheat the oven properly
A fully preheated oven gives the loaf an immediate burst of heat, helping it rise and develop a good crust.
Optional Garlic-Herb Version
For a savory variation, add:
- 1 teaspoon garlic powder
- 1 teaspoon dried oregano
- 1 teaspoon dried parsley
- ½ teaspoon dried rosemary
After baking, brush the loaf with melted butter mixed with minced garlic and parsley.
This creates an incredibly flavorful bread that’s perfect with pasta, soup, or roasted meats.
🧀 Cheesy Bread Version
You can also turn this into a cheesy loaf.
Add approximately 1 cup shredded mozzarella or cheddar to the dough during the final mixing stage.
You can also sprinkle additional cheese on top before baking.
For an especially delicious version, mix mozzarella with Parmesan and a little garlic powder.
The cheese melts into the bread while the top becomes beautifully browned.
🧅 Onion & Herb Bread
Finely chop half an onion and sauté it in a teaspoon of oil until soft and lightly golden.
Allow it to cool completely.
Add it to the dough together with fresh parsley, thyme, or rosemary.
This produces a savory loaf with sweet pieces of caramelized onion throughout.
🍞 How to Store the Bread
Once completely cool, place the bread in a bread bag or airtight container.
Keep it at room temperature for approximately 2–3 days.
Avoid refrigerating homemade bread unless necessary because refrigeration can make the crumb stale more quickly.
For longer storage, freeze the bread.
You can freeze the entire loaf or slice it first.
If slicing before freezing, place parchment paper between the slices so you can remove individual pieces as needed.
How to Reheat Frozen Bread
To refresh a whole loaf, let it thaw at room temperature and then place it in a 350°F (175°C) oven for approximately 8–12 minutes.
For individual slices, simply toast them.
You can also warm them in a skillet with a small amount of butter.
Serving Ideas
This homemade bread is incredibly versatile.
Serve warm slices with:
- Butter
- Honey
- Jam
- Cream cheese
- Scrambled eggs
- Avocado
- Soup
- Stew
- Pasta
- Roasted chicken
- Grilled vegetables
For breakfast, toast a slice and spread it with butter and honey.
For lunch, use it for a sandwich.
For dinner, serve warm slices alongside soup or stew so you can soak up the flavorful broth.
🥖 Complete Recipe Card
Easy Homemade Soft Bread
Ingredients
- 3 cups (375 g) all-purpose flour
- 1 cup + 2 tbsp warm water
- 2¼ tsp active dry yeast
- 1 tbsp sugar
- 1 tsp salt
- 2 tbsp olive oil
- 1 tbsp milk powder, optional
- 1 tbsp milk for brushing
- 1 tsp melted butter for finishing
Instructions
- Combine warm water, sugar, and yeast.
- Let stand for 5–10 minutes until foamy.
- Add flour, salt, milk powder, and oil.
- Mix until a soft, slightly sticky dough forms.
- Cover and let rise for 60–90 minutes.
- Grease and line a round baking pan.
- Gently shape the risen dough into a round loaf.
- Place it in the pan.
- Cover and let rise again for 30–45 minutes.
- Brush with milk.
- Optionally dust with flour or add sesame seeds.
- Bake at 375°F (190°C) for 30–40 minutes.
- Brush with melted butter immediately after baking.
- Cool for at least 30–45 minutes.
- Slice and serve.
⭐ Final Result
You’ll have a soft, fluffy homemade loaf with a golden, lightly crisp crust and a tender interior. The recipe is simple enough for a beginner, requires minimal kneading, and can easily be adapted with cheese, garlic, herbs, or caramelized onions.
For the closest appearance to the bread in your image, bake the dough as one thick round loaf in a small parchment-lined pan, brush the top with milk before baking, and finish it with a little melted butter while it’s still hot.