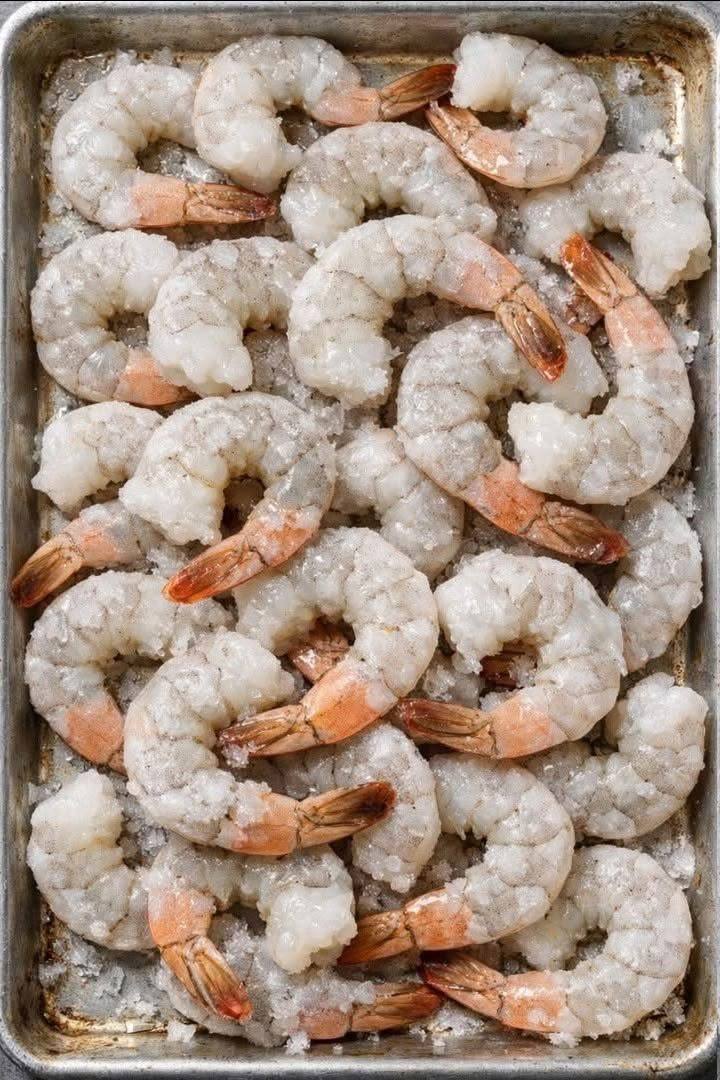
There’s a simple trick professional cooks have relied on for years to get shrimp that’s plump, juicy, and perfectly seasoned all the way through, rather than shrimp that’s rubbery or bland no matter how carefully it’s cooked. This salt-cured garlic shrimp recipe uses that exact technique — a quick dry salt cure before cooking — to draw out excess moisture, firm up the texture, and season the shrimp from the inside out, resulting in the juiciest, most flavorful shrimp you’ll ever make at home.
The idea behind salt-curing shrimp is simple but genuinely transformative. A light coating of salt applied directly to raw shrimp for a short period of time draws out surface moisture through osmosis, which is then reabsorbed along with the salt, seasoning the shrimp far more deeply than a quick sprinkle right before cooking ever could. The result is shrimp with a noticeably firmer, snappier texture and a more concentrated, well-seasoned flavor throughout, rather than just on the surface.
Once cured, the shrimp are seared quickly in a hot pan with garlic and butter, allowing that deep seasoning to shine through against a rich, savory garlic butter base. Because the shrimp are already well-seasoned from the curing process, this dish needs very little additional salt or fuss, letting the natural sweetness of the shrimp and the aromatic garlic butter truly take center stage.
Texturally, this is where the technique really pays off: the shrimp turn out snappy and firm, never mushy or watery, with a juicy, almost bouncy bite that holds up beautifully against the rich, glossy garlic butter coating every piece. It’s a small extra step that makes a genuinely noticeable difference compared to shrimp cooked straight from the package.
Whether you’re making this for a quick weeknight dinner, an elegant appetizer, or simply to finally understand what perfectly cooked shrimp is supposed to taste like, this salt-cured garlic shrimp recipe delivers results worth the small extra bit of planning.
Why You’ll Love This Recipe
- The salt cure produces noticeably juicier, firmer shrimp than any other method.
- The seasoning penetrates throughout, not just on the surface.
- The garlic butter sauce is rich and deeply savory.
- It’s a simple technique that makes a genuinely big difference.
- It’s quick to prepare, with most of the time being hands-off curing.
- It works beautifully as an appetizer, main dish, or over pasta.
- It’s a professional-level trick made accessible for home cooks.
- It results in shrimp with a satisfying, snappy bite.
- It’s endlessly versatile, pairing well with countless sides and dishes.
- It’s a genuine upgrade to your usual shrimp routine.
Ingredients
For the Salt Cure
- 1.5 lbs large or jumbo shrimp, peeled and deveined, tails on or off
- 1 1/2 teaspoons kosher salt
For the Garlic Butter
- 3 tablespoons unsalted butter
- 1 tablespoon olive oil
- 5 garlic cloves, minced
- 1/4 teaspoon red pepper flakes (optional)
- 1 tablespoon fresh lemon juice
- 2 tablespoons fresh parsley, chopped
Ingredient Notes
- Shrimp: Large or jumbo shrimp work best for this technique, since their size gives the salt cure enough surface area and time to properly firm up the texture. Fresh shrimp is ideal, though thawed frozen shrimp works well too, as long as it’s fully thawed before curing.
- Kosher salt: Kosher salt is recommended over table salt for curing, since its larger, less dense granules distribute more evenly and are easier to control without over-salting.
- Butter and olive oil combination: Using both allows the butter to add rich flavor while the olive oil raises the smoke point slightly, helping prevent the butter from burning during the quick, hot sear.
- Red pepper flakes: Optional, but they add a subtle warmth that complements the rich garlic butter without overwhelming the delicate sweetness of the shrimp.
- Lemon juice: Added at the end to brighten the dish and balance the richness of the butter.
Kitchen Equipment
- Large baking sheet or plate (for curing)
- Paper towels
- Large skillet
- Tongs
- Cutting board and knife
Step-by-Step Instructions
- Pat the shrimp dry. Thoroughly pat the shrimp dry with paper towels — this step is important, as excess moisture will interfere with the curing process.
- Apply the salt cure. Arrange the shrimp in a single layer on a baking sheet or plate. Sprinkle evenly with the kosher salt on both sides.
- Cure the shrimp. Let the shrimp sit uncovered at room temperature for 15–20 minutes, or in the refrigerator for up to 30 minutes. You’ll notice moisture beading on the surface as the salt draws it out.
- Rinse and dry. Rinse the shrimp briefly under cold water to remove the surface moisture and excess salt, then pat thoroughly dry again with paper towels.
- Heat the pan. Heat the butter and olive oil in a large skillet over medium-high heat until the butter is melted and the pan is hot.
- Sear the shrimp. Add the shrimp in a single layer and cook for about 1–2 minutes per side, until pink, opaque, and lightly golden at the edges.
- Add the garlic. Add the minced garlic and red pepper flakes (if using) during the last minute of cooking, stirring frequently to prevent burning.
- Finish with lemon. Remove from heat and squeeze fresh lemon juice over the shrimp, tossing to coat.
- Garnish and serve. Sprinkle with fresh parsley and serve immediately.
Chef Tips
- Don’t skip patting the shrimp dry both before and after curing — moisture is the enemy of a good sear.
- Keep the curing time within the recommended window; too long can make the shrimp overly salty or start to firm up too much.
- Use a very hot pan for searing to develop good color quickly without overcooking the shrimp.
- Add the garlic toward the end of cooking to prevent it from burning and turning bitter.
- Because the shrimp are already seasoned from the cure, taste before adding any extra salt to the finished dish.
- Serve immediately after cooking for the best texture, as shrimp can continue cooking slightly from residual heat if left in the hot pan.
Variations
- Spicy Salt-Cured Shrimp: Increase the red pepper flakes or add a pinch of cayenne to the garlic butter for extra heat.
- Herb Garlic Butter Shrimp: Add fresh thyme or basil to the garlic butter for an herby variation.
- Salt-Cured Shrimp Scampi: Toss the finished shrimp and garlic butter with cooked linguine for a complete pasta dish.
- Smoky Salt-Cured Shrimp: Add a pinch of smoked paprika to the cure or the garlic butter for a subtle smoky depth.
- Salt-Cured Shrimp Tacos: Serve the finished shrimp in warm tortillas with shredded cabbage and a squeeze of lime.
- Garlic Parmesan Shrimp: Toss the finished shrimp with a sprinkle of grated Parmesan cheese just before serving.
- Salt-Cured Shrimp Skewers: Thread the cured shrimp onto skewers and grill instead of pan-searing for a smoky, charred version.
- White Wine Garlic Shrimp: Add a splash of dry white wine to the pan along with the garlic for a deeper, more complex sauce.
Serving Suggestions
- Over pasta, rice, or creamy polenta
- With crusty bread for soaking up the garlic butter
- As an appetizer with toothpicks for easy serving
- Alongside a simple green salad for a light dinner
- A crisp white wine, such as Sauvignon Blanc, for pairing
Storage Instructions
Refrigerator: Store leftovers in an airtight container in the refrigerator for up to 2 days.
Freezer: Cooked shrimp can be frozen for up to 2 months, though the texture may soften slightly upon thawing.
Reheating: Reheat gently in a skillet over low to medium heat for a couple of minutes, being careful not to overcook. Avoid the microwave if possible, as it can easily overcook shrimp and make them rubbery.
Common Mistakes to Avoid
- Not patting the shrimp dry before curing. Excess surface moisture interferes with how effectively the salt cure works.
- Curing for too long. This can result in overly salty or excessively firm shrimp; stick to the recommended time window.
- Skipping the rinse after curing. This step removes excess surface salt and moisture before cooking.
- Overcrowding the pan while searing. This can cause the shrimp to steam rather than sear, resulting in a less flavorful crust.
- Overcooking the shrimp. Shrimp cook very quickly and can turn tough and rubbery if left in the pan too long.
- Adding garlic too early. This increases the risk of it burning and turning bitter before the shrimp are done.
- Adding extra salt without tasting first. The cure already seasons the shrimp significantly, so additional salt may not be needed.
- Letting the shrimp sit in the hot pan after cooking. Residual heat can continue cooking the shrimp past the ideal doneness; remove promptly once done.
Frequently Asked Questions (FAQ)
1. Why does salt-curing make shrimp juicier? The salt draws out surface moisture through osmosis, which is then partially reabsorbed along with the salt, firming up the texture and seasoning the shrimp more deeply than surface seasoning alone.
2. How long should I cure the shrimp? 15–20 minutes at room temperature, or up to 30 minutes in the refrigerator, is the ideal window for this technique.
3. Can I use frozen shrimp for this recipe? Yes, just make sure it’s fully thawed and patted dry before beginning the salt cure.
4. Will the shrimp taste overly salty? No, as long as you rinse the shrimp after curing and don’t exceed the recommended curing time, the seasoning should be well-balanced rather than overly salty.
5. Can I skip the rinsing step? It’s recommended to rinse briefly to remove excess surface salt and moisture, which helps achieve a better sear during cooking.
6. Can I use this curing technique for other seafood? Yes, this method can also be applied to scallops and firm white fish fillets with good results, adjusting curing time based on size and thickness.
7. Can I make this dish ahead of time? The shrimp can be cured ahead of time and refrigerated, but the actual cooking is best done just before serving for the best texture.
8. What’s the best pan to use for searing? A heavy-bottomed skillet, such as stainless steel or cast iron, retains heat well and helps achieve a good sear.
9. Can I make this dish dairy-free? Yes, simply use additional olive oil in place of the butter for a dairy-free version.
10. What can I serve this shrimp with? Pasta, rice, crusty bread, or a simple salad all pair beautifully with this dish.
Nutrition Information
The following values are estimates per serving (based on 4 servings) and may vary depending on specific ingredients and brands used.
| Nutrient | Amount (approx.) |
|---|---|
| Calories | 240 kcal |
| Protein | 27g |
| Fat | 14g |
| Carbohydrates | 2g |
| Fiber | 0g |
| Sugar | 0g |
| Sodium | 560mg |
Final Thoughts
Salt-cured garlic shrimp proves that sometimes the smallest extra step makes the biggest difference in the kitchen. By taking just 15 to 20 minutes to properly season the shrimp from the inside out before cooking, you end up with a noticeably juicier, firmer, more flavorful result than any quick-seasoned shrimp could ever achieve. Give this technique a try, and it’s likely to change the way you cook shrimp for good.