No-bake cherry cheesecake bars are one of the most beloved classic desserts, combining a buttery crumb crust, a smooth and fluffy cheesecake filling, and a delicious cherry topping that gives the dessert its vibrant red color and irresistible flavor. The recipe is incredibly simple, yet produces a stunning dessert that tastes bakery-quality every time. What makes this recipe special is the balance between sweetness, creaminess, and the slight tartness of the cherries, which makes each bite refreshing and indulgent at once.
This dessert is ideal for gatherings, holidays, potlucks, birthdays, and especially summer days when you want a cold dessert without turning on the oven. The layers hold well, slice perfectly, and stay beautifully structured when chilled overnight. Below is a professional, detailed version of the recipe—perfect for home cooks, bloggers, and food creators.
✨ Ingredients
⭐ 1. Biscuit Crust
- 300 g digestive biscuits or graham crackers
- 120 g melted butter
- 2 tablespoons sugar (optional)
- ½ teaspoon cinnamon (optional, but delicious)
⭐ 2. Cheesecake Filling
- 450 g cream cheese, softened
- 1 cup (250 ml) cold heavy whipping cream
- ¾ cup powdered sugar
- 1 tablespoon lemon juice
- 1 teaspoon vanilla extract
- Optional: 150 g mascarpone for extra creaminess
⭐ 3. Cherry Topping
You may use either:
Option A: Canned Cherry Pie Filling
- 1 large can (600–700 g)
Option B: Homemade Cherry Topping
- 3 cups fresh or frozen cherries
- ½ cup sugar
- 2 tablespoons lemon juice
- 2 tablespoons cornstarch dissolved in 3 tablespoons water
- ½ teaspoon vanilla
✨ Instructions
1. Prepare the Biscuit Crust
The crust is the foundation of the dessert. It should be firm enough to support the layers but still tender enough to cut easily.
- Crush the biscuits to a fine crumb using a food processor or by placing them inside a sealed bag and rolling with a rolling pin.
- Pour the melted butter over the crumbs. Add sugar and cinnamon if using.
- Mix until all crumbs are coated and moistened.
- Transfer the mixture into a rectangular or square pan (20×30 cm recommended).
- Press down firmly using the bottom of a glass until the crust becomes compact and even.
Tip: A well-compacted crust avoids crumbling when slicing.
Chill the crust for 20–30 minutes while preparing the filling.
2. Make the Cheesecake Filling
This layer is creamy, fluffy, and incredibly rich.
- In a mixing bowl, beat the softened cream cheese until completely smooth.
- Add powdered sugar, lemon juice, and vanilla extract. Mix until creamy and lump-free.
- In another bowl, whip the cold heavy cream until stiff peaks form.
- Fold the whipped cream gently into the cream cheese mixture using a spatula.
- If using mascarpone, add it at this stage and fold again.
The filling should be light and airy but thick enough to hold its shape.
- Spread the cheesecake filling evenly over the chilled crust.
- Smooth the top with a spatula.
Place the pan in the refrigerator for at least 1 hour before adding the cherry topping.
3. Prepare the Cherry Topping
⭐ If using
canned cherry topping:
Simply open, stir gently, and pour evenly over the cheesecake layer.
⭐ If making
homemade cherry topping:
- Place cherries, sugar, and lemon juice in a saucepan.
- Heat over medium flame, stirring occasionally, until cherries release their juices.
- Add the cornstarch-water mixture and stir continuously until the sauce thickens.
- Remove from heat, add vanilla, and let cool completely before topping the cheesecake.
Important: The topping must be cool before spreading it, otherwise it will melt the cheesecake layer.
4. Assemble the Dessert
- Once the cheesecake layer is firm, pour the cherry topping evenly over the surface.
- Spread gently using a spatula so that the cherries remain whole and glossy.
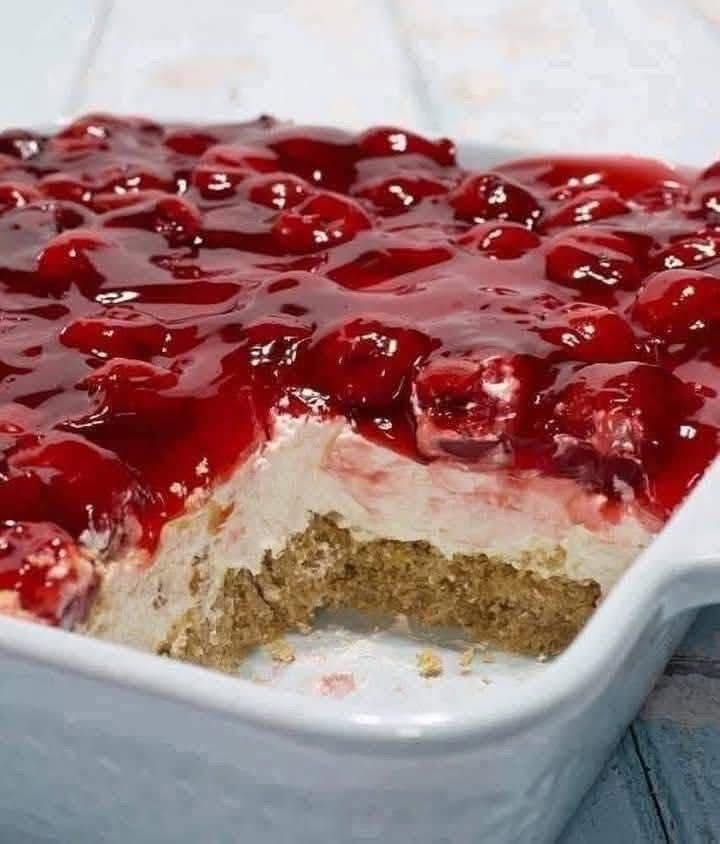
- Cover the pan with plastic wrap and refrigerate for at least 4 hours, but preferably overnight.
Chilling allows the layers to set beautifully and produces clean, sharp slices like the dessert in your picture.
✨ Serving and Slicing
- Dip a sharp knife in hot water, wipe it dry, and cut straight down through the layers.
- Clean the knife between cuts for perfect edges.
- Serve cold for best texture.
This dessert slices beautifully into squares or rectangles.
It can be served plain, or with:
- whipped cream
- extra cherries
- a drizzle of cherry syrup
- white chocolate curls
✨ Tips for the Perfect Cheesecake Bars
- Use full-fat cream cheese — low-fat versions produce a loose filling.
- Whip the cream until stiff peaks — this gives the dessert structure.
- Chill long enough — the longer it chills, the better it slices.
- Don’t skip the lemon juice — it enhances flavor and stabilizes the filling.
- If the crust seems dry, add 1–2 tablespoons more melted butter.
- For extra firmness, mix 1 teaspoon gelatin into the filling (optional).
✨ Storage
- Keeps 4–5 days in the refrigerator.
- Store covered to prevent the cherry topping from drying.
- Freezing is possible but may slightly change the texture of the cherries.