Ingredients
For the Pie Crust
- 2 ½ cups all-purpose flour
- 1 tablespoon sugar
- 1 teaspoon salt
- 1 cup cold unsalted butter (cut into cubes)
- 6–8 tablespoons ice water
For the Apple Filling
- 6–7 large apples (Granny Smith, Honeycrisp, or Fuji)
- ¾ cup granulated sugar
- ¼ cup brown sugar
- 2 tablespoons all-purpose flour
- 1 teaspoon ground cinnamon
- ¼ teaspoon nutmeg
- ¼ teaspoon salt
- 1 tablespoon lemon juice
- 1 teaspoon vanilla extract
- 2 tablespoons butter
For the Topping
- 1 egg (for egg wash)
- 1 tablespoon milk
- 2 tablespoons coarse sugar (optional)
Choosing the Best Apples
The key to a great apple pie is selecting the right apples. Not all apples behave the same during baking. Some become too soft, while others hold their shape and provide the perfect texture.
The best apples for skillet pie include:
Granny Smith – Tart flavor balances the sweetness of the filling.
Honeycrisp – Crisp texture and natural sweetness.
Fuji – Sweet and juicy with excellent structure.
Braeburn – Slightly spicy flavor that works beautifully with cinnamon.
Many bakers prefer to mix two varieties to create a more complex flavor.
Step 1: Prepare the Pie Dough
In a large mixing bowl, combine flour, sugar, and salt. Mix them together until evenly distributed.
Add the cold butter cubes to the flour mixture. Using a pastry cutter or your fingertips, work the butter into the flour until the mixture resembles coarse crumbs with pea-sized butter pieces.
The small chunks of butter are important because they create the flaky layers that make pie crust so delicious.
Gradually add ice water one tablespoon at a time, gently mixing until the dough just begins to come together.
Do not overwork the dough.
Once the dough holds together, divide it into two portions. Flatten each portion into a disk, wrap in plastic wrap, and refrigerate for at least 30 minutes.
This chilling step relaxes the gluten and makes the dough easier to roll.
Step 2: Prepare the Apple Filling
Peel, core, and slice the apples into thin slices about ¼ inch thick.
Place the sliced apples into a large bowl.
Add the following ingredients:
- Granulated sugar
- Brown sugar
- Flour
- Cinnamon
- Nutmeg
- Salt
- Lemon juice
- Vanilla extract
Mix everything gently until the apples are evenly coated.
The flour helps thicken the juices as the pie bakes, preventing the filling from becoming too watery.
Let the apple mixture sit for about 10 minutes so the flavors begin to combine.
Step 3: Prepare the Cast Iron Skillet
Using a 10-inch cast iron skillet, lightly grease the inside with butter.
A cast iron skillet is ideal for baking pies because it retains heat extremely well. This helps cook the bottom crust evenly and prevents a soggy base.
Preheat your oven to 375°F (190°C).
Step 4: Roll the Bottom Crust
Remove one dough disk from the refrigerator.
On a lightly floured surface, roll the dough into a circle about 12 inches wide.
Carefully place the rolled dough into the cast iron skillet, pressing it gently into the bottom and sides.
Trim any excess dough that hangs over the edges.
Step 5: Add the Apple Filling
Pour the apple mixture into the crust-lined skillet.
Spread the apples evenly so they form a smooth layer.
Dot the top of the apples with small pieces of butter. This adds richness and helps create a slightly caramelized filling.
Step 6: Roll the Top Crust
Roll the second dough disk into another circle.
Place it over the apples and gently press the edges together with the bottom crust.
You can seal the edges by crimping them with your fingers or pressing with a fork.
Use a knife to cut several small slits in the top crust. These vents allow steam to escape while baking.
Step 7: Egg Wash and Sugar Topping
In a small bowl, whisk together the egg and milk.
Brush the mixture over the top crust. This helps create a shiny, golden finish.
Sprinkle coarse sugar over the crust for extra texture and sweetness.
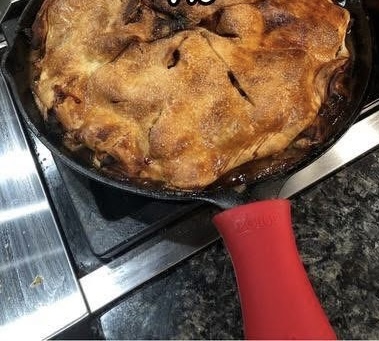
Step 8: Bake the Pie
Place the skillet in the preheated oven.
Bake for 45–55 minutes until:
- The crust is golden brown
- The filling is bubbling through the vents
If the crust begins to brown too quickly, loosely cover the top with aluminum foil.
Step 9: Cooling the Pie
Once baked, remove the skillet from the oven and allow the pie to cool for at least 30 minutes.
Cooling allows the filling to thicken so the slices hold their shape when served.
Serving Suggestions
Iron skillet apple pie is delicious on its own, but it becomes even more special with a few additions.
Serve with:
- Vanilla ice cream
- Fresh whipped cream
- Caramel sauce drizzle
- Cinnamon sugar sprinkle
The contrast between warm pie and cold ice cream is truly irresistible.
Tips for the Perfect Apple Pie
Keep Ingredients Cold
Cold butter is essential for flaky crust.
Use a Mix of Apples
Combining tart and sweet apples improves flavor.
Avoid Overfilling
Too many apples can cause juices to overflow.
Vent the Top Crust
Steam must escape so the crust stays crisp.
Let the Pie Rest
Cutting too soon can make the filling runny.
Variations
Caramel Apple Pie
Add ¼ cup caramel sauce to the apple filling.
Apple Crumble Skillet Pie
Instead of a top crust, add a crumb topping made from butter, flour, sugar, and oats.
Spiced Apple Pie
Add cloves, ginger, or cardamom for deeper spice flavor.
Maple Apple Pie
Replace part of the sugar with maple syrup.
Storage and Reheating
Apple pie stores very well and can be enjoyed for several days.
Room temperature: 2 days (covered).
Refrigerator: up to 5 days.
To reheat:
- Oven: 350°F for 10 minutes
- Microwave: 20–30 seconds
Why Cast Iron Makes a Better Pie
Cast iron skillets provide several advantages when baking pies.
First, they retain heat extremely well, ensuring even cooking throughout the crust.
Second, the heavy pan creates a crisp, golden bottom crust that traditional pie plates sometimes struggle to achieve.
Finally, cast iron gives the pie a rustic presentation that looks beautiful when served directly from the skillet.
Final Thoughts
Iron skillet apple pie is more than just a dessert. It represents warmth, comfort, and the joy of homemade baking.
The combination of flaky crust, tender cinnamon apples, and caramelized juices makes every bite unforgettable.
Whether you are baking for family, guests, or simply treating yourself, this classic dessert delivers incredible flavor with a charming rustic style.