In the pantheon of home baking, the Chocolate Loaf Cake occupies a unique space. It is more substantial than a delicate sponge, more refined than a standard brownie, and more versatile than a layered celebration cake. While indulgent treats like Gooey Chocolate Lava Cookies provide a quick hit of molten sugar, the loaf cake offers a sustained, deep cocoa experience that transitions perfectly from a morning coffee accompaniment to an elegant dinner finale.
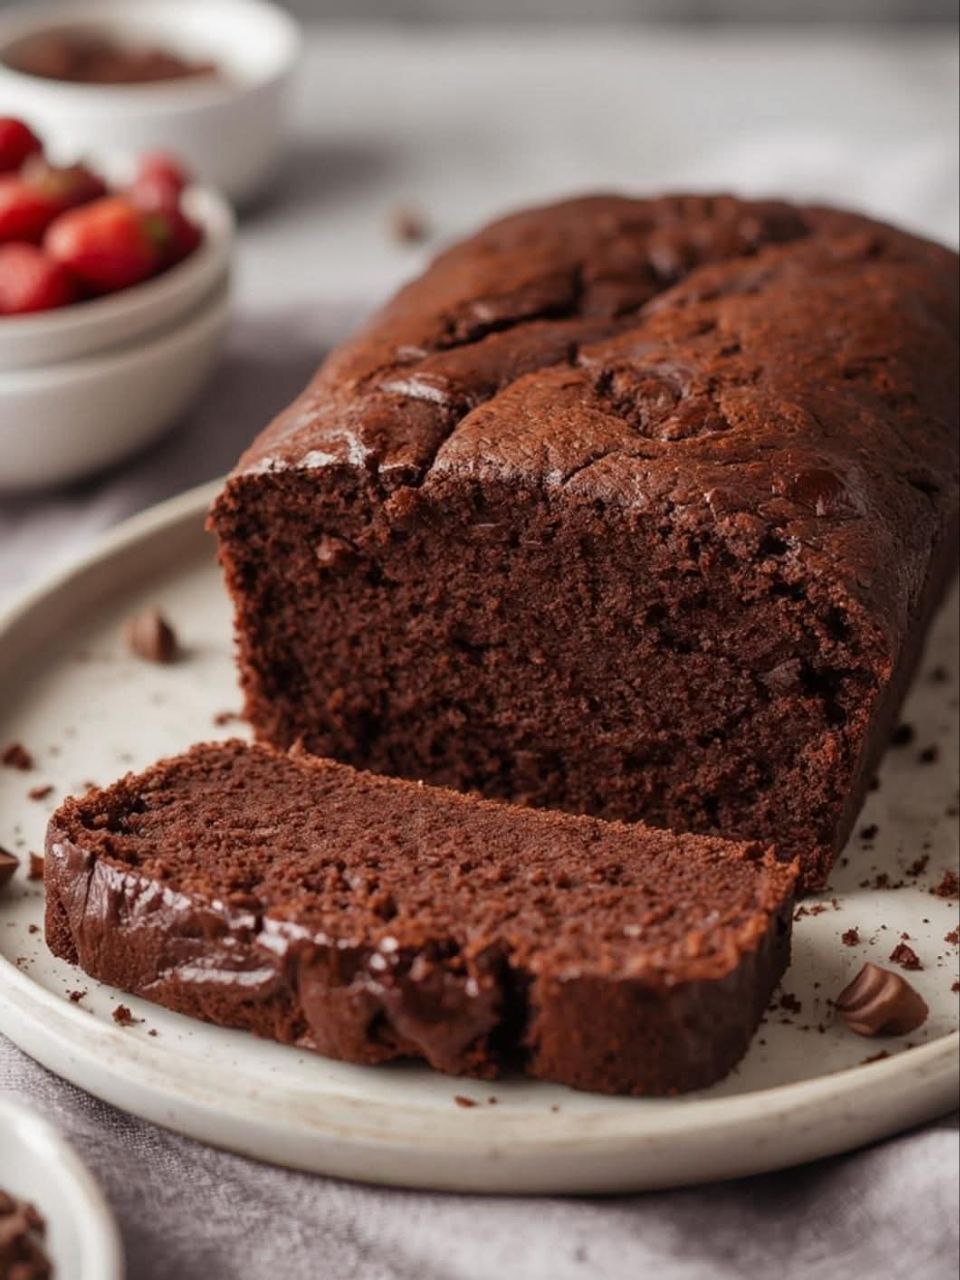
The featured image showcases a masterfully executed loaf, boasting a high, proud rise and a moist, tight crumb that promises a “melt-in-your-mouth” texture. Resting on a minimalist ceramic plate and flanked by fresh strawberries, this cake represents the pinnacle of rustic-chic dessert presentation.
1. Visual Anatomy: Indicators of a Superior Bake
Achieving the specific look and feel of the cake in the photograph requires attention to the fine details of the “crumb” and the “crust”:
The Structural “Bloom”
- The Central Fissure: Notice the deep, natural crack running down the center of the loaf. This is not a flaw; it is the sign of a strong “oven spring”. As the batter heats from the outside in, the center remains liquid the longest, eventually pushing through the set crust to create this beautiful, artisanal bloom.
- Matte Sheen: The exterior has a slightly glossy, almost tacky appearance in spots, suggesting the presence of high-quality fats (like butter or oil) and a hint of melted chocolate chips within the batter.
The Internal Crumb Texture
- Uniform Aeration: Looking at the cut slice, you can see a dense but well-aerated structure. Unlike a light chiffon, this loaf has smaller, tighter air pockets, which helps it hold its shape and gives it a satisfying weight on the palate.
- Moisture Gradient: The crumb appears remarkably dark and “tight,” which is a visual indicator of high moisture content. This is often achieved through the use of sour cream, buttermilk, or even a touch of coffee to bloom the cocoa.
2. Technical Execution: Mastering the Loaf
To recreate the professional results shown, one must navigate three critical phases of the baking process:
Phase 1: The Flavor Foundation
A great chocolate loaf relies on the “Bloom” technique. Before adding dry ingredients, whisk your cocoa powder into hot liquid (like boiling water or hot coffee). This releases the essential oils trapped in the cocoa, resulting in a deeper, more complex flavor profile than simply whisking it in with the flour.
Phase 2: Emulsification
The secret to the velvety slice seen in the photo is the emulsion of fats and sugars. If using butter, it must be creamed with sugar until the mixture is pale and voluminous. If using oil, it must be whisked thoroughly with the eggs to create a stable base that won’t separate during the long bake time required for a loaf pan.
Phase 3: The Slow Bake
Loaf cakes are notorious for being dry on the outside and raw in the middle. To prevent this, bake at a slightly lower temperature (approx. 160°C – 175°C) for a longer duration. This allows the heat to penetrate the dense center without scorching the edges.
3. Strategic Menu Pairings
Because this cake is intensely chocolate-forward and rich in fat, it benefits from pairings that offer acidity or “freshness”:
The Fruit Contrast
- Strawberries and Raspberries: As suggested by the garnish in the image, fresh red berries provide a tartness that cuts through the cocoa’s bitterness.
- Citrus Accents: A thin glaze made from lemon juice or orange zest (similar to the bright notes in the Garlic Lemon Chicken) can elevate the chocolate to a more sophisticated “adult” dessert.
The Beverage Companion
- Unsweetened Espresso: The roasted notes of coffee amplify the earthy qualities of the chocolate.
- Whipped Cream: A dollop of unsweetened, cold whipped cream provides a thermal and textural contrast to a room-temperature or slightly warmed slice.
4. FAQ: Perfecting the Loaf
Why does my cake always sink in the middle? This is usually caused by opening the oven door too early. The sudden drop in temperature causes the delicate air bubbles to collapse before the structure is set. Another culprit is over-leavening; too much baking powder creates a “balloon” that pops and sinks.
How do I get that perfect “clean” slice? For the precise edges seen in the photo, you must wait for the cake to cool completely. Slicing a warm chocolate loaf will cause the delicate crumb to tear and the internal chocolate chips to smear.
Can I add inclusions? Absolutely. The visual texture of this loaf suggests it could easily accommodate toasted walnuts, sea salt flakes, or even a swirl of peanut butter.
5. Photography Analysis: Creating “Dessert Drama”
The image uses Soft Side-Lighting and a Neutral Palette to make the chocolate the absolute hero:
- The Plate Choice: The off-white, speckled ceramic plate mirrors the rustic nature of a loaf cake while providing a clean background that allows the dark brown cake to “pop”.
- Macro Focus on the Slice: By pulling a single slice forward, the photographer invites the viewer to inspect the texture, making the experience feel tactile and “cravable”.
- Color Pop: The vibrant red of the strawberries in the background provides the only “warm” color aside from the cake, drawing the eye toward the plate and signaling that this is a fresh, fruit-friendly dessert.