In the hierarchy of baked goods, few treats command as much immediate attention as the Gooey Chocolate Lava Cookie. While classic comfort foods like Crockpot Beef Tips with Mushrooms or Cheesy Potato Patties satisfy a savory craving, the lava cookie is a deliberate indulgence designed to play with temperature, texture, and intensity.
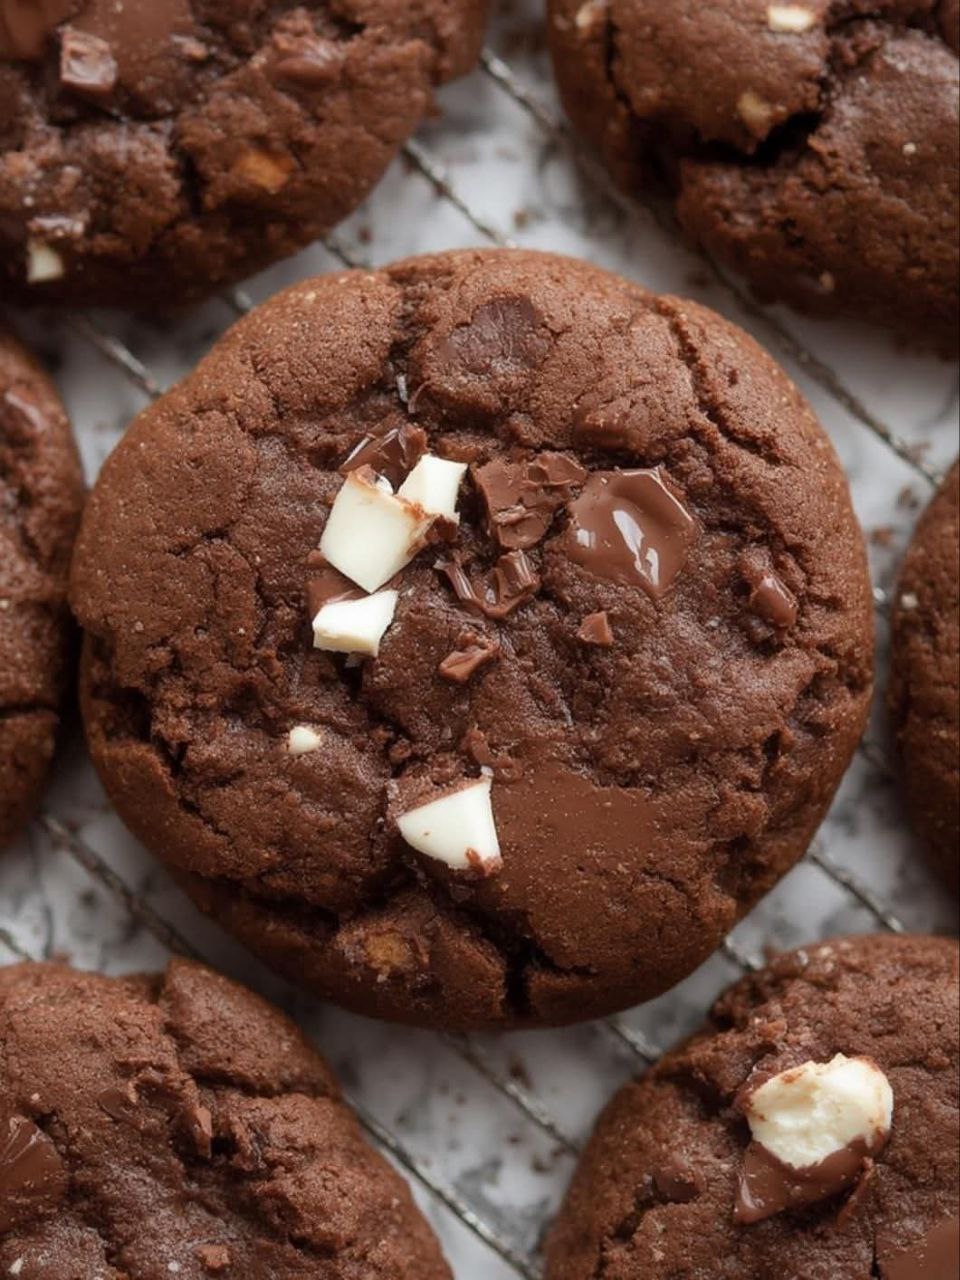
The featured image showcases a collection of thick, fudgy cookies resting on a wire cooling rack. They are characterized by a matte, cocoa-rich exterior and a “molten” heart signaled by large, shimmering pools of semi-melted dark chocolate and contrasting chunks of white chocolate.
1. Visual Anatomy: The Markers of a “Gooey” Center
A superior chocolate lava cookie is defined by the tension between its structural edges and its liquid core:
The Fudgy Exterior
- Deep Cocoa Hue: The cookie base exhibits a dark, uniform brown color, suggesting a high percentage of Dutch-processed cocoa powder. This provides the bitter backbone necessary to balance the sweetness of the inclusions.
- Crinkle Top: Fine cracks on the surface indicate a “fudgy” rather than “cakey” crumb. These cracks allow the internal steam to escape while providing a delicate crunch that contrasts with the interior.
The Inclusion Strategy
- Mixed-Media Chocolate: The use of both white chocolate chunks and dark chocolate chips creates a visual and flavor contrast. The white chocolate pieces remain largely intact and creamy, while the dark chocolate melts into “lava” pools.
- The “Pool” Effect: In the center of the main cookie, a large dark chocolate chunk has collapsed into a glossy liquid state. This is the visual promise of the “lava” experience.
2. Technical Execution: Mastering the Underbake
Achieving the texture seen in the photo requires a fundamental departure from traditional cookie baking:
The Chilled Dough Technique
To ensure the cookies remain thick and don’t spread into flat wafers, the dough must be chilled for at least 2–4 hours (or overnight) before baking. This solidifies the fats, ensuring the edges set while the center remains undercooked and gooey.
Precision Timing
- The “Set” Edge: The cookies are removed from the oven when the edges are firm to the touch but the centers still look slightly “wet” or unstable.
- Carry-Over Cooking: As the cookies sit on the wire rack, the residual heat from the baking sheet finishes the cooking process just enough to make the center safe to eat while maintaining a molten consistency.
3. Flavor Complexity: Beyond Basic Sugar
While the Strawberry Cream Pie relies on fruit acidity, these lava cookies use minerals and fats to create depth:
- Salt Amplification: If you look closely at the surface, there is a subtle sparkle that suggests the use of sea salt flakes. Salt is the “secret weapon” in chocolate baking, as it suppresses bitterness and enhances the perception of sweetness.
- The Fat Ratio: To achieve the sheen seen on the chocolate pools, a high-fat European-style butter is often used. This contributes to the “melt-in-your-mouth” quality of the crumb.
- Vanilla Depth: A heavy hand of pure vanilla extract or vanilla bean paste provides a floral aromatic that rounds out the intense cocoa notes.
4. Strategic Menu Pairings: The Dessert Finale
To elevate these cookies into a full dessert course, consider pairings that offer temperature or flavor contrast:
The Dairy Counterpart
- Cold Whole Milk: The classic pairing. The cold, neutral fat of the milk cleanses the palate after the heavy, warm chocolate.
- Bourbon Vanilla Ice Cream: Serving a warm cookie with a scoop of premium ice cream mimics the “lava cake” experience found in high-end restaurants.
The Berry Contrast
- Fresh Raspberries: Much like the strawberries used in the Creamy Shrimp Salad or the Fruit Tart, the tartness of berries cuts through the richness of the dark chocolate lava.
5. FAQ: Troubleshooting the Lava Cookie
Why did my cookies spread too thin? Your butter was likely too soft when you started, or you skipped the chilling step. For the tall, thick profile shown, the dough must be cold when it enters the hot oven.
How do I get the chocolate pools on top? Don’t mix all your chocolate into the dough. Reserve about 20% of your chocolate chunks and press them into the top of the dough balls immediately before baking.
Can I freeze the dough? Yes! In fact, baking these cookies from frozen is the best way to ensure the center stays “lava-like” while the outside gets a perfect crust. Simply add 1–2 minutes to your bake time.
6. Photography Analysis: The “Baker’s Rack” Aesthetic
The photography of this dish uses Macro Focus and Natural Textures to emphasize the artisan quality of the bake:
- The Wire Rack: Placing the cookies on a cooling rack rather than a plate suggests they are “fresh from the oven,” tapping into a sense of warmth and anticipation.
- Top-Down Detail: The camera angle allows the viewer to see the varying textures—the matte cookie dough vs. the shiny, liquid chocolate.
- Repetition of Form: Showing multiple cookies in the frame creates a sense of abundance, making the viewer feel as though they are standing in a professional bakery.