Ingredients
For the Cake Layers:
- 3 eggs
- 150 g sugar (¾ cup)
- 80 g butter
- 3 tablespoons honey
- 1 teaspoon baking soda
- 400–450 g flour (3 to 3½ cups)
For the Cream Filling:
- 700 ml milk
- 3 tablespoons flour
- 2 tablespoons cornstarch
- 150 g sugar
- 2 egg yolks
- 200 g butter (softened)
- 1 teaspoon vanilla extract
For the Crunchy Coating:
- 150 g crushed cake crumbs (from baked scraps)
- 100 g crushed nuts (walnuts or peanuts)
- Optional: caramel sauce drizzle
Step 1: Prepare the Dough Base
In a heatproof bowl, combine:
- Eggs
- Sugar
- Butter
- Honey
Place the bowl over a water bath (double boiler method). Stir continuously until the mixture becomes smooth and slightly foamy.
Add baking soda and keep stirring. You’ll notice the mixture expands slightly and turns lighter—this is normal.
Remove from heat and gradually add flour. Mix until a soft dough forms. It should be:
- Soft
- Slightly sticky
- Easy to handle
Wrap the dough and let it rest for 20–30 minutes.
Step 2: Shape and Bake the Layers
Divide the dough into 6–8 equal portions.
Roll each portion thin (about 2–3 mm thick) into circles. You can use a plate or pan as a guide for perfect round shapes.
Place each layer on parchment paper and bake in a preheated oven at 180°C (350°F) for about 5–7 minutes, until golden.
👉 Important:
- Bake quickly; these layers cook fast
- Save all trimmings—they’ll be used for the crunchy coating
Let all layers cool completely before assembling.
Step 3: Prepare the Cream
In a saucepan, mix:
- Milk
- Sugar
- Egg yolks
- Flour
- Cornstarch
Whisk until smooth.
Cook over medium heat, stirring constantly until thickened into a custard.
Once thick:
- Remove from heat
- Let it cool completely
In another bowl, beat softened butter until creamy. Gradually add the cooled custard while mixing.
Add vanilla extract and continue beating until smooth and fluffy.
Step 4: Assemble the Cake
Place the first cake layer on a serving plate.
Spread a generous layer of cream evenly.
Repeat:
- Cake layer
- Cream
- Cake layer
Continue until all layers are stacked.
Spread cream over the top and sides of the cake.
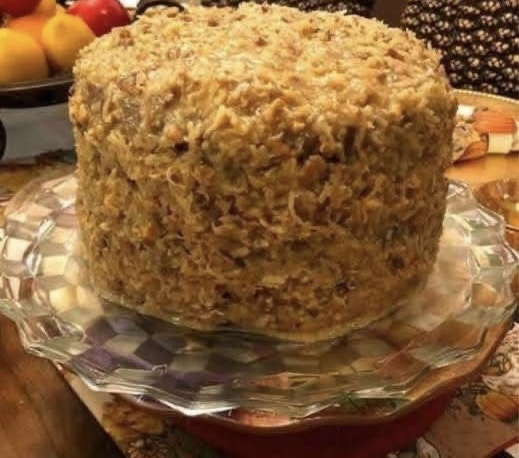
Step 5: Prepare the Crunchy Coating
Take the leftover baked scraps and crush them finely.
Mix with crushed nuts (walnuts or peanuts work best).
Press this mixture gently onto the sides and top of the cake until fully covered.
Optional:
- Drizzle light caramel sauce for extra flavor
Step 6: Resting Time (Very Important)
Refrigerate the cake for at least 6–8 hours (overnight is best).
This allows:
- Layers to soften
- Cream to absorb
- Flavors to blend perfectly
Step 7: Serving
Slice with a sharp knife.
You’ll see:
- Beautiful thin layers
- Soft creamy filling
- Crunchy outer coating
Serve chilled or slightly softened at room temperature.
Tips for Success
1. Roll Thin Layers
The thinner the layers, the more delicate and professional your cake will look.
2. Don’t Skip Rest Time
This cake is MUCH better the next day.
3. Balance Sweetness
If you prefer less sweet:
- Reduce sugar slightly in cream
- Use less caramel
4. Even Cream Distribution
Spread evenly to avoid uneven layers.
Flavor Variations
You can customize this cake easily:
- Chocolate Version: Add cocoa powder to cream
- Coffee Flavor: Add instant coffee to cream
- Nutty Boost: Add ground almonds or hazelnuts
- Fruit Twist: Add thin banana or berry layers
Storage
- Keep refrigerated up to 4–5 days
- Cover well to avoid drying
- Do not freeze after assembly (cream may separate)
Final Result
You’ll get a cake that is:
- Soft and melt-in-your-mouth
- Rich and creamy
- Slightly crunchy outside
- Beautifully layered
It’s a bakery-style cake made at home with simple ingredients.