Ingredients You’ll Need
Strawberry Layer (Pink)
- 4 cups milk
- 3 tablespoons cornstarch
- 3 tablespoons sugar
- 1 packet strawberry jelly powder (or strawberry pudding mix)
- 1 tablespoon butter
- ½ teaspoon vanilla
Vanilla Cream Layer (White)
- 4 cups milk
- 4 tablespoons cornstarch
- 4 tablespoons sugar
- 1 teaspoon vanilla extract
- 2 tablespoons butter
- ½ cup heavy cream (optional but makes it richer)
Topping
- Cocoa powder or chocolate shavings
OR - Crushed biscuits
OR - Coconut flakes
## Tools You’ll Need
Nothing fancy here.
Just:
- Saucepan
- Whisk
- Spatula
- 9×13 inch glass dish (or similar)
- Refrigerator
That’s it. Super beginner-friendly.
## Step 1 – Making the Strawberry Layer
This is your colorful base layer.
In a saucepan, add:
- Milk
- Cornstarch
- Sugar
- Strawberry powder
Whisk BEFORE turning on heat.
This prevents lumps.
Now cook on medium heat while stirring constantly.
After 5–7 minutes, it thickens like pudding.
You’ll notice:
✔ Glossy texture
✔ Smooth
✔ Creamy
✔ Thick but pourable
Turn off heat.
Add:
- Butter
- Vanilla
Stir until melted.
The smell? Sweet strawberry candy vibes 🍓
## Step 2 – Pour and Chill the First Layer
Immediately pour into your dish.
Spread evenly using a spatula.
Tap the dish lightly to remove air bubbles.
Now refrigerate for 20–30 minutes.
Important:
It must be semi-set before adding next layer.
Not fully hard.
Just firm enough to hold weight.
If you pour too early → layers mix.
We want clean layers, not marble chaos 😄
## Step 3 – Making the Vanilla Cream Layer
While the first layer chills, prepare the white layer.
In a clean saucepan add:
- Milk
- Cornstarch
- Sugar
Whisk cold first again.
Cook over medium heat.
Stir constantly until thick.
When pudding consistency appears:
Add:
- Butter
- Vanilla
- Heavy cream
Mix well.
This layer tastes like custard + whipped cream + cheesecake filling.
Super smooth and luxurious.
Honestly… you’ll want to eat it straight from the pan.
(No judgment if you sneak a spoon 😂)
## Step 4 – Layering Time
Remove dish from fridge.
Check texture:
Touch gently.
If it jiggles but doesn’t stick to finger → perfect.
Now slowly pour vanilla mixture on top.
Tip:
Pour over a spoon or spatula so it doesn’t break the strawberry layer.
Spread evenly.
Look at those clean lines forming… so satisfying.
## Step 5 – Chill Until Set
Return to fridge.
Chill at least:
- 3–4 hours
OR - overnight (best result)
The longer it chills, the cleaner the slices.
Patience here pays off BIG time.
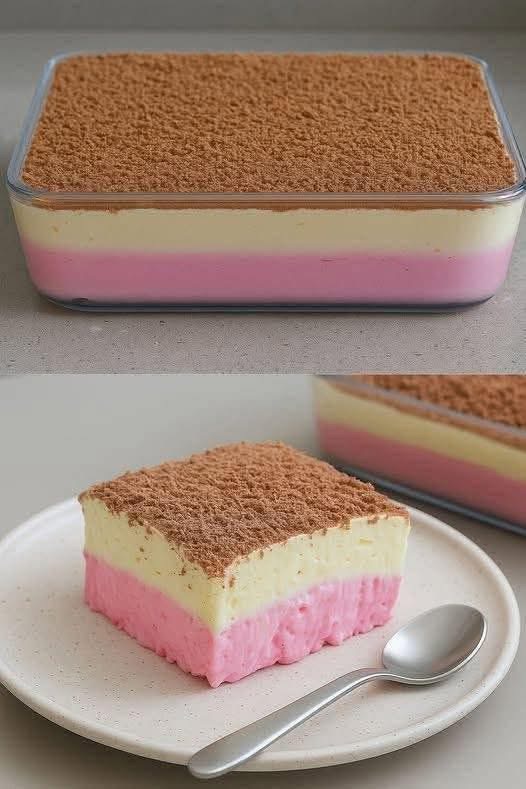
## Step 6 – Add the Topping
Before serving, dust cocoa powder on top.
Use a sieve for even finish.
Why cocoa?
Because:
- Slight bitterness balances sweetness
- Adds chocolate aroma
- Looks elegant and bakery style
You can also try:
- Grated chocolate
- Crushed Oreos
- Coconut
- Nuts
- Caramel drizzle
Get creative.
## How to Slice Perfect Squares
Here’s the trick:
Use a sharp knife.
Dip in hot water → wipe → cut.
Repeat each slice.
Result?
Clean Instagram-perfect squares.
No messy edges.
Super professional look.
## Texture & Taste Description
Let me paint the vibe:
Top → light cocoa dust
Middle → silky vanilla cream
Bottom → fruity strawberry pudding
When you bite:
Soft
Cold
Creamy
Melt-in-mouth
Lightly sweet
Refreshing
It’s like pudding + mousse + custard combined.
Not heavy like cake.
Not dense like cheesecake.
Just smooth heaven.
## Flavor Variations You Can Try
Once you master this recipe, you can switch flavors easily.
Chocolate Version
Replace strawberry with cocoa powder or chocolate pudding
Mango Version
Use mango jelly + puree
Coffee Version
Add instant coffee to vanilla layer
Coconut Version
Use coconut milk + flakes
Oreo Version
Add crushed cookies between layers
So many possibilities. Same method. Endless fun.
## Storage Tips
Fridge
Store covered → up to 4 days
Freezer
Can freeze 1 month (texture slightly firmer)
Serve cold always
This dessert is best straight from fridge.
Warm = too soft.
Cold = perfect creamy bite.
## Common Mistakes to Avoid
Let’s save you headaches:
❌ Not whisking cornstarch well
→ lumps form
❌ Pouring layers too hot
→ mixing
❌ Not chilling enough
→ messy slices
❌ Too much sugar
→ overly sweet
Follow steps and you’ll get bakery quality.
## When to Serve This Dessert
Perfect for:
- Family gatherings
- Ramadan desserts
- Summer parties
- Kids birthdays
- Potlucks
- Late night sweet cravings
It’s light enough after heavy meals too.
Everyone always asks:
“Who made this??”
That’s your moment 😎
## Final Thoughts
This no-bake layered strawberry vanilla dessert is one of those recipes that looks impressive but secretly takes very little effort.