The Ultimate Creamy Chocolate Dessert Bar
If you love chocolate desserts that are rich, silky, and melt in your mouth, this recipe will instantly become your favorite. These chocolate custard cream bars combine three irresistible layers: a deep cocoa biscuit base, a thick and creamy vanilla custard center, and a smooth glossy chocolate ganache topping.
Each bite gives you contrast and harmony at the same time. The bottom layer is firm and slightly crunchy, the middle is soft and velvety, and the top is smooth, chocolatey, and luxurious.
What makes this dessert even better is how simple it is. No complicated techniques. No fancy equipment. No baking required.
Just layer, chill, slice, and enjoy.
Perfect for:
- family gatherings
- Eid and holiday tables
- birthdays
- potlucks
- or midnight chocolate cravings
Trust me… everyone will ask you for the recipe.
🍪 Why You’ll Love This Recipe
There are hundreds of chocolate desserts out there, but this one hits different.
Here’s why:
- No oven needed
- Simple ingredients
- Super creamy texture
- Rich chocolate flavor
- Easy to slice clean squares
- Make-ahead friendly
- Looks bakery-quality
It tastes like something you’d buy at an expensive café, but you make it at home with basic ingredients.
🧺 Ingredients You’ll Need
Chocolate Base Layer
- 250 g chocolate biscuits (or digestive biscuits)
- 2 tablespoons cocoa powder
- 120 g melted butter
Creamy Custard Filling
- 3 cups milk
- 1/2 cup sugar
- 1/3 cup cornstarch
- 3 egg yolks
- 1 tablespoon vanilla extract
- 2 tablespoons butter
Chocolate Ganache Topping
- 200 g dark or milk chocolate
- 1/2 cup heavy cream
Optional extras:
- pinch of salt
- coffee powder (enhances chocolate flavor)
- crushed nuts
- coconut flakes
🍫 Step 1 – Make the Chocolate Biscuit Base
This base gives structure and a deep chocolate taste that balances the sweetness of the custard.
Start by crushing the biscuits. You can use:
- food processor
or - place biscuits in a plastic bag and crush with a rolling pin
You want fine crumbs, like sand.
Transfer to a bowl and mix with cocoa powder.
Pour melted butter over the crumbs and mix until the texture feels like wet sand. When you press it together, it should hold its shape.
Press this mixture firmly into a lined square pan (8×8 or 9×9 inches).
Use the back of a spoon or glass to flatten evenly.
Place in fridge for 20 minutes to set.
This chilling step makes the base strong and compact.
🥛 Step 2 – Prepare the Silky Custard Filling
This is the heart of the dessert.
Creamy, smooth, rich, and lightly sweet.
In a saucepan, whisk together:
- milk
- sugar
- cornstarch
- egg yolks
Whisk very well so there are no lumps.
Cook over medium heat, stirring constantly.
Important: do not stop stirring or it may stick or burn.
After 5–7 minutes, the mixture will thicken like pudding.
Once thick and smooth, remove from heat.
Add:
- butter
- vanilla
Stir until glossy and creamy.
Let it cool slightly for 5 minutes.
🥄 Step 3 – Layer the Custard
Take your chilled biscuit base from the fridge.
Pour the warm custard on top.
Spread evenly with a spatula.
Tap the pan gently to remove air bubbles.
Return to fridge for at least 1 hour until completely set.
This step is key. The custard must be firm before adding chocolate on top.
🍫 Step 4 – Make the Chocolate Ganache
Now for the best part… the chocolate blanket 😍
Heat the cream in a small saucepan until just hot (not boiling).
Pour over chopped chocolate in a bowl.
Let sit for 2 minutes.
Then stir slowly until smooth and shiny.
You’ll get a silky chocolate sauce.
Optional: add a pinch of salt or coffee powder for deeper flavor.
✨ Step 5 – Add the Final Chocolate Layer
Pour the ganache over the chilled custard.
Spread gently to cover everything.
Tilt the pan for a smooth finish.
Return to fridge for 1–2 hours until fully set.
Patience is hard here… but worth it 😄
🔪 Step 6 – Slice Perfect Bars
Once firm, remove from pan using parchment paper.
For clean slices:
- use a sharp knife
- wipe knife between cuts
- cut slowly
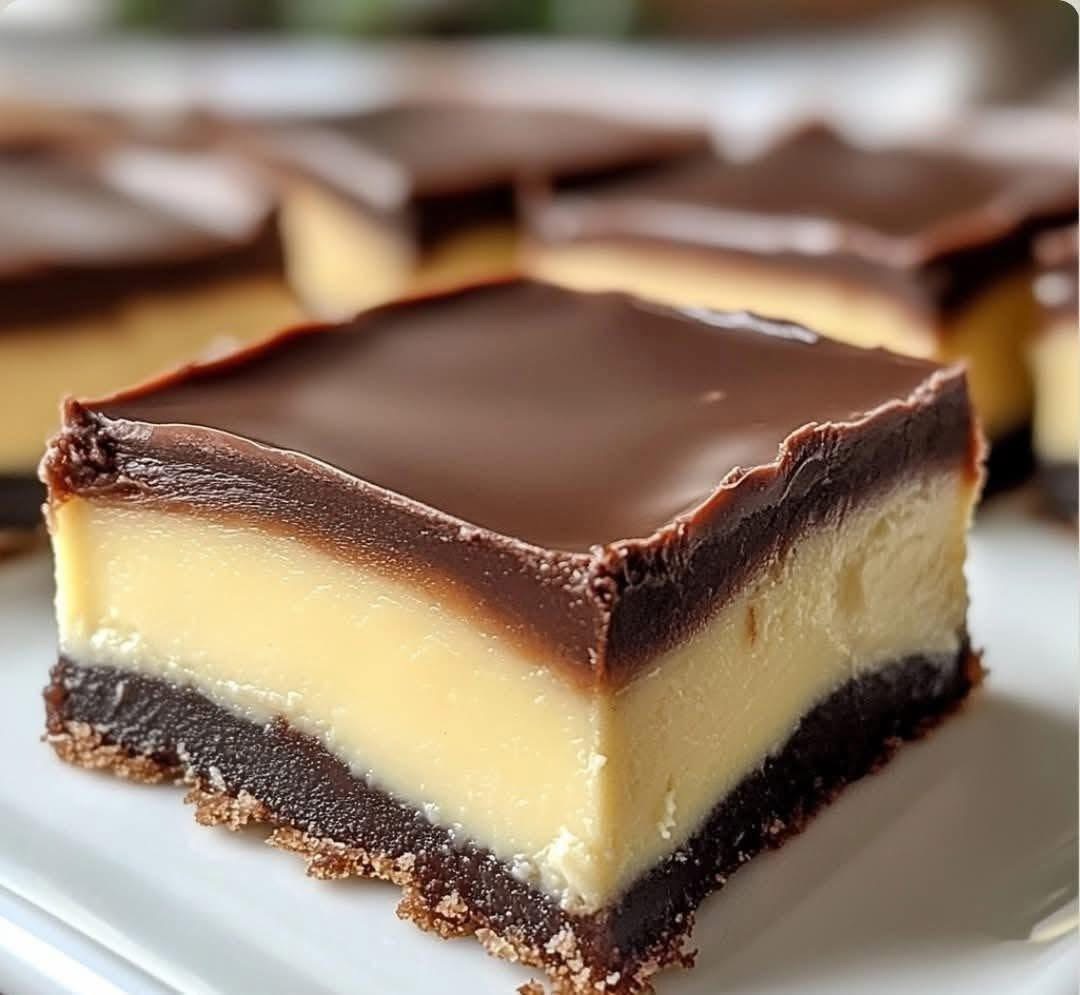
You’ll see those beautiful three layers:
dark base
creamy center
glossy chocolate top
Super satisfying.
😍 Texture & Flavor
This dessert is a dream combination:
Bottom → slightly crunchy, chocolatey
Middle → creamy, custard-like, smooth
Top → rich, melt-in-mouth chocolate
It’s not too sweet, not too heavy, just perfectly balanced.
Cold from the fridge = even better.
🍽 Serving Ideas
Serve:
- chilled squares
- with coffee or tea
- with fresh berries
- dusted with cocoa
- drizzled with caramel
- topped with whipped cream
They also look stunning on dessert platters.
🧠 Pro Tips for Best Results
Use good chocolate
Better chocolate = better taste
Chill between layers
Never rush or layers will mix
Stir custard constantly
Prevents lumps
Line your pan
Makes removal easy
Let fully set
For perfect clean cuts
🔄 Fun Variations
Want to change it up?
Try:
Peanut butter version
Add peanut butter to custard
Mocha version
Add coffee powder
Coconut version
Add coconut flakes to base
White chocolate top
Swap ganache for white chocolate
Oreo base
Use Oreo cookies instead of plain biscuits
No egg option
Replace eggs with extra cornstarch
❄️ Storage Tips
Keep in fridge in airtight container.
Stays fresh for:
- 4–5 days refrigerated
Can also freeze:
- up to 2 months
Eat cold or slightly softened.
❤️ Final Thoughts
This dessert is proof that simple recipes can taste luxurious.
It looks fancy.
It tastes amazing.
It’s easy to make.
And honestly… it might become your new favorite chocolate treat.
If you make this once, you’ll make it again and again.