Ingredients
For the biscuit layers
- 24–30 rectangular tea biscuits or digestive biscuits
(Maria, Petit Beurre, Rich Tea, or similar)
For the chocolate mixture
- 2 cups (350g) semi-sweet chocolate chips or chopped chocolate
- 1 cup heavy cream
- ½ cup unsalted butter
- ½ cup sugar
- 2 tablespoons cocoa powder
- 1 teaspoon vanilla extract
- Pinch of salt
Optional extras (highly recommended)
- ½ cup chopped nuts (hazelnuts, almonds, walnuts)
- ½ cup shredded coconut
- mini marshmallows
- crushed cookies
- peanut butter
- caramel drizzle
🧰 Equipment
- Loaf pan or small rectangular dish
- Saucepan
- Spatula
- Parchment paper
- Refrigerator
👩🍳 Step-by-Step Instructions
Step 1 – Prepare the Pan
Line your loaf pan with parchment paper.
Make sure the paper hangs over the edges. This will help you lift the cake out easily later.
Lightly grease if needed.
Set aside.
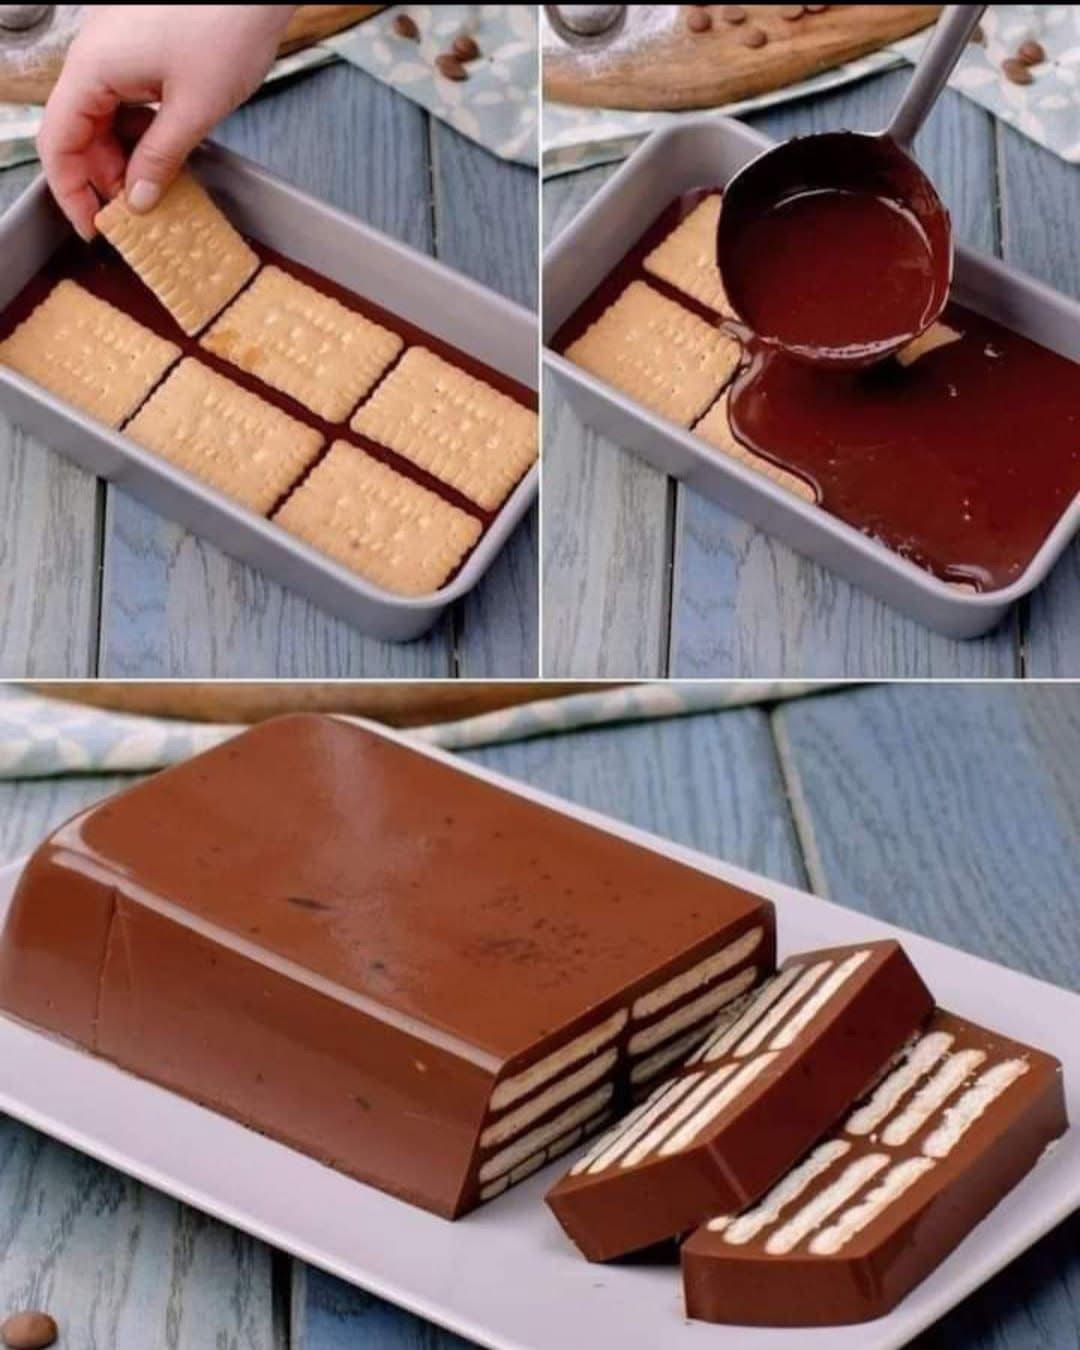
Step 2 – Arrange the First Biscuit Layer
Place biscuits flat in a single layer on the bottom of the pan.
Break some biscuits if needed to fill gaps.
You want a tight layer with no spaces.
This forms the base of your cake.
Step 3 – Make the Chocolate Sauce
In a saucepan over low heat, add:
- heavy cream
- butter
- sugar
Stir gently until butter melts and sugar dissolves.
Do NOT boil.
Once warm, add:
- chocolate
- cocoa powder
- salt
Stir continuously until everything melts into a smooth, glossy chocolate mixture.
Remove from heat.
Add vanilla extract.
Your chocolate should now look thick, silky, and shiny.
Smells amazing already 😍
Step 4 – Layer the Cake
Pour a thin layer of warm chocolate over the biscuits.
Spread evenly using a spatula.
Then add another layer of biscuits.
Press lightly.
Pour more chocolate.
Repeat:
Biscuits → Chocolate → Biscuits → Chocolate
Continue until pan is full.
Finish with a thick chocolate layer on top.
Tap the pan gently on the counter to remove air bubbles.
Optional: sprinkle nuts or coconut on top.
Step 5 – Chill
Cover with plastic wrap.
Refrigerate for at least 3–4 hours.
Overnight is even better.
During this time:
- chocolate hardens
- biscuits soften
- flavors blend together
- texture becomes cake-like
This step is essential. Don’t rush it.
Step 6 – Slice and Serve
Lift cake out using parchment paper.
Place on a cutting board.
Use a sharp knife.
Slice into thick bars or squares.
Look at those beautiful layers!
Each slice should show clear biscuit stripes inside the chocolate.
😋 Taste & Texture
This dessert is:
✔ Rich and chocolatey
✔ Smooth and creamy
✔ Slightly fudgy
✔ Soft biscuit layers
✔ Not too sweet
✔ Perfect with coffee or tea
The biscuits absorb some chocolate and become tender, almost like cake. The outside stays firm and glossy like fudge.
It’s the perfect balance.
🍽 Serving Ideas
Serve:
- chilled straight from fridge
- with whipped cream
- with vanilla ice cream
- with fresh berries
- with coffee or espresso
- drizzled with caramel or chocolate syrup
It also makes a great lunchbox treat.
🧊 Storage
Fridge
Store covered for up to 5 days.
Freezer
Freeze slices individually for up to 2 months.
Thaw 10 minutes before eating.
Tastes like chocolate ice cream cake when frozen!
🔁 Delicious Variations
🥜 Nutty Version
Add crushed hazelnuts or almonds.
🍪 Cookies & Cream
Use chocolate biscuits + white chocolate.
🥥 Coconut
Add shredded coconut inside layers.
🥜 Peanut Butter
Swirl peanut butter into chocolate mixture.
🍓 Fruity
Add dried cranberries or raisins.
🍫 Triple Chocolate
Mix dark + milk + white chocolate.
💡 Pro Tips
⭐ Use good quality chocolate for best flavor
⭐ Warm chocolate must be pourable but not too hot
⭐ Press layers gently for clean slices
⭐ Chill completely before cutting
⭐ Dip knife in hot water for perfect cuts
❤️ Why Everyone Loves This Recipe
Because it’s:
- No bake
- Beginner friendly
- Budget friendly
- Only 6–7 ingredients
- Kid approved
- Customizable
- Looks impressive
- Always delicious
Honestly… this is one of those desserts that disappears fast at parties.