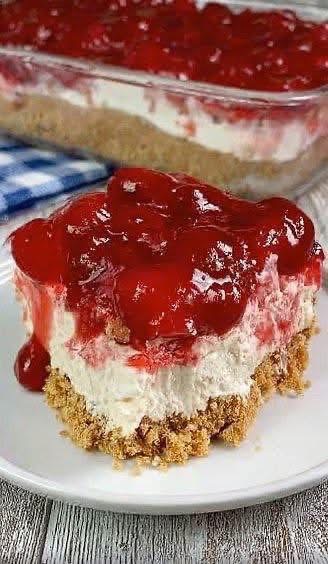
These strawberry cheesecake bars are rich, creamy, and perfectly sweet with a crunchy buttery crust and a bright fruity topping. They’re ideal for parties, family gatherings, or when you just want an easy homemade dessert that looks impressive but takes very little effort.
You don’t need complicated tools or advanced baking skills. If you can mix, press, and chill — you can make this.
🧈 Ingredients
For the crust
- 2 cups graham cracker crumbs (or digestive biscuits, crushed)
- ½ cup melted unsalted butter
- 3 tablespoons sugar
- Pinch of salt
For the cheesecake filling
- 500 g (16 oz) cream cheese, softened
- 1 cup heavy whipping cream (cold)
- ¾ cup powdered sugar
- 1 teaspoon vanilla extract
- 1 tablespoon lemon juice (optional, but adds freshness)
For the strawberry topping
- 2 cups fresh or frozen strawberries, chopped
- ½ cup sugar
- 1 tablespoon lemon juice
- 1 tablespoon cornstarch + 2 tablespoons water
OR - 1 can strawberry pie filling (for quick version)
🥣 Equipment
- 8×8 or 9×9 inch square pan
- Mixing bowls
- Hand mixer or whisk
- Spatula
- Saucepan
- Refrigerator
🍪 Step 1 – Prepare the Crust
The crust gives structure and crunch to balance the creamy filling.
- Crush the biscuits until very fine (sand-like texture).
- In a bowl, mix:
- crumbs
- melted butter
- sugar
- salt
- Stir until the mixture looks like wet sand.
- Press firmly into the bottom of your pan.
- Use a glass or spoon to flatten evenly.
- Chill in the fridge for 20–30 minutes to set.
Tip: Press HARD so the crust doesn’t crumble later.
🧀 Step 2 – Make the Cheesecake Filling
This layer should be light, smooth, and creamy.
- Beat softened cream cheese until smooth and lump-free.
- Add powdered sugar and vanilla.
- Mix until creamy.
- In another bowl, whip cold heavy cream until stiff peaks form.
- Gently fold whipped cream into the cream cheese mixture.
- Add lemon juice if using.
Result: fluffy, silky, mousse-like texture.
Don’t overmix or it becomes dense.
🧁 Step 3 – Assemble the Layers
- Remove crust from fridge.
- Spread cheesecake mixture evenly on top.
- Smooth the surface with a spatula.
- Tap the pan lightly to remove air bubbles.
Place back in the fridge while you prepare the topping.
🍓 Step 4 – Make Strawberry Topping (Homemade)
This adds freshness and beautiful color.
- Add strawberries, sugar, and lemon juice to saucepan.
- Cook over medium heat until strawberries soften and release juice.
- Mix cornstarch + water.
- Add to pan and stir until thick and glossy.
- Cool completely.
Very important: Don’t pour hot topping over cheesecake or it melts.
Quick Shortcut
If you’re in a hurry, just use canned strawberry pie filling. No cooking needed.
🍰 Step 5 – Final Assembly
- Once topping is cool, pour over cheesecake layer.
- Spread gently to cover evenly.
- Refrigerate at least 4–6 hours (overnight is best).
Patience = perfect slices.
🔪 Step 6 – Cutting Perfect Bars
For clean cuts:
- Use a sharp knife
- Wipe knife after each slice
- Cut slowly
You’ll get neat bakery-style squares.
🍽️ Taste & Texture
When done right, you get:
✅ Crunchy buttery crust
✅ Light fluffy cheesecake
✅ Sweet fruity strawberry layer
✅ Perfect sweet-tangy balance
Every bite melts in your mouth with a slight crunch underneath.
Dangerously good 😄
💡 Pro Tips
✔ Use full-fat cream cheese for best flavor
✔ Chill overnight for firm texture
✔ Add gelatin if you want extra stability
✔ Freeze 30 minutes before cutting for sharp edges
✔ Try adding white chocolate drizzle for decoration
🔄 Flavor Variations
You can easily switch things up:
- Blueberry topping
- Raspberry sauce
- Mango puree
- Chocolate ganache
- Oreo crust instead of graham crackers
- Add strawberry pieces inside filling
Same base, endless flavors.
🧊 Storage
- Fridge: up to 4–5 days
- Freezer: up to 2 months
- Cover tightly to prevent drying
Serve cold straight from fridge.
🎉 When to Serve
Perfect for:
- Parties
- Birthdays
- Ramadan desserts
- Summer treats
- Potlucks
- Family dinners
It looks fancy but secretly super easy.