Ingredients You’ll Need
Serves 8–10 slices.
Chocolate Cake
- 1 ¾ cups all-purpose flour
- 3/4 cup cocoa powder
- 1 ½ cups sugar
- 1 teaspoon baking powder
- 1 teaspoon baking soda
- 1/2 teaspoon salt
- 2 eggs
- 1 cup milk
- 1/2 cup oil
- 2 teaspoons vanilla
- 1 cup hot coffee or hot water
Cheesecake Layer
- 500 g cream cheese (softened)
- 3/4 cup sugar
- 2 eggs
- 1/2 cup heavy cream
- 1 teaspoon vanilla
- 1 tablespoon cornstarch
Chocolate Ganache
- 1 cup heavy cream
- 200 g dark or milk chocolate (chopped)
Optional toppings:
- Chocolate crumbs
- Chocolate chips
- Shavings
Simple ingredients → bakery-level dessert.
Why This Cake Is So Special
This cake works because of contrast:
Chocolate cake → soft and fudgy
Cheesecake → thick and creamy
Ganache → smooth and glossy
Three textures in one bite.
It’s like:
Brownie + cheesecake + truffle
Super rich and super satisfying.
One slice feels like a full dessert.
Step 1 – Making the Cheesecake First
Always bake cheesecake layer first.
Preheat oven to 160°C (320°F).
Beat:
- Cream cheese
- Sugar
Until smooth.
Add:
- Eggs
- Cream
- Vanilla
- Cornstarch
Mix gently.
Don’t overmix (avoids cracks).
Pour into lined cake pan.
Bake 35–40 minutes.
Center slightly jiggly is fine.
Cool completely.
Then chill in fridge.
Cold cheesecake is easier to assemble later.
Step 2 – Making the Chocolate Cake
Increase oven to 175°C (350°F).
In bowl mix dry ingredients:
- Flour
- Cocoa
- Sugar
- Baking powder
- Baking soda
- Salt
Add wet ingredients:
- Eggs
- Milk
- Oil
- Vanilla
Mix well.
Then slowly add hot coffee or water.
Batter will be thin.
That’s normal.
Thin batter = moist cake.
Bake in two pans for 25–30 minutes.
Cool completely.
Why Coffee Is Used
Coffee doesn’t make cake taste like coffee.
It enhances chocolate flavor.
Makes it deeper and richer.
If you don’t want coffee, use hot water.
But coffee is highly recommended.
Big difference.
Step 3 – Making the Ganache
Heat cream until steaming.
Pour over chopped chocolate.
Wait 2 minutes.
Stir until smooth.
Silky, glossy, perfect.
Let cool slightly to thicken.
Not too runny.
Not too thick.
Step 4 – Assembling the Cake
Now the fun part 😍
Layer 1
Chocolate cake
Layer 2
Cold cheesecake
Layer 3
Second chocolate cake
Press gently.
Stack carefully.
Looks beautiful already.
Step 5 – Ganache Topping
Pour ganache on top.
Spread gently.
Let it drip down sides naturally.
That drip look = bakery style.
Optional:
Sprinkle crumbs or chocolate chips.
So pretty.
Step 6 – Chilling
Chill cake 30–60 minutes.
This helps:
Set layers
Firm ganache
Slice cleanly
Cold cake = perfect slices.
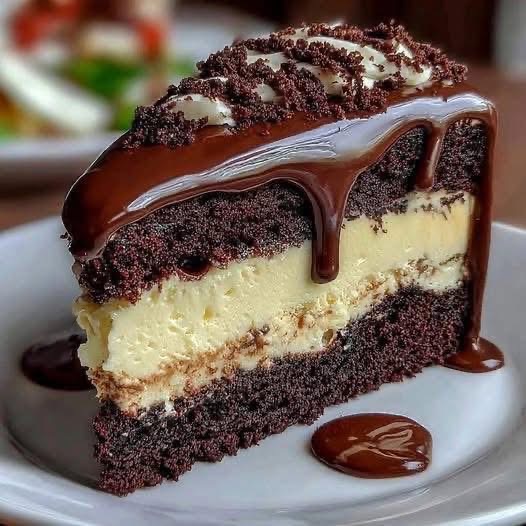
Texture and Taste
When sliced you’ll see:
Top:
Glossy chocolate ganache
Middle:
Thick creamy cheesecake
Outside:
Soft chocolate cake
Flavor:
Deep chocolate + creamy vanilla
Texture:
Fudgy + smooth + rich
Basically heaven.
Chocolate lovers will lose their minds 😂
Serving Ideas
Serve with:
- Coffee
- Tea
- Vanilla ice cream
- Fresh berries
- Extra chocolate drizzle
Or just plain.
It’s already incredible.
Flavor Variations
Want to switch it up?
Oreo cheesecake
Add crushed Oreos
Peanut butter
Add peanut butter swirl
Nutella
Add Nutella layer
Caramel
Add caramel drizzle
White chocolate
Use white ganache
Mocha
Add espresso
Same base, endless fun.
Storage Tips
Fridge:
Up to 5 days
Freezer:
Up to 2 months (slice first)
Serve slightly chilled.
Best texture.
Common Mistakes to Avoid
Overbaking cheesecake
Dry cracks
Overmixing
Too much air
Warm layers
Cake slides
Runny ganache
Too hot
Cutting warm
Messy slices
Take your time for best results.
Why This Recipe Works
Here’s the magic:
Cocoa → rich flavor
Cream cheese → creaminess
Ganache → luxury texture
Layering → perfect balance
Together = bakery masterpiece.
Simple steps, stunning result.
Final Thoughts
This chocolate cheesecake layer cake isn’t just dessert — it’s an event. Rich, creamy, fudgy, and absolutely indulgent, it’s the kind of cake that makes people stop mid-bite and say “wow.” Perfect for special occasions or whenever you want to treat yourself to something unforgettable.