Why This Fried Chicken Is Special
This style of fried chicken:
- Uses thin chicken cutlets (fast cooking, extra crisp)
- Has a seasoned flour coating
- Is fried at the right temperature for crunch without dryness
- Drains properly so it’s not greasy
- Tastes amazing even cold the next day
It’s simple, honest, and deeply satisfying.
Ingredients (Serves 4–6)
Chicken
- 1 kg (2.2 lb) chicken breast or boneless thighs
- Cut into medium cutlets
Marinade (Tenderness & Flavor)
- 2 cups buttermilk
(or milk + 1 tbsp vinegar/lemon juice) - 1 tsp salt
- 1 tsp black pepper
- 1 tsp paprika
- ½ tsp garlic powder
- ½ tsp onion powder
Coating (Crunch Builder)
- 2½ cups all-purpose flour
- 1½ tsp salt
- 1 tsp black pepper
- 1½ tsp paprika
- 1 tsp garlic powder
- 1 tsp onion powder
- ½ tsp cayenne pepper (optional)
Frying
- Vegetable oil / sunflower oil / peanut oil
- Enough for shallow or deep frying
Step 1: Prepare the Chicken Properly
- If using chicken breast, slice each breast horizontally into thinner pieces.
- Aim for even thickness so all pieces cook at the same rate.
- Pat dry lightly with paper towel.
Why this matters:
Thin cutlets cook quickly, preventing the outside from burning before the inside is done.
Step 2: Marinate for Juiciness
- In a large bowl, mix:
- Buttermilk
- Salt
- Pepper
- Paprika
- Garlic powder
- Onion powder
- Add chicken pieces.
- Cover and refrigerate:
- Minimum: 1 hour
- Best: 4–12 hours
Science behind it:
Buttermilk slightly breaks down proteins, making the chicken extra tender and helping the coating stick better.
Step 3: Prepare the Seasoned Flour
In a wide bowl or tray, mix:
- Flour
- Salt
- Pepper
- Paprika
- Garlic powder
- Onion powder
- Cayenne (optional)
Mix thoroughly so spices are evenly distributed.
Pro tip:
Well-seasoned flour is the difference between “crispy” and “wow”.
Step 4: Coat the Chicken (Correct Technique)
- Remove chicken from marinade (do not wipe it dry).
- Place directly into seasoned flour.
- Press firmly so flour sticks into every fold.
- Shake off excess gently.
- For extra crunch, dip back into buttermilk and flour again (double coating).
Why pressing matters:
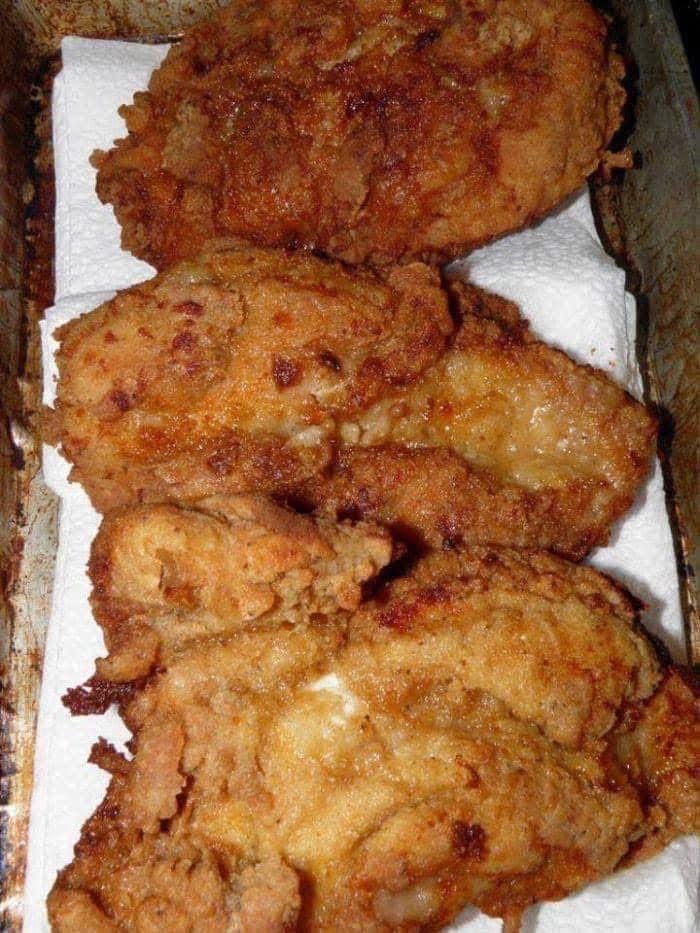
Those uneven clumps become crispy ridges—exactly what you see in the photo.
Step 5: Let the Coating Rest (Very Important)
Place coated chicken on a rack or tray for 10–15 minutes before frying.
This step:
- Hydrates the flour
- Helps coating stick
- Prevents it from falling off in oil
Most people skip this—don’t.
Step 6: Heat the Oil Properly
- Pour oil into a heavy pan (about 2–3 cm deep for shallow frying).
- Heat to 170–180°C (340–355°F).
How to test without thermometer:
- Drop a pinch of flour:
- Sizzles immediately → ready
- Browns instantly → too hot
- Sinks → too cold
Step 7: Fry Like a Pro
- Carefully place chicken into hot oil.
- Do NOT overcrowd the pan.
- Fry 3–4 minutes per side.
- Turn only once.
- Color should be deep golden brown.
What’s happening:
- Moisture escapes as steam
- Oil creates a sealed crust
- Inside stays juicy
Step 8: Drain Correctly (No Greasy Chicken)
- Remove chicken and place on:
- Paper towels OR
- Wire rack over a tray
- Sprinkle lightly with salt while hot.
Do NOT stack immediately—steam makes it soggy.
Texture You Should Get
- Outside: Crunchy, crackly, golden
- Inside: Juicy, soft, flavorful
- Crust: Stays crisp even when cool
Exactly like the image you shared.
Flavor Variations
🌶 Spicy Fried Chicken
Add:
- Extra cayenne
- Chili powder
- Hot sauce in buttermilk
🧄 Garlic Lovers
Add:
- Fresh garlic paste to marinade
- Extra garlic powder in flour
🌿 Herb Version
Add to flour:
- Dried thyme
- Oregano
- Parsley
🧀 Cheesy Crunch
Mix into flour:
- Finely grated Parmesan
Serving Ideas
- With fries 🍟
- In sandwiches 🥪
- With coleslaw 🥗
- With rice 🍚
- As a snack with sauce
Best Sauces
- Garlic mayo
- Honey mustard
- Spicy ketchup
- BBQ sauce
Storage & Reheating
Fridge:
- Up to 3 days
Reheat (best):
- Oven at 180°C (350°F), 10 minutes
Avoid microwave → kills crunch
Final Words
This is real homemade fried chicken—not fast food, not factory-made. The crisp, uneven golden crust in your image is achieved through:
- Proper marination
- Well-seasoned flour
- Correct oil temperature
- Patience