Ingredients You Need
You will only need a handful of basic staples:
- 4 cups all-purpose flour
- 2 teaspoons salt
- 1 tablespoon sugar
- 2 teaspoons instant yeast or active dry yeast
- 1 ½ cups warm water (not hot)
- 2 tablespoons olive oil (optional, adds softness)
- Extra flour for kneading and dusting
Preparing the Dough
Mix the Dry Ingredients
In a large bowl, combine flour, salt, and sugar. If using instant yeast, mix it directly into the flour. If using active dry yeast, dissolve it separately in warm water first and let it foam for 5 minutes.
Add Water and Bring Dough Together
Pour warm water slowly into the bowl. Stir with a wooden spoon until dough becomes shaggy and sticky. Add olive oil if using.
Knead Until Smooth
Transfer dough to a lightly floured surface. Knead for 8–10 minutes until dough becomes elastic, smooth, and stretchy.
If dough sticks heavily, sprinkle in a small amount of flour, but avoid adding too much—it can stiffen the bread.
First Rise (Bulk Proof)
Place dough in an oiled bowl. Cover with a towel or plastic wrap. Let rise for 1 hour, or until dough doubles in size.
Ideal resting temperature is warm—around 24°C / 75°F.
If kitchen is chilly, place the bowl near a warm oven or inside a turned-off microwave with a mug of hot water.
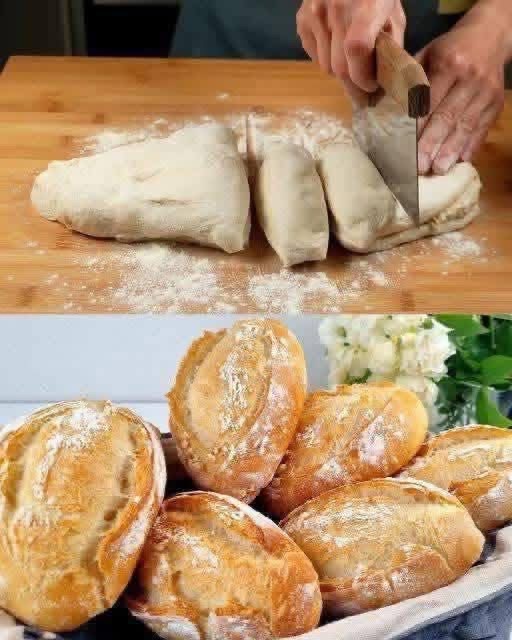
Shaping the Rolls
Once dough has doubled, gently punch it down to release excess air.
Divide the Dough
Turn onto a floured board and cut into 8 pieces for large rolls or 10–12 for smaller ones, as seen in the picture.
Shape Neatly
Cup each piece gently between your palms and round into a ball, tucking ends underneath. The smoother the shape, the prettier the baked roll will be.
Alternate shaping method:
Roll dough into a log, slice evenly, and pinch seams tightly on each piece.
Second Rise
Place dough balls onto a lined baking tray, leaving space to expand.
Dust lightly with flour for rustic bakery style.
Cover loosely and let rise 30–40 minutes, until visibly puffier.
Creating the Signature Crust
To achieve that crisp artisan crust, steam is your friend.
Making Steam at Home
Preheat oven to 230°C / 450°F.
Place an empty metal tray on the lowest rack.
Right after putting rolls in, pour 1 cup of hot water into the bottom tray and close oven door quickly.
Steam forms instantly, helping crust blister and shine.
Baking the Bread Rolls
Cut a shallow slash across the top of each roll using a sharp knife or razor. This allows expansion and gives that classic bakery look.
Bake rolls for 18–22 minutes, or until golden brown with crisp tops.
Tap a roll lightly—if it sounds hollow, it’s ready.
Cool briefly on a wire rack before serving.
Serving Ideas
These rolls are versatile and pair with nearly everything:
- Split and buttered for breakfast
- Stuffed with ham and cheese
- Served alongside soup, stew, or pasta
- Used as mini dinner sandwich buns
- Drizzled with olive oil and herbs for appetizers
Warm rolls are best enjoyed fresh, but they also freeze beautifully.
Storage and Freezing
Storing Fresh Rolls
Keep in airtight bags or containers for up to 3 days. Add a paper towel to absorb moisture and preserve crispness.
Reviving Leftovers
Warm in oven for 5 minutes at 180°C / 350°F to restore crunch.
Freezing for Long Storage
Freeze fully cooled rolls. Reheat frozen ones directly in oven for 8–10 minutes.
Variations You Can Try
Bread dough is wonderfully flexible—customize it any way you like:
- Add cheese on top before baking
- Mix herbs (rosemary, oregano, garlic powder) into dough
- Brush dough balls with melted butter or egg wash
- Use half whole-wheat flour for nuttier flavor
- Form baguette shapes instead of rolls
Each variation transforms these simple rolls into something unique and delicious.
Why Homemade Bread Wins Every Time
Baking bread connects the kitchen with tradition.
You are working with four humble ingredients—flour, yeast, water, salt—yet transforming them into something magical. The process is calm and comforting: kneading, watching dough rise, shaping with your hands.
Unlike store-bought rolls, homemade versions contain no preservatives or additives. Your kitchen fills with the irresistible smell of fresh bread, and the satisfaction of tearing one open reveals the soft, steaming interior you created yourself.
Food tastes better when crafted with care.
Troubleshooting Common Issues
Dough Too Sticky?
Add flour a tablespoon at a time until manageable.
Dense Rolls?
Possible reasons:
- Not kneading enough
- Dough didn’t rise long enough
- Yeast was old
Pale Tops?
Raise oven temperature or bake slightly longer without burning.
Practice makes perfect—and every batch teaches something new.
Final Thoughts
These crusty homemade bread rolls prove that baking bread doesn’t have to be complicated. Flour, yeast, water, salt, and time come together to create something extraordinary.
Once you master the basics, the possibilities are endless—from sandwich bread to artisan loaves.
Bake them once and you’ll want them on your table every week!