Introduction
Japanese cheese tarts—sometimes known as Hokkaido cheese tarts—are a worldwide sensation that began in Japan and spread across bakeries and coffee shops everywhere.
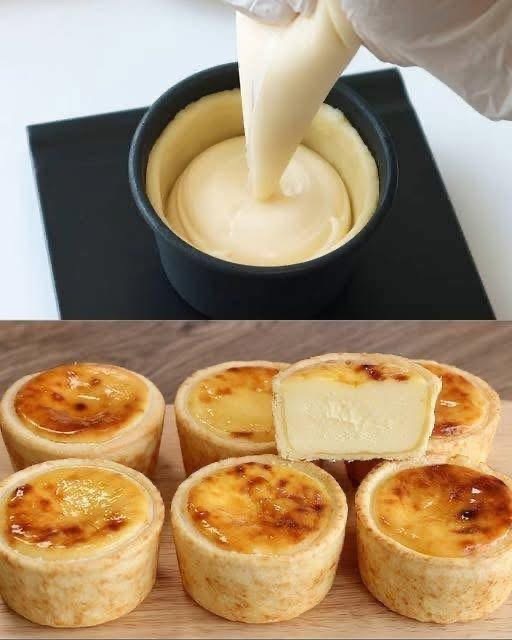
What makes them special is the layering of textures:
a delicate shortcrust pastry, a velvety cream cheese filling, and a glossy golden top that blisters gently in the oven like crème brûlée.
Unlike classic Western cheesecake which is heavy and dense, these tarts are airy, light, and slightly tangy. The filling is smooth and creamy, almost molten when eaten warm, but sets beautifully when cooled. One bite brings together the buttery crunch of the shell and a silky custard interior that melts away on your tongue.
These cheese tarts are perfect for celebrations, afternoon tea, coffee breaks, or simply when you want to treat yourself with something luxurious and satisfying. And trust me — making them at home isn’t as hard as they look. Follow the steps below and you’ll end up with bakery-quality results every time.
🧾 Ingredients
For the tart crust
- 120 g butter (softened)
- 60 g powdered sugar
- 1 egg yolk
- 200 g flour (sifted)
- Pinch of salt
- Optional: ½ teaspoon vanilla or lemon zest
For the cheese filling
- 150 g cream cheese (room temperature)
- 100 g mascarpone or ricotta
- 100 ml milk or heavy cream
- 50 g butter
- 60 g sugar
- 1 tablespoon cornstarch
- 1 egg
- 1 teaspoon lemon juice or zest
- ½ teaspoon vanilla extract
🥣 Step 1 — Make the Tart Crust
In a bowl, cream the softened butter and powdered sugar until pale and fluffy.
Add the egg yolk and mix until fully combined.
Incorporate the flour and salt slowly and mix until the dough forms.
It should come together softly—if too sticky, add a tablespoon of flour; if crumbly, add a teaspoon of milk.
Shape into a flat disk, wrap in cling film, and refrigerate 30 minutes.
This rest time helps the gluten relax and prevents shrinking while baking.
🥧 Step 2 — Shape & Blind Bake the Shells
Roll out the chilled dough to about 3–4 mm thick.
Cut circles slightly larger than your tart molds, then gently press dough into each cup.
Trim edges cleanly for neat tart shapes.
Use a fork to poke small holes in the base—this prevents puffing.
Place the unbaked shells into the freezer for 10 minutes (cold pastry = crisp pastry).
Bake at 180°C (350°F) for about 10–12 minutes, just until pale and lightly set.
Do not brown them fully—they will continue baking later.
Let cool while preparing the filling.
🧀 Step 3 — Prepare the Cream Cheese Filling
In a saucepan over low heat:
- Combine cream cheese, mascarpone, butter, milk/cream, and sugar.
- Stir continuously until smooth and well-blended.
Remove from the heat and whisk in:
- Lemon juice or zest
- Vanilla
In a small bowl, mix egg and cornstarch until smooth.
Pour this mixture into the warm cheese mixture, whisking constantly.
Return to low heat for 2–4 minutes, stirring until the mixture thickens slightly—think custard consistency.
Do not boil!
Remove from heat and let cool 5–10 minutes.
🥄 Step 4 — Fill the Tart Shells
Spoon or pipe the creamy filling into the tart crusts.
Fill nearly to the top — these tarts puff gently but don’t overflow.
Smooth the surface with a spatula if needed.
Optional:
Brush tops lightly with beaten egg for a glossy brûléed finish.
🔥 Step 5 — Bake to Golden Goodness
Return filled tarts to the oven at 200°C (390°F) for 5–8 minutes.
You want:
- Set edges
- Light browning on top
- Soft slightly jiggly center
For that signature Hokkaido look:
Turn on the top broiler/grill for 1 minute to blister the surface.
Remove and cool slightly before serving.
😍 How to Serve
You can enjoy these tarts in three magic phases:
🍮 Hot and Melty
Right from the oven — the filling flows like lava
🍰 Room Temperature
Creamy, custardy, rich but light
🍧 Chilled
Texture becomes cheesecake-like—perfect for summer days
Each temperature offers a different experience.
Try all three and decide your favorite!
💡 Tips & Variations
Add a twist of flavor:
- Lemon or orange zest
- Honey drizzle
- Nutmeg or cinnamon
- Caramelized sugar top (like crème brûlée)
Fillings upgrades
Try mixing or swapping:
- White chocolate
- Matcha powder
- Blueberry compote
- Strawberry jam center
- Nutella core (kids go crazy for this!)
Crust alternatives
Instead of shortcrust:
- Cookie crumb base (like cheesecake)
- Puff pastry tart cups
Make ahead
- Pastry shells can be baked 2 days in advance
- Filling keeps 24–48 hours in fridge
- Fully baked tarts freeze beautifully
🧊 Storage
- Room temp: 6–8 hours
- Fridge: 3–4 days (airtight container)
- Freezer: up to 1 month
Reheat at 160°C (320°F) for 5 minutes to bring back the creaminess.
🎉 When to Serve
These elegant tarts are ideal for:
- Tea parties
- Bridal or baby showers
- Coffee breaks
- Ramadan dessert trays
- Kids’ birthdays
- Holiday gift boxes
- Afternoon pampering!
They’re small enough to enjoy guilt-free, yet rich enough to feel luxurious.
❤️ Final Thoughts
Japanese cheese tarts prove that elegance doesn’t require complicated steps — just balance and technique.
A buttery casing that melts on the tongue and a filling so silky it feels like a dream.
Once you bake a batch, your kitchen will smell like a high-end Japanese bakery, and the tarts will disappear faster than you can make more