Introduction
Few culinary experiences are as comforting and satisfying as the smell of freshly baked bread drifting through the house. While many believe that making bakery-quality bread requires specialized equipment, expert skills, and hours of kneading, this recipe proves the opposite.
The No-Knead Artisan Bread is an incredible back-to-basics method that transforms three basic ingredients—flour, water, and yeast—into a crisp, golden loaf with large airy pockets inside. What makes this bread special is not the kneading, but the slow fermentation that develops deep flavor and structure naturally.
This recipe is ideal whether you are a beginner baker, a busy student, or someone who simply wants delicious bread without fuss. With a few minutes of mixing, a long overnight rest, and a hot oven, you will have a professional-looking rustic loaf worthy of any bakery window.
🍞 Ingredients Needed
Minimal ingredients for a perfect loaf
- 3 cups (360g) all-purpose flour
- 1 ½ teaspoons salt
- ½ teaspoon instant dry yeast
- 1 ½ cups (355ml) warm water
- Extra flour for dusting
- Olive oil or butter for greasing the pot (optional)
🥣 Mixing the Dough
The magic starts here
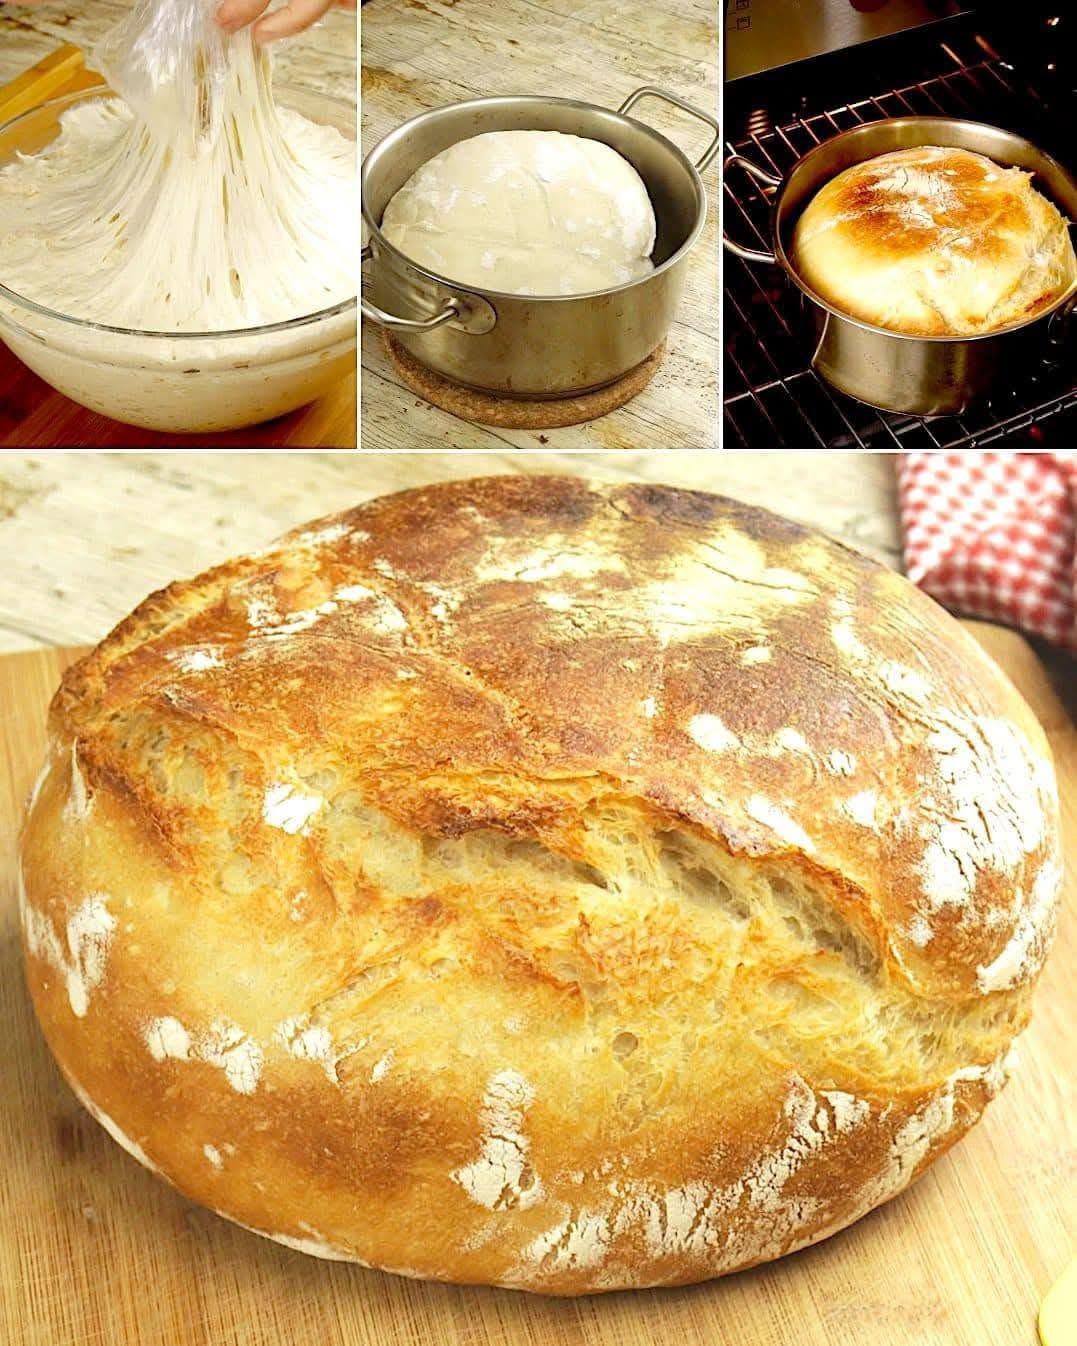
In a large bowl, combine flour, salt, and instant yeast. Mix with a spoon until fully combined. Add warm water and stir slowly to bring the dough together. You’ll notice it becomes sticky and shaggy — this is exactly what you want.
Unlike traditional dough that requires patience and kneading to build gluten structure, this recipe relies on time. The long rest allows the flour to fully hydrate and the yeast to gently produce carbon dioxide, which naturally forms gluten strands. As the hours pass, the dough transforms from sticky and flat to stretchy and elastic, ready for baking.
💤 Slow Overnight Fermentation
Let time work for you
Cover your bowl tightly with plastic wrap or a clean kitchen towel. Leave it at room temperature for 12–18 hours.
During this period, the dough doubles in size and becomes full of tiny bubbles. Its surface may look irregular and webby — a sign that fermentation is working beautifully.
Time equals flavor. This slow fermentation mimics professional sourdough processes and creates:
- A richer, slightly tangy taste
- Beautiful airy crumb texture
- Better crust development
If your kitchen is cold, allow it to rest closer to 18 hours. In hot climates, 10–12 hours may be enough.
🫕 Preparing the Pot
The key baking method
Preheat your oven to 230°C (450°F).
Place a heavy oven-safe pot with lid (Dutch oven or cast-iron) inside while preheating. The pot becomes blazing hot and creates the perfect baking environment — trapping steam that gives your bread a crunchy, blistered crust.
While the oven heats, prepare your dough:
- Flour your hands and gently pull the dough from the bowl
- Shape it lightly into a round ball — don’t press hard
- Cover loosely while the pot heats
🔥 Baking
The transformation
Carefully remove the hot pot. Place your dough inside — parchment paper can help if the dough is delicate.
Cover with the lid and bake for 30 minutes. This traps steam, which keeps the dough moist and allows maximum rise.
After 30 minutes, remove the lid and allow the bread to bake uncovered for 10–15 more minutes. This stage turns the surface into a golden, crispy crust with natural cracks and caramelization.
Once golden brown, remove the pot from the oven and lift out your loaf. Let it cool at least 20 minutes before slicing — patience ensures the crumb sets perfectly.
😍 The Result
What to expect
- A gorgeous rustic loaf with a lacquered golden crust
- Airy, soft interior full of uneven holes
- A flavor reminiscent of artisan bakery bread
- A loaf that stays fresh longer than commercial sliced bread
The crust crackles when you touch it, and the aroma alone is enough to gather everyone around the kitchen table.
🍽️ Serving Suggestions
Simple, versatile, delicious
This bread shines in countless ways:
- Slice warm and slather with butter
- Dip in olive oil and balsamic vinegar
- Make thick toast with honey or jam
- Serve alongside soups, salads, or pasta
- Turn into sandwiches or garlic bread
Tip: If the loaf becomes harder after a few days, revive slices in the toaster or sprinkle with water and reheat in the oven for a few minutes.
🌾 Tips & Variations
Make the recipe your own
- Substitute up to 1 cup flour with whole wheat
- Add seeds: sesame, flax, or sunflower
- Add herbs like rosemary or thyme
- Stir in garlic or grated cheese for flavor
- For tangier bread, ferment an extra few hours
This method is endlessly adaptable — once you master the base, variation becomes fun and effortless.
🧠 Why This Recipe Works
The science behind simplicity
Traditional kneading aligns gluten proteins manually.
Here, the wet dough + long rise allows gluten to form naturally.
Steam inside the covered pot mimics a professional deck oven, giving:
- high oven spring (rapid rise)
- glossy blistered crust
- tender interior crumb
It’s a perfect example of technique over effort.
🎉 Conclusion
Homemade artisan bread is more than food — it is comfort, aroma, tradition, and sharing. With just flour, water, and yeast, you can create something stunningly beautiful and deeply satisfying. Whether this is your first loaf or your hundredth, this no-knead recipe becomes a loyal kitchen companion.