The Crispy Fried Chicken featured in your collection is a prime example of culinary engineering, achieving a perfect “glass-like” crunch on the exterior while maintaining a glistening, succulent interior. Unlike the grilled preparation of your Grilled Chicken with Fried Rice, which relies on direct flame for a smoky char, this fried method uses oil as a heat-transfer medium to dehydrate the skin and batter into a rigid, golden-brown crust.
This dish represents the pinnacle of comfort food, offering a high-protein centerpiece that can be paired with anything from the light crunch of BLTA Lettuce Wraps to the rich, savory depths of a Hearty Beef Stew.
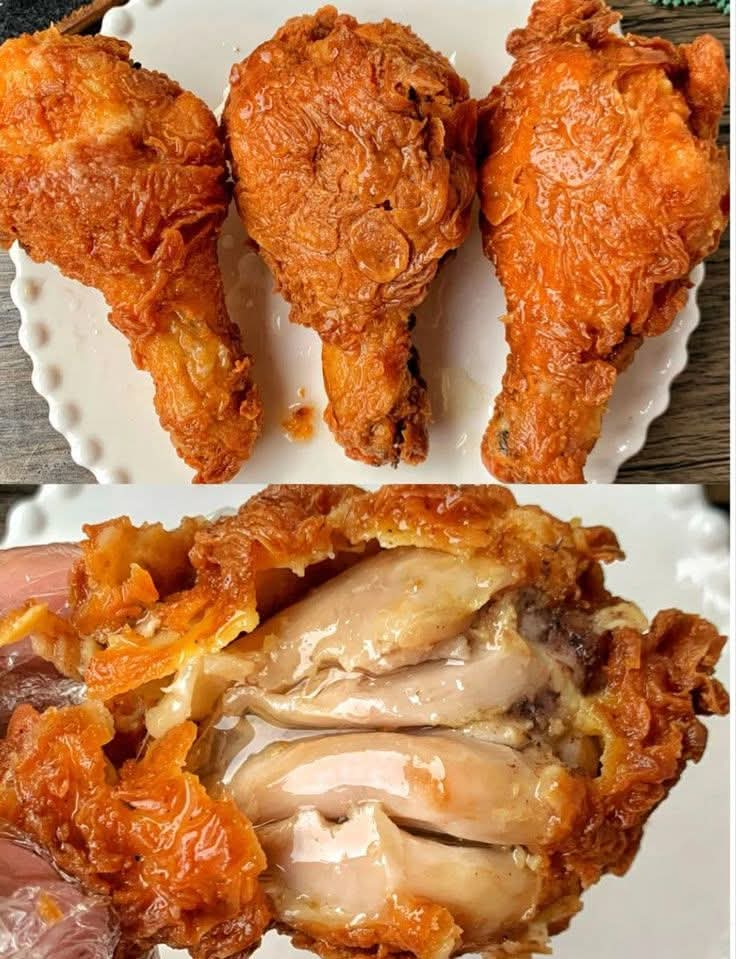
1. The Anatomy of a Perfect Fried Drumstick
As evidenced by your close-up cross-section, professional fried chicken is defined by the separation of layers and the retention of moisture:
- The Craggy Exterior: The skin features deep ridges and a “bubbly” texture, indicating a multi-stage dredging process that traps air for a lighter crunch.
- The Golden Hue: A deep, uniform orange-gold color suggests the use of high-smoke-point oils and a spice blend rich in paprika or turmeric.
- The Steam Barrier: A visible gap between the meat and the crust shows that the batter formed a protective shell, allowing the chicken to steam in its own juices.
- The Succulent Core: The meat fibers are clearly glistening with natural oils and juices, proving that the internal temperature was managed perfectly to prevent drying.
2. Technical Precision: Mastering the Crunch
Achieving the level of crispness seen in your photo requires a deep understanding of moisture management and flour science.
The “Dry-Wet-Dry” Dredging Method
The secret to the craggy, textured surface in the image is a three-step process:
- First Dry Coat: Seasoned flour is pressed into the chicken to absorb surface moisture.
- The Binder: A “wet” dip—often buttermilk or egg—is used to create a sticky surface.
- The Final Shag: A second dry coat is applied. Pro-tip: Drizzle a few tablespoons of the wet binder into the dry flour before the final dip to create the “flour clumps” that become the extra-crispy ridges visible in your photo.
Thermal Management
Notice how the chicken in your photo is fully cooked through without any burnt spots on the crust?. This is achieved by maintaining oil at approximately 175°C (350°F). If the oil is too cold, the breading absorbs grease and becomes heavy; if too hot, the outside burns before the bone-in meat is safe to eat.
3. Flavor Profiles: Savory, Spicy, and Salty
The flavor of this fried chicken is designed to be “explosive,” providing a much more intense sensory experience than the delicate Creamy Shrimp Gratin or the sweet Raspberry Mousse.
- The Brine Foundation: The deep juiciness of the meat suggests it was brined in a saltwater or buttermilk solution, which tenderizes the proteins.
- The Aromatic Shell: The crust likely contains a high concentration of garlic powder, onion powder, and white pepper, which provides a lingering warmth without overpowering the natural chicken flavor.
- The Umami Pop: Often achieved by adding a touch of MSG or celery salt to the flour, enhancing the savory “chicken” essence.
4. Nutritional Profile: High-Density Protein
While fried, this dish remains a significant source of protein and essential fats, especially when compared to pasta-heavy dishes like the Cheesy Beef Rotini.
| Component | Nutritional Value | Benefit |
| Chicken Drumstick | Lean Protein & Myoglobin | Excellent for muscle recovery and iron intake. |
| Spiced Crust | Micronutrients | Capsaicin from peppers can slightly boost metabolism. |
| Natural Juices | Healthy Lipids | Provides satiety and aids in the absorption of fat-soluble vitamins. |
5. Aesthetic Staging: The “Golden Platter”
To replicate the inviting presentation in your photo, follow these visual cues:
- The Scalloped Plate: Notice how the white plate with the ruffled edge provides a clean, classic contrast to the rugged texture of the chicken?. It makes the dish feel like a “Sunday Family Dinner.”
- The Triangle Trio: Grouping the drumsticks in a set of three creates a sense of abundance.
- The “Hero Shot” (Cross-Section): The second image, showing the interior, is the most important for food photography. It proves the quality of the cook by showing the moisture still trapped inside the meat.
6. Culinary Inspiration: Integrating Your Menu
This Crispy Fried Chicken is a versatile star that can be paired with many elements from your kitchen gallery:
- The “Double Chicken” Meal: Serve these drumsticks alongside the BLTA Chicken Salad Lettuce Wraps for a “textural study” in chicken—crispy and fried vs. creamy and cold.
- The Starchy Side: These would be incredible served with a side of your Potato and Ham Gratin or the Root Vegetable Gratinée for a rich, comforting meal.
- The Bread Companion: Use your Soft Pan Flatbread to make a “fried chicken wrap” with a drizzle of honey or hot sauce.
- The Sweet Palette Cleanser: After the salty intensity of the fried chicken, a slice of your Golden Sponge Cake or a Mini Caramel Flan Muffin provides a light, airy finish.
7. Frequently Asked Questions (FAQ)
Why is my fried chicken soggy?
You likely overcrowded the pan. Adding too many pieces at once drops the oil temperature, causing the batter to absorb oil rather than “flash-frying.” Cook in batches like the three-piece set shown in your photo.
How do I get the meat that juicy?
The glistening meat in your photo is the result of a buttermilk brine. The lactic acid in buttermilk breaks down the proteins, while the salt ensures the meat retains its water during the high-heat frying process.
Can I bake this and get the same result?
To get the specific craggy ridges seen in the image, you need the bubbling action of hot oil. However, an air-fryer with a light spray of oil can come close to this “shattered-glass” texture.