The creamy homemade dessert showcased in your latest upload represents the pinnacle of “minimalist gourmet”—a dish that achieves a luxurious, silken texture without the need for a traditional oven, chemical setting agents like gelatine, or hours of labor. This dessert is a masterclass in dairy emulsification, where the natural proteins in milk and eggs (or starch thickeners) are gently heated to create a structure that is both stable enough to be scooped and delicate enough to dissolve instantly on the tongue.
Unlike your Velvety Caramel Flan Muffins, which require a water bath and a precision-baked “cap,” this no-oven version relies on stovetop agitation to ensure a perfectly smooth, “aerated” finish.
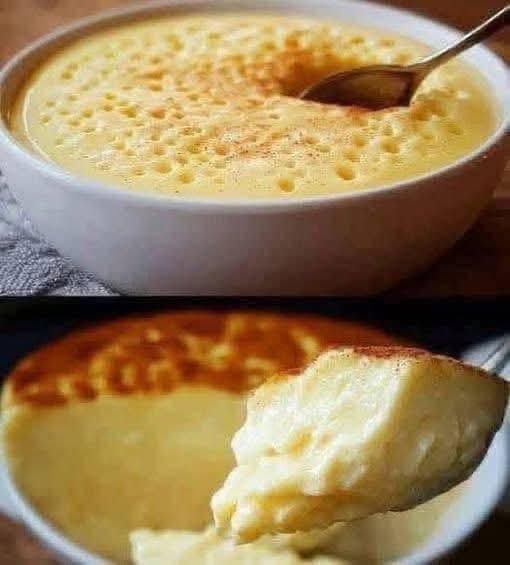
1. The Anatomy of a No-Oven Creamy Dessert
A professional-grade stovetop pudding or “crema” is defined by its uniformity. Based on your image, this dessert achieves success through three distinct sensory phases:
- The Aerated Surface: Notice the tiny, uniform “pores” on the surface of the top bowl?. This indicates that the mixture was likely whisked vigorously during the cooling phase, incorporating just enough air to keep the texture light rather than dense and “rubbery.”
- The Spice Infusion: The fine dusting of cinnamon or nutmeg on top provides a warm, aromatic contrast to the cool, sweet dairy base. This “bridge flavor” enhances the perception of creaminess by stimulating the olfactory senses.
- The Spoon Stability: As seen in the bottom half of your image, the dessert holds a clean edge when scooped. This structural integrity is achieved through the gelatinization of starches (like cornstarch or flour) or the coagulation of egg proteins at low temperatures, rather than using gelatine.
2. Technical Precision: Thickness Without Gelatine
To replicate the “melt-in-your-mouth” consistency seen in your photo, you must master the relationship between heat and thickening agents.
The Science of Starch Gelatinization
Without gelatine, this dessert likely uses a fine starch. When starch granules are heated in milk to approximately 160°F–175°F, they begin to absorb liquid and swell.
- Phase One (Hydration): Whisk the starch into cold milk first to prevent the clumps often found in amateur puddings.
- Phase Two (The Thickening): Heat the mixture slowly. As the granules burst, they release amylose molecules that create a web-like structure, trapping the milk fats and sugars into the “velvety” consistency seen in your scoop.
Why “No Oven” Works
Baking can often “shock” dairy proteins, leading to the small bubbles or “wheying off” (liquid separation) seen in some cheesecakes. By using the stovetop (No Oven), you maintain total control over the temperature, ensuring the dessert remains as smooth as your Heavenly Raspberry Mousse Parfait.
3. Flavor Profiles: The “Golden Milk” Axis
The success of a 5-minute dessert relies on high-quality aromatics to mask the “starchy” taste of the thickener.
- The Vanilla-Cinnamon Harmony: The pale yellow hue of your dessert suggests a rich infusion of vanilla. When paired with the cinnamon dusting, it creates a flavor profile reminiscent of the Arroz con Leche or French Custard.
- Dairy Enrichment: For the “super creamy” results mentioned, using a blend of whole milk and a splash of heavy cream (or evaporated milk) increases the fat content, which coats the tongue and slows down the release of sugar, making the dessert feel more indulgent.
4. Nutritional Profile: Wholesome Energy
While primarily a treat, this milk-based dessert provides essential macronutrients and minerals.
| Component | Benefit |
| Whole Milk | High in Calcium and Vitamin B12; essential for bone health and nerve function. |
| Cinnamon | Contains potent antioxidants and has anti-inflammatory properties. |
| Egg Yolks (if used) | Provide Choline and healthy fats for brain health. |
| Natural Sugars | Provide a quick source of glucose for a mid-day energy boost. |
5. Aesthetic Staging for the Perfect “Creamy” Shot
To achieve the professional “soft-light” look seen in your photo, follow these visual principles:
- The “Close-Up” Texture: The top image uses a macro-style shot to highlight the pores and the dusting. This invites the viewer to “feel” the texture before they even taste it.
- The “Action Scoop”: The bottom image is the “hero” shot. By showing the dessert on a spoon, you demonstrate its perfect consistency—neither too liquid nor too hard.
- Color Neutrality: Using a simple white bowl allows the delicate ivory color of the dessert and the reddish-brown of the cinnamon to be the stars of the composition.
6. Culinary Inspiration: Integrating Your Menu
This 5-minute creamy wonder is the perfect “quick-fix” dessert for your existing meal rotations:
- The Palate Cleanser: After a heavy, savory meal like your Cheesy Beef Rotini or Garlic Parmesan Chicken, this light, cinnamon-dusted cream acts as a soothing palate cleanser.
- The Texture Play: Serve a scoop of this dessert on top of a warm slice of your Moist Butter Cake. The cold, silken cream melting into the warm, airy sponge is a classic high-end restaurant pairing.
- The Fruit Twist: Top the bowl with fresh raspberries, drawing inspiration from your Heavenly Raspberry Mousse Parfait, to add a burst of acidity that cuts through the rich dairy.
- The “Flan-Style” Inversion: If you have 5 extra minutes, drizzle some of the amber syrup from your Velvety Caramel Flan Muffins over the top of this pudding for an instant flavor upgrade.