Why You’ll Love These Chocolate Fudge Bars
This dessert is popular for many good reasons:
No oven required
Simple pantry ingredients
Rich chocolate flavor
Perfect texture: soft, creamy, slightly chewy
Easy to slice and serve
Great for gifting or events
Whether you’re making dessert for guests or just treating yourself, these fudge bars never disappoint.
Ingredients for Chocolate Peanut Fudge Bars
Base Layer Ingredients
2 cups semi-sweet chocolate chips
1 can (14 oz / 395 g) sweetened condensed milk
2 tablespoons unsalted butter
1 teaspoon vanilla extract
1½ cups roasted peanuts (unsalted or lightly salted)
Chocolate Topping
1½ cups milk chocolate or dark chocolate chips
2 tablespoons heavy cream
1 tablespoon butter
Optional Flavor Boosters
Pinch of sea salt
½ teaspoon espresso powder (enhances chocolate flavor)
Kitchen Tools Needed
Medium saucepan
Heatproof spatula
8×8-inch or 9×9-inch baking pan
Parchment paper
Knife for slicing
Prepare the Pan
Line your baking pan with parchment paper, leaving some overhang on the sides. This makes removing and slicing the bars much easier later. Lightly grease the parchment if needed.
Set the pan aside.
Make the Fudge Base
In a medium saucepan over low heat, add:
Sweetened condensed milk
Butter
Semi-sweet chocolate chips
Stir constantly until the mixture is completely melted and smooth. Do not rush this step—low heat prevents the chocolate from burning or becoming grainy.
Once smooth, remove from heat and stir in:
Vanilla extract
Optional espresso powder
Add the Peanuts
Fold the roasted peanuts gently into the warm fudge mixture. Make sure the peanuts are evenly distributed so every bite has crunch and flavor.
Immediately pour the mixture into the prepared pan and spread evenly using a spatula. Press gently to eliminate air pockets.
Prepare the Chocolate Topping
In a small saucepan over low heat, combine:
Milk or dark chocolate chips
Heavy cream
Butter
Stir until silky smooth and glossy. This topping adds a luxurious finish and makes the bars look bakery-quality.
Pour the chocolate topping over the fudge base and spread evenly.
Chill Until Set
Place the pan in the refrigerator for at least 3–4 hours, or until completely firm. For faster results, you can chill it in the freezer for 1 hour, then transfer to the fridge.
Once set, lift the fudge out using the parchment paper.
Slice and Serve
Use a sharp knife, wiping it clean between cuts, to slice the fudge into neat squares. For extra clean edges, warm the knife slightly before cutting.
Sprinkle a pinch of sea salt on top if desired.
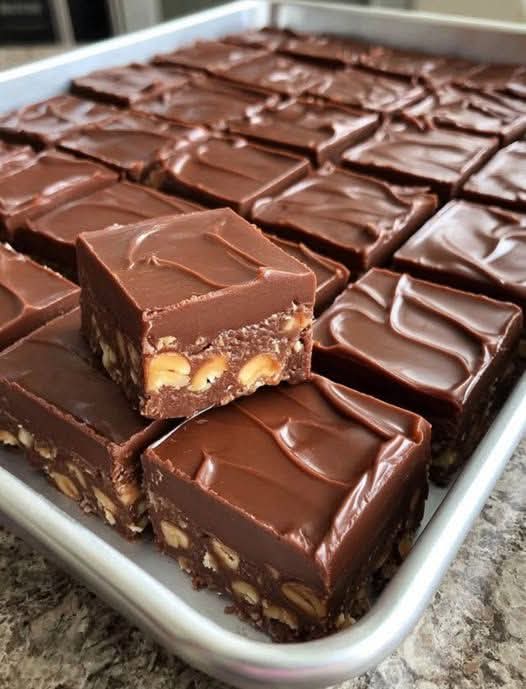
Texture and Flavor Notes
These bars are:
Creamy and dense
Slightly chewy from the condensed milk
Crunchy from roasted peanuts
Smooth and glossy on top
The balance between sweet chocolate and nutty crunch is what makes this recipe irresistible.
Flavor Variations to Try
Peanut Butter Chocolate Fudge
Replace ½ cup of chocolate chips with creamy peanut butter for a richer nutty flavor.
Almond or Hazelnut Version
Swap peanuts with chopped almonds or hazelnuts for a different crunch.
Dark Chocolate Lovers
Use 70% dark chocolate for both layers to reduce sweetness and intensify cocoa flavor.
Coconut Chocolate Bars
Add ½ cup shredded coconut to the base for extra texture.
Storage Instructions
Refrigeration
Store in an airtight container in the refrigerator for up to 7 days.
Freezing
Freeze individual squares wrapped tightly for up to 2 months. Thaw in the fridge before serving.
Serving Ideas
These chocolate peanut fudge bars pair perfectly with:
Coffee or espresso
Cold milk
Vanilla ice cream
Holiday dessert platters
They are excellent for:
Bake sales
Family gatherings
Gift boxes
Potlucks
Common Mistakes to Avoid
Using high heat when melting chocolate
Skipping parchment paper
Not chilling long enough before slicing
Overloading with peanuts
Slow melting and patience are the keys to perfect fudge.
Nutrition Information (Approximate)
Per square (based on 16 pieces):
Calories: 280
Fat: 18 g
Carbohydrates: 26 g
Protein: 6 g
Values vary depending on chocolate and nut type.
Final Thoughts
These Chocolate Peanut Fudge Bars are proof that you don’t need complicated steps or baking skills to create a stunning dessert. With minimal effort and maximum flavor, this recipe delivers rich chocolate indulgence every time.