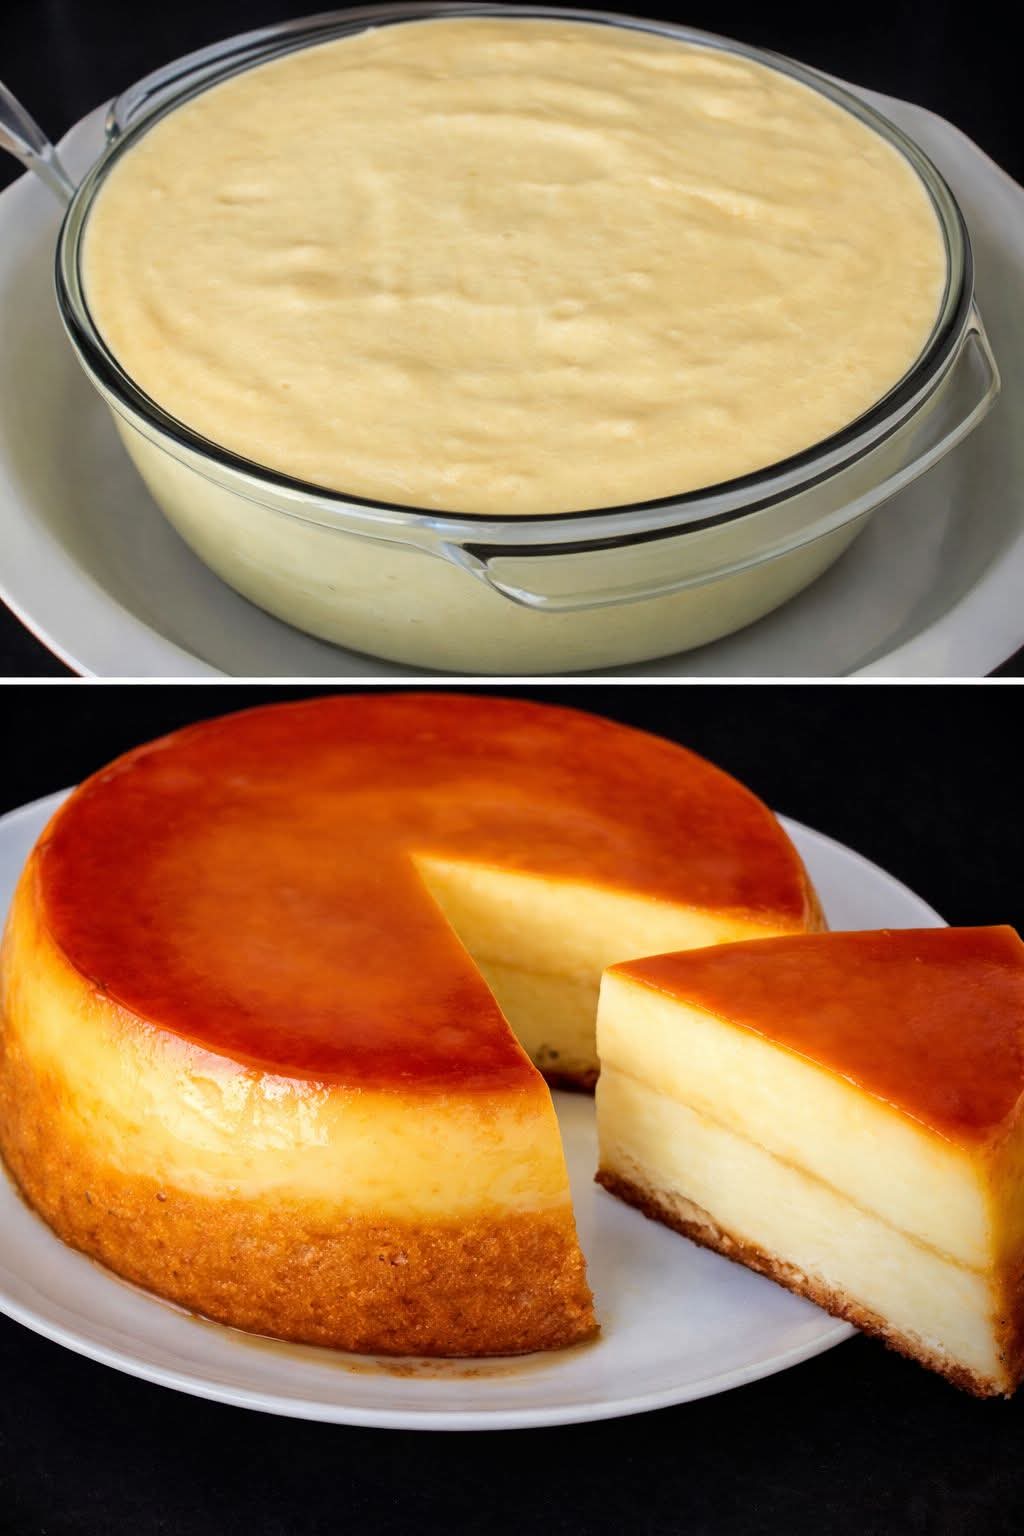
The Caramel Custard Cake, often referred to as “Flan Cake” or “Magic Custard Cake,” is a breathtaking multi-layered dessert that combines the silky elegance of a crème caramel with the light, airy structure of a chiffon or sponge cake. As shown in your collection, this dessert is a visual triumph, featuring a deep mahogany caramel glaze that drapes over a pale, velvety custard and a golden cake base.
Mastering this dessert requires an understanding of thermodynamics, emulsification, and the delicate art of water-bath baking. This 800-word guide explores the culinary science and professional techniques needed to achieve the perfect “magic” separation and flawless texture seen in your images.
1. Anatomy of a Three-Layer Masterpiece
A professional Caramel Custard Cake is defined by three distinct, harmonized layers that are typically baked together in a single pan:
- The Caramel Crown: This is the topmost layer after inverting. It must be a clear, amber liquid that provides a bitter-sweet contrast to the rich fats of the layers below.
- The Silk Custard: The middle layer is a dense yet tender egg custard. It should be completely smooth, devoid of air bubbles, with a “melt-in-the-mouth” consistency.
- The Chiffon Base: The bottom layer (before inverting) is a light sponge. It acts as a structural foundation, soaking up just enough caramel to stay moist without becoming soggy.
2. The Science of the “Magic” Separation
One of the most fascinating aspects of this cake is that the layers are often poured into the pan in one order but emerge perfectly separated.
- Density and Buoyancy: The cake batter is typically lighter (aerated with egg whites) than the heavy, liquid custard. When poured correctly, the cake batter floats to the top during the initial stages of baking.
- Thermal Protection: Because the custard is sensitive to high heat, the cake layer acts as an insulator, protecting the delicate egg proteins in the middle from curdling while the cake itself sets.
3. Step-by-Step Culinary Instructions
Stage 1: The Amber Caramel
The foundation of the flavor is the dry-burn or wet-burn caramel.
- Heat granulated sugar in a heavy-bottomed saucepan until it liquefies and turns a deep amber.
- Professional Tip: Do not stir with a spoon; swirl the pan gently to ensure even melting.
- Pour the hot caramel immediately into your baking tin, tilting it to coat the bottom completely before it hardens.
Stage 2: The Velvety Custard
The custard must be an emulsion of eggs and milk (or evaporated/condensed milk for a “big” flavor profile).
- Whisk eggs and sugar gently to avoid creating excess foam.
- Slowly incorporate warm milk and vanilla extract.
- The Secret Step: Strain the custard through a fine-mesh sieve twice. This removes any unmixed egg chalazae and air bubbles, ensuring the glass-smooth finish seen in your image.
Stage 3: The Airy Chiffon
This layer provides the height and “sponge” factor.
- Create a standard chiffon batter by folding stiff-peaked egg whites into a yolk-and-flour base.
- The folding must be done with a light hand to preserve the air bubbles that allow the cake to float above the custard.
4. The Critical Role of the “Bain-Marie” (Water Bath)
As seen in the preparation image in your gallery, the cake tin is placed inside a larger tray filled with hot water. This is the Bain-Marie.
- Temperature Regulation: Water evaporates at 100°C (212°F). By surrounding the cake with water, you ensure the custard never exceeds this temperature, preventing the eggs from boiling and creating “holes” or a rubbery texture.
- Moisture Control: The steam created in the oven prevents the top of the cake from drying out or cracking before the custard has set.
5. Nutritional Insights: A Decadent Source of Energy
While primarily a celebratory treat, Caramel Custard Cake is nutritionally dense:
| Component | Primary Nutrients | Functional Benefit |
| Egg Custard | High-quality Protein, Choline | Supports muscle repair and brain health. |
| Milk/Cream | Calcium, Vitamin D | Essential for bone density and metabolic health. |
| Caramel/Sponge | Simple & Complex Carbs | Provides a rapid energy boost and immediate satiety. |
6. Common Pitfalls and Professional Fixes
Problem: The Caramel is Stuck to the Pan
- Cause: The caramel was cooked too long or the cake wasn’t “loosened” correctly.
- Fix: Before inverting, sit the bottom of the pan in warm water for 60 seconds to re-liquefy the base of the caramel.
Problem: Bubbles in the Custard Layer
- Cause: The custard was whisked too aggressively or baked at too high a temperature.
- Fix: Always bake at a lower temperature (150°C – 160°C) and ensure your water bath reaches halfway up the side of the cake tin.
Problem: The Layers Have Mixed
- Cause: The cake batter was too heavy or was poured too forcefully onto the custard.
- Fix: Use a spoon to break the fall of the batter as you pour it over the custard layer.
7. The Art of the Inversion
The most dramatic moment in creating this dessert is the “flip.”
- Chill Thoroughly: The cake must be refrigerated for at least 6 to 8 hours (ideally overnight) to allow the custard to fully set.
- Loosen the Edges: Run a thin knife around the perimeter of the pan.
- The Flip: Place a large, rimmed plate over the tin and invert in one swift motion. The rimmed plate is essential to catch the extra caramel sauce that will pour out.
8. Frequently Asked Questions (FAQ)
Can I make this dairy-free?
Yes, full-fat coconut milk makes an excellent substitute for the custard, providing a similar fat content and creamy mouthfeel.
Why did my cake layer turn out soggy?
This usually happens if the cake is removed from the water bath and left to sit in the water while cooling. Always remove the cake tin from the Bain-Marie immediately after taking it out of the oven.
How long does it stay fresh?
Because of the high egg and milk content, this cake should be kept refrigerated and consumed within 3 to 4 days.