Ingredients Overview
Before starting, gather all ingredients so the process flows smoothly.
For the Biscuit Base
- 250 g digestive biscuits (or graham crackers)
- 120 g unsalted butter, melted
- 1 tablespoon sugar (optional, depending on biscuit sweetness)
For the Creamy Cheesecake Layer
- 400 g cream cheese (full fat, softened)
- 1 cup powdered sugar (adjust to taste)
- 1 teaspoon vanilla extract
- 1½ cups cold whipping cream
- 1 tablespoon lemon juice (optional but recommended)
For the Topping
- 2–3 crushed biscuits (finely crumbled)
- Optional: cinnamon or vanilla biscuit crumbs
Essential Tools You Will Need
- Square or rectangular glass baking dish
- Food processor or rolling pin
- Mixing bowls (large and medium)
- Electric mixer or whisk
- Spatula
- Measuring cups and spoons
Preparing the Biscuit Base
The base is the foundation of this dessert and provides structure and contrast.
- Place the digestive biscuits in a food processor and pulse until fine crumbs form. If you don’t have a processor, place biscuits in a sealed bag and crush them using a rolling pin.
- Transfer the crumbs to a bowl and add the melted butter.
- Mix until the crumbs are evenly coated and resemble wet sand.
- Press the mixture firmly into the bottom of your glass dish using the back of a spoon or a flat glass.
- Refrigerate for 20–30 minutes to allow the base to firm up.
Tip: Press firmly, especially around the edges, to avoid crumbling when slicing later.
Making the Creamy Cheesecake Filling
This layer is the heart of the dessert—smooth, rich, and lightly sweet.
- In a large bowl, beat the softened cream cheese until smooth and lump-free.
- Add powdered sugar gradually while mixing to avoid clumps.
- Pour in the vanilla extract and lemon juice, mixing until fully incorporated.
- In a separate chilled bowl, whip the cold whipping cream until stiff peaks form.
- Gently fold the whipped cream into the cream cheese mixture using a spatula. Do not overmix—this keeps the texture light and airy.
Texture Goal: Silky, fluffy, and thick enough to hold its shape.
Assembling the Dessert Layers
Now comes the satisfying part—building the dessert.
- Remove the chilled biscuit base from the refrigerator.
- Spoon the cheesecake filling evenly over the base.
- Smooth the top using a spatula for a clean, professional look.
- Lightly tap the dish on the counter to remove air bubbles.
- Sprinkle finely crushed biscuits evenly across the surface.
This crumb topping adds visual appeal and a gentle crunch without overpowering the creaminess.
Chilling and Setting Time
This dessert requires patience, but the result is worth it.
- Cover the dish with plastic wrap or foil.
- Refrigerate for at least 4–6 hours, preferably overnight.
- The longer it chills, the better the texture and flavor.
Avoid freezing, as it can change the creamy consistency.
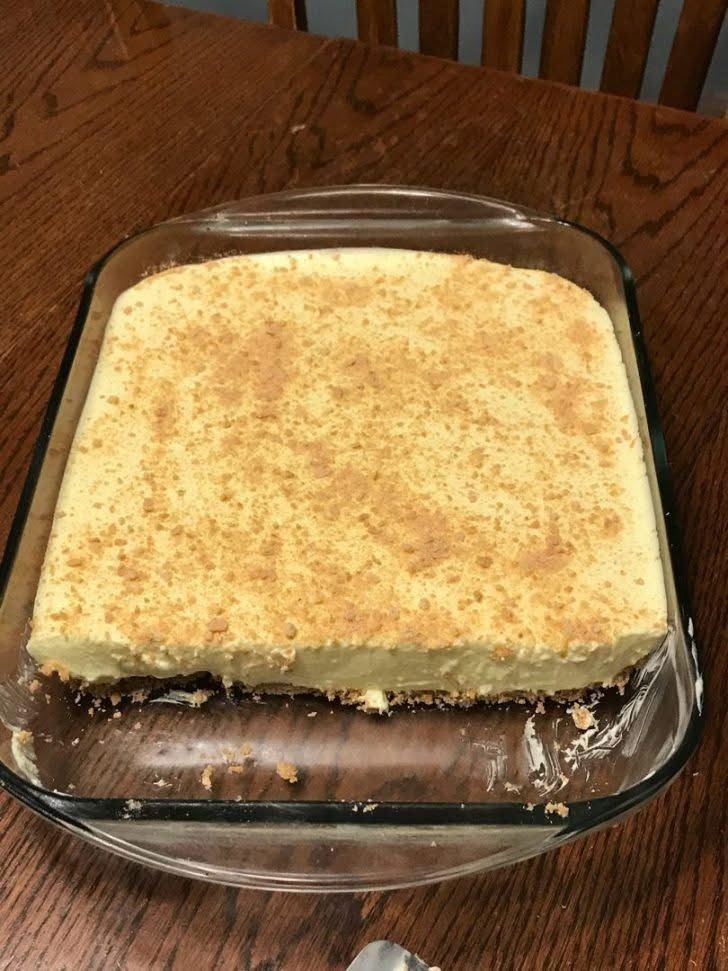
How to Slice and Serve Perfectly
To achieve neat slices like the dessert in your image:
- Use a sharp knife.
- Wipe the blade clean between cuts.
- Serve chilled directly from the refrigerator.
You can serve it plain or with optional toppings like:
- Fresh fruit
- Drizzled caramel
- Chocolate shavings
Flavor Variations You Can Try
This recipe is extremely versatile.
Lemon Cheesecake Version
Add extra lemon juice and lemon zest for a refreshing citrus twist.
Chocolate Cheesecake Version
Mix melted chocolate into the filling and use chocolate biscuits for the base.
Coffee Cheesecake Version
Add instant coffee dissolved in a tablespoon of hot water to the cream cheese mixture.
Nutty Version
Mix crushed nuts into the base or sprinkle on top.
Storage and Shelf Life
- Store covered in the refrigerator.
- Keeps fresh for 3–4 days.
- Do not leave at room temperature for more than 1 hour.
This makes it perfect for preparing ahead of parties or family gatherings.
Common Mistakes to Avoid
- Using warm cream cheese (causes lumps)
- Overmixing after adding whipped cream
- Not chilling long enough
- Using low-fat cream cheese (texture won’t set well)
Why This Dessert Is Always a Crowd Favorite
This no-bake cheesecake dessert combines ease, elegance, and comfort in one dish. It looks impressive, tastes indulgent, and doesn’t require advanced baking skills. The smooth creamy layer paired with the buttery base creates a nostalgic yet timeless dessert that suits every occasion—from casual family dinners to festive celebrations.
Final Thoughts
If you love desserts that are simple, creamy, and guaranteed to impress, this recipe is for you. The image you shared reflects a homemade classic that never goes out of style. With minimal ingredients and a little patience, you can recreate this beautiful dessert perfectly every time.