Ingredients You Will Need
Before starting, prepare all your ingredients. This recipe uses simple pantry items and does not require an oven.
Main Dough Ingredients
- 2 cups all-purpose flour
- 2 tablespoons sugar
- 1 teaspoon salt
- 1 tablespoon instant dry yeast
- 1 large egg
- ¾ cup warm milk (not hot)
- 2 tablespoons melted butter or vegetable oil
For Frying
- Neutral oil (sunflower or vegetable oil)
Optional Toppings
- Powdered sugar
- Honey
- Jam
- Chocolate spread
Why This Recipe Works So Well
This recipe creates buns that are:
- Soft and fluffy inside
- Golden and crispy outside
- Not greasy
- Perfectly sweet but not overpowering
The secret is the yeast-based dough combined with gentle pan-frying instead of deep frying.
Step 1: Activating the Yeast
In a medium bowl, pour the warm milk and add:
- Sugar
- Dry yeast
Mix gently and let it rest for 5–10 minutes.
What You Should See
- Small bubbles forming on the surface
- A light foam
This means your yeast is alive and active.
Step 2: Mixing the Dough
In a large mixing bowl:
- Add the flour and salt
- Make a small well in the center
- Pour in the activated yeast mixture
- Add the egg
- Add melted butter or oil
Mix with a spoon or your hand until a soft dough forms.
Step 3: Kneading for Softness
Transfer the dough to a lightly floured surface.
How to Knead
- Knead for 8–10 minutes
- Push the dough away with your palm
- Fold it back over itself
- Rotate and repeat
Dough Texture
- Soft
- Slightly sticky but manageable
- Smooth and elastic
If sticky, add a little flour, but do not overdo it.
Step 4: First Rise (Fermentation)
Place the dough in a lightly oiled bowl.
- Cover with a clean kitchen towel
- Leave in a warm place for 1 to 1½ hours
Dough After Rising
- Doubles in size
- Very soft and airy
This step is crucial for fluffy buns.
Step 5: Shaping the Buns
Once risen:
- Punch down the dough gently to remove air
- Roll it out to about 1–1.5 cm thickness
- Use a round cutter or glass to cut circles
Alternative Shaping
- Roll into small balls
- Flatten slightly with your hand
Place shaped buns on a floured surface and cover.
Step 6: Second Rest (Important Step)
Let the shaped buns rest for 20–30 minutes.
Why This Matters
- Makes the dough lighter
- Helps buns puff beautifully during frying
Do not skip this step.
Step 7: Frying the Buns
Heat a non-stick or heavy pan over medium-low heat.
- Add oil (about 1–2 cm deep)
Frying Instructions
- Place buns gently into the oil
- Do not overcrowd the pan
- Fry 2–3 minutes per side
- Turn when golden brown
Cook slowly so the inside cooks fully.
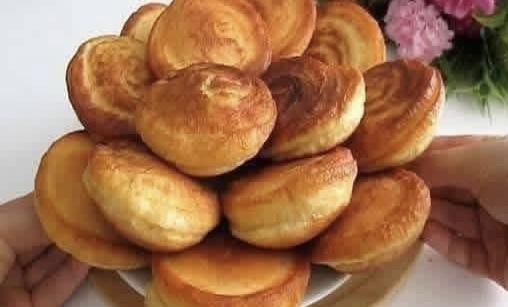
Step 8: Perfect Golden Color
As you fry, you will notice:
- Beautiful golden swirls
- Soft puffed centers
Remove and place on paper towels to absorb excess oil.
Step 9: Serving Suggestions
These fluffy buns are extremely versatile.
Sweet Options
- Sprinkle with powdered sugar
- Drizzle with honey
- Spread with jam
- Dip in chocolate sauce
Savory Twist
- Reduce sugar slightly
- Serve with cheese or eggs
Storage and Reheating Tips
Storing
- Keep in airtight container
- Room temperature: 1 day
- Refrigerator: up to 3 days
Reheating
- Pan for 1 minute each side
- Microwave for 10–15 seconds
They taste best fresh.
Common Mistakes to Avoid
Oil Too Hot
- Causes dark outside and raw inside
Skipping Second Rise
- Results in dense buns
Too Much Flour
- Makes buns hard
Always keep the dough soft.
Variations You Can Try
Vanilla Milk Buns
- Add 1 teaspoon vanilla extract
Orange Zest Flavor
- Add 1 teaspoon orange zest
Cinnamon Sugar Buns
- Sprinkle cinnamon sugar after frying
Why These Buns Are So Popular
- Easy to make
- Affordable ingredients
- Loved by kids and adults
- Perfect with tea or coffee
They are a comfort food classic that never fails.
Final Thoughts
These fluffy golden fried buns are exactly what you see in the image:
- Soft
- Puffy
- Golden
- Irresistible