Ingredients for the Biscuit Layer
- 2 packs (about 400 g) tea biscuits or ladyfinger biscuits
- ½ cup milk (for dipping biscuits lightly)
These biscuits form the sturdy but soft base that absorbs flavor and holds the cream layers beautifully.
Ingredients for the Cream Layer
- 2 cups cold heavy whipping cream
- ½ cup powdered sugar
- 1 tsp vanilla extract
- 200 g cream cheese (optional, for a firmer texture)
This layer is thick, fluffy, and smooth, giving the dessert its signature creamy bite.
Ingredients for the Cherry Topping
- 2 cups cherry pie filling or canned cherries
- 2 tbsp cornstarch (if cherries are not pre-thickened)
- 2 tbsp sugar (optional, adjust to taste)
- ½ cup cherry juice or water
The glossy cherry topping is what makes this dessert visually irresistible.
Preparing the Cream Layer
Step 1: Chill Everything
Make sure the cream, bowl, and beaters are very cold. This helps achieve maximum volume.
Step 2: Whip the Cream
In a large bowl, whip the heavy cream on medium speed until it starts to thicken.
Step 3: Add Sugar and Vanilla
Gradually add powdered sugar and vanilla extract while whipping.
Step 4: Optional Cream Cheese
If using cream cheese, beat it separately until smooth, then fold it gently into the whipped cream.
The result should be a thick, fluffy, stable cream that holds its shape.
Preparing the Cherry Topping
Step 1: Heat the Cherries
In a saucepan, add cherries and juice over medium heat.
Step 2: Sweeten
Add sugar if needed, depending on the sweetness of your cherries.
Step 3: Thicken
Dissolve cornstarch in a little water and add to the saucepan, stirring constantly.
Step 4: Cool Completely
Once thick and glossy, remove from heat and let cool fully before assembling.
Cooling is essential to prevent melting the cream layer.
Preparing the Biscuit Base
Step 1: Dip Lightly
Quickly dip each biscuit into milk. Do not soak—just a quick dip.
Step 2: Arrange in Dish
Place biscuits tightly in a glass or ceramic dish, covering the entire bottom.
This layer provides structure and absorbs moisture beautifully.
Assembling the Dessert Layers
First Layer: Biscuits
Cover the base of your dish completely with dipped biscuits.
Second Layer: Cream
Spread a thick, even layer of whipped cream over the biscuits.
Third Layer: Cherry Sauce
Spoon a generous layer of cherry topping over the cream.
Repeating the Layers
Repeat the layering process:
- Biscuits
- Cream
- Cherry topping
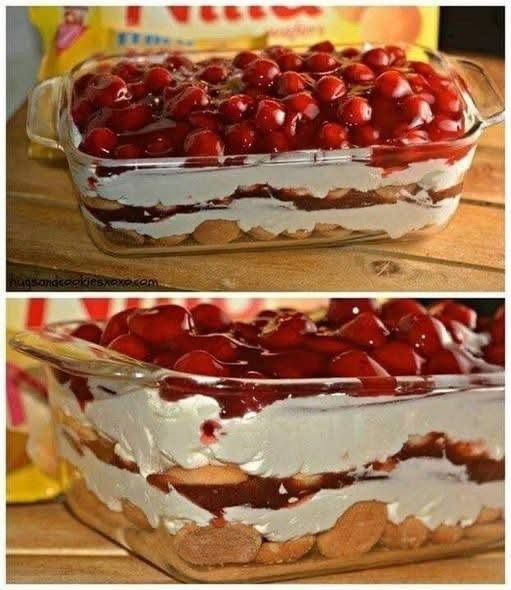
Finish with a final layer of cherries, as shown in the image.
Refrigeration and Setting
Step 1: Cover
Cover the dish tightly with plastic wrap.
Step 2: Chill
Refrigerate for at least 6 hours, preferably overnight.
This allows the biscuits to soften and the layers to firm up perfectly.
Texture and Flavor Description
- Bottom: Soft biscuit cake, slightly soaked
- Middle: Rich, fluffy vanilla cream
- Top: Sweet-tart cherry glaze
The contrast between creamy and fruity flavors makes every bite balanced and refreshing.
Serving Suggestions
Serve this dessert:
- Chilled, straight from the fridge
- In clean square slices
- With extra cherries on top
Perfect for:
- Family dinners
- Parties
- Holiday tables
- Afternoon desserts
Storage Instructions
- Store covered in refrigerator
- Keeps well for 3–4 days
- Do not freeze (cream texture may change)
Why This Dessert Is So Popular
- No baking required
- Affordable ingredients
- Easy to prepare
- Beautiful presentation
- Customizable flavors
Flavor Variations
Strawberry Version
Replace cherry topping with strawberry sauce.
Chocolate Layer
Add cocoa powder to half the cream.
Banana Biscuit Cake
Add sliced bananas between layers.
Vanilla Custard Version
Replace whipped cream with vanilla custard for a richer texture.
Common Mistakes to Avoid
- Using warm cherry topping
- Over-soaking biscuits
- Not chilling long enough
- Cutting before fully set
Tips for Perfect Results
- Always cool layers before stacking
- Use a glass dish for a visual effect
- Spread layers evenly
- Chill overnight for best texture