Ingredients Needed
To prepare these delicious chocolate nut & date bars, you will need:
- 2 cups (350 g) pitted dates
- 1 cup (120 g) mixed nuts (almonds, walnuts, cashews—your choice)
- 1/2 cup (40 g) rolled oats
- 3 tbsp peanut butter or almond butter
- 1 tbsp coconut oil
- 1/4 tsp salt
- 1/2 tsp vanilla extract
- 200 g dark chocolate or milk chocolate (for coating)
- Optional:
- 2 tbsp honey or maple syrup (extra sweetness)
- Chopped dried fruits (apricots, raisins)
- Chia seeds, flax seeds, or sesame seeds
Preparing the Date Mixture
Start by preparing the base of the bars, which comes from the natural sweetness of dates. Dates act as a binder and give the bars their chewy texture.
- Soften the dates:
If your dates are dry or slightly firm, soak them in warm water for about 10 minutes. Drain thoroughly before using. - Blend the dates:
Add the dates to a food processor and blend until you get a thick, sticky paste.
This should take about 30–40 seconds depending on your processor’s power. - Add nut butter and coconut oil:
Add the peanut butter (or almond butter) and coconut oil to the food processor.
Blend again until fully combined and creamy. - Add vanilla & salt:
Add vanilla extract and a pinch of salt to balance the sweetness.
Your mixture should now be smooth, sticky, and fragrant.
Mixing in the Nuts and Oats
Once the date paste is ready, it’s time to add texture and crunch.
- Chop the nuts:
Roughly chop your nuts with a knife or pulse briefly in the processor.
Avoid grinding them too fine—chunks add texture. - Combine with oats:
Mix the chopped nuts and rolled oats in a medium bowl. - Add the date mixture:
Add the date paste to the bowl and use your hands to combine everything.
The heat from your hands helps soften the paste, making mixing easier. - Optional add-ins:
At this stage, you can add seeds, dried fruits, or honey for extra sweetness or nutrition.
The final mixture should hold together easily when pressed.
Shaping the Bars
Shaping is key to achieving neat, evenly sized bars like the ones in your photo.
- Line a baking tray:
Use parchment paper to line a small tray or baking dish (about 20×20 cm or 8×8 inches). - Press the mixture:
Transfer the entire mixture to the tray.
Press firmly with your hands or the back of a spatula to flatten it evenly.
Tip:
Place another sheet of parchment paper on top and press with a rolling pin for a perfectly smooth surface. - Chill:
Refrigerate for 20–30 minutes to firm up before adding chocolate.
Preparing the Chocolate Coating
This layer gives your bars the luxurious, glossy finish seen in the image.
- Melt the chocolate:
You can melt the chocolate using one of two methods:
- Microwave method:
Heat in 20-second intervals, stirring each time, until fully melted. - Double boiler method:
Place a heatproof bowl over simmering water and stir until smooth.
- Microwave method:
- Add oil (optional):
A teaspoon of coconut oil helps the chocolate spread more smoothly and creates a thinner coating. - Pour over the bar base:
Once melted, pour the chocolate evenly over your date-nut mixture in the tray. - Spread evenly:
Use a spatula or spoon to smooth the chocolate into a uniform layer.
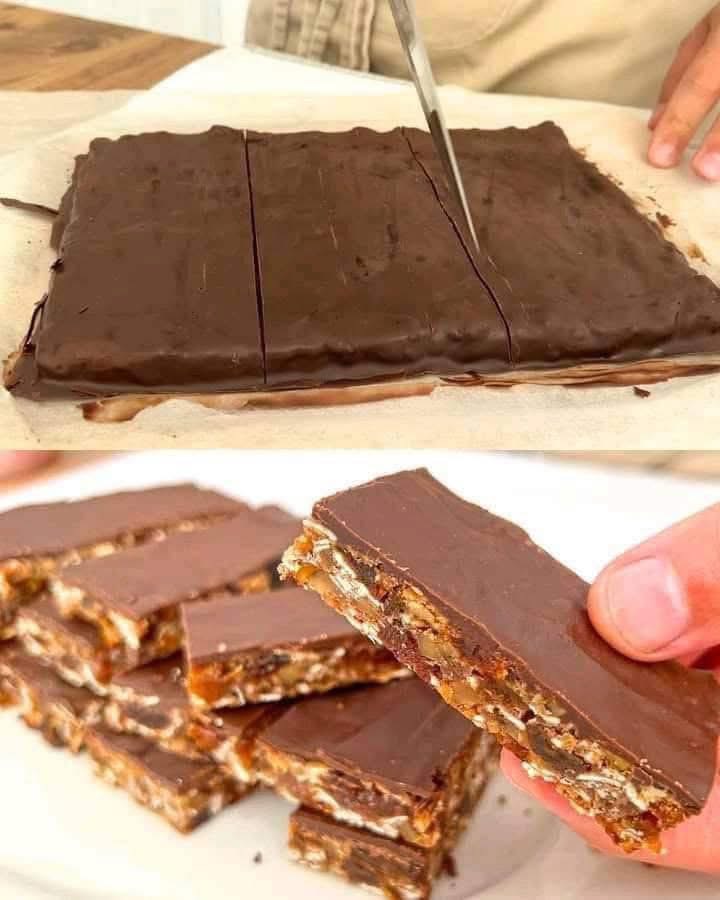
Final Chilling and Cutting
To get clean, perfect slices like the ones shown, follow these simple steps:
- Chill again:
Place the tray in the refrigerator for 1 hour or until the chocolate is fully set. - Remove from tray:
Lift the block using the parchment paper. - Score before cutting:
Use a knife to score the chocolate layer slightly before fully slicing.
This prevents the chocolate from cracking unevenly. - Cut into bars:
Slice into rectangles or squares depending on your preference.
For uniform bars, measure each piece before cutting.
Your bars are now ready to serve!
Storage Tips
These bars last surprisingly long thanks to the natural preservatives in dates and nuts.
- Refrigerator:
Store in an airtight container for up to 3 weeks. - Freezer:
Freeze individually wrapped bars for up to 3 months.
Thaw at room temperature for 10–15 minutes before eating. - Room temperature:
They can stay out for a day or two, but chocolate may soften.
Tips for Perfect Bars
Here are extra tips to help you get the best results every time:
Use soft dates
Dry dates make the mixture crumbly. Soft or soaked dates ensure perfect binding.
Choose the right chocolate
Dark chocolate adds richness and keeps the bars from being too sweet.
Milk chocolate works if you prefer a sweeter flavor.
Customize the texture
- Add more oats for firmness.
- Add more nut butter for softness.
- Add seeds for crunch.
Press firmly
This prevents the bars from falling apart when cutting.
Cut with a hot knife
Dip your knife in hot water, wipe dry, then slice.
You’ll get beautiful clean cuts.
Serving Ideas
These bars are versatile and can be enjoyed in many ways:
- As a breakfast bar with milk or coffee
- As a gym snack for quick energy
- As a kid-friendly lunchbox treat
- With yogurt for a mini dessert bowl
- As a travel snack because they don’t melt easily
Why You’ll Love This Recipe
Aside from being delicious, these bars are:
- No-bake
- Nutrient-dense
- High in fiber and healthy fats
- Refined sugar-free (if using dark chocolate)
- Customizable with countless variations
- Easy to store and travel with