Ingredients
For the Inner Filling
- 300 g milk chocolate or dark chocolate
- 100 g butter
- 1 cup chopped nuts (hazelnuts, almonds, peanuts, or a mix)
- 200 g plain biscuits (Maria, Digestive, or tea biscuits)
- 3 tablespoons cocoa powder (optional for extra richness)
- 1 teaspoon vanilla extract
- 2 tablespoons honey or sweetened condensed milk (optional for chewiness)
For the Crunchy Chocolate Coating
- 300 g milk chocolate
- ½ cup finely chopped nuts
- 1 tablespoon vegetable oil (optional for shine)
Preparing the Biscuit-Nut Filling
Crushing the Biscuits
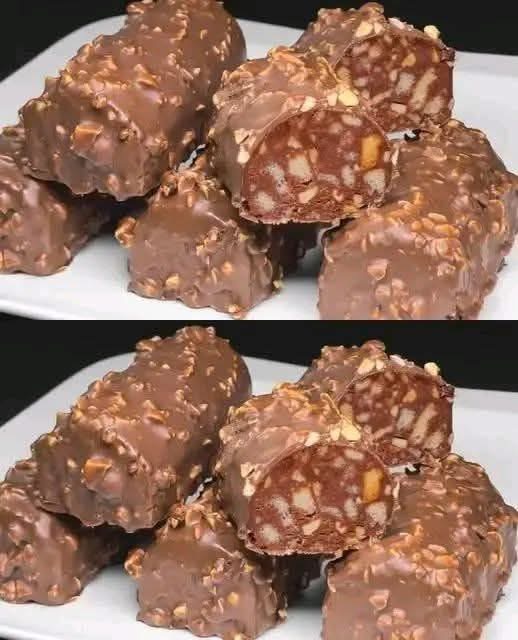
Place the biscuits in a bowl and crush them by hand into small pieces—not powder. You want irregular chunks because these create the beautiful mosaic texture visible inside the bars in your image. Avoid crushing them too finely.
Chopping the Nuts
Use any nuts you prefer: peanuts for classic crunch, almonds for firmness, or hazelnuts for a Ferrero-Rocher style flavor. Chop them into small rough pieces. They should be small enough to mix well but large enough to add noticeable crunch.
Melting the Chocolate and Butter
Double-Boiler Method
Place a heatproof bowl over simmering water. Add the chocolate and butter. Stir until smooth and fully melted. Remove from heat.
Microwave Method
Heat the chocolate and butter in a microwave-safe bowl in 20-second intervals, stirring each time until fully melted.
Adding Flavor
Add vanilla extract and honey (if using). Mix well. The mixture should be glossy and smooth.
Combining the Filling Ingredients
Mixing the Chocolate Base
Pour the melted chocolate mixture over the crushed biscuits and chopped nuts.
Coating Everything Evenly
Using a spatula or wooden spoon, gently fold the ingredients until all pieces are coated with chocolate. Work slowly to avoid breaking the biscuit chunks too much.
Optional Cocoa Boost
For a deeper chocolate flavor, sift in the cocoa powder and mix again.
Shaping the Bars
Forming Logs
Place the mixture onto a sheet of plastic wrap or parchment. Shape it into a thick log using your hands. Press gently to compact it—this helps achieve the dense interior structure shown in your image.
Wrapping and Chilling
Wrap tightly and place in the refrigerator for at least 2–3 hours or in the freezer for 1 hour to firm up quickly.
Slicing
Once firm, slice the log into bar-shaped pieces. Each piece should hold its shape well with visible chunks of biscuit and nuts.
Preparing the Crunchy Chocolate Coating
Melting the Chocolate
Melt the milk chocolate using a double boiler or microwave, just like earlier.
Adding Nuts
Mix in the finely chopped nuts. This gives the outer coating the signature crunchy, textured appearance seen in your photos.
Adding Oil (Optional)
A small amount of vegetable oil creates a shinier, smoother coating and makes dipping easier.
Coating the Bars
Dipping
Using a fork or dipping tool, lower each sliced bar into the melted chocolate mixture. Coat all sides thoroughly.
Draining Excess
Lift the bar and tap the fork gently against the bowl to remove excess chocolate.
Setting the Coating
Place the coated bars onto a tray lined with parchment paper. Refrigerate for at least 30–40 minutes until the outer shell is firm.
Once chilled, your bars will look exactly like the ones in the image—smooth chocolate coating with nut bits all around and a crunchy, mosaic-like interior when sliced.
Serving Suggestions
Presentation Ideas
- Serve them on a white platter to highlight their color and texture.
- Dust with cocoa powder for a gourmet look.
- Slice some bars diagonally for variety.
- Serve cold for maximum crunch.
With Drinks
These bars pair nicely with:
- Cold milk
- Espresso
- Hot chocolate
- Black tea
Storage Instructions
Refrigeration
Store in the fridge in an airtight container for up to 10 days.
Freezer Storage
Wrap individually and freeze for up to 3 months. Thaw in the fridge before eating.
Room Temperature
If your home is cool, they can stay out for a few hours, but the coating may soften.
Tips for Perfect Results
Use Quality Chocolate
Because chocolate is the main flavor, choose a brand with good taste and smooth melting qualities.
Don’t Over-Crush the Biscuits
The appeal of these bars is the chunky, crunchy interior—keep biscuit pieces medium-sized.
Chill Before Coating
Make sure the logs are firm before cutting and dipping. This ensures clean slices.
Control the Coating Thickness
If you like a thinner outer layer, add a bit more oil to the melted chocolate.
Customize the Nuts
Pistachios give a beautiful green contrast, walnuts add earthiness, peanuts add crunch. Mix and match freely.
Variations
White Chocolate Version
Use white chocolate inside and outside for a sweeter variation.
Dark Chocolate Bars
Use dark chocolate for a richer, less sweet snack.
Coconut Lovers
Add ½ cup shredded coconut to the filling.
Caramel Crunch
Add chopped caramel candies or toffee bits.
Fruit & Nut Bars
Add raisins, dried cherries, or cranberries for a chewy twist.