Ingredients
For the Crumb Crust & Topping
- 2 ½ cups crushed graham crackers or digestive biscuits
- ½ cup unsalted butter, melted
- ¼ cup granulated sugar (optional, depending on biscuit sweetness)
For the Pineapple Layer
- 2 cans (20 oz / 560 g each) crushed pineapple, well drained
- ½ cup pineapple juice (reserved from the cans)
- ½ cup granulated sugar
- 3 tablespoons cornstarch
For the Cream Layer
- 1 ½ cups heavy whipping cream
- 225 g (8 oz) cream cheese, softened
- 1 cup powdered sugar
- 1 teaspoon vanilla extract
Instructions
1. Make the Crumb Crust
In a mixing bowl, combine the crushed biscuits, melted butter, and optional sugar. Mix until the crumbs are fully moistened and resemble wet sand. Reserve 1 cup of this mixture for the topping later.
Press the remaining crumb mixture firmly onto the bottom of a 9×13 inch (23×33 cm) pan. Use a flat-bottomed glass to pack it tightly. Chill in the refrigerator while you prepare the layers.
2. Prepare the Pineapple Filling
This layer adds a bright, fruity sweetness that contrasts beautifully with the creamy topping.
In a saucepan over medium heat, combine:
- Drained crushed pineapple
- Reserved pineapple juice
- Sugar
- Cornstarch
Stir continuously for 5–8 minutes until the mixture thickens into a glossy pineapple gel. Remove from heat and allow it to cool completely. The texture should be spreadable, not runny.
Spread the cooled pineapple mixture evenly over the chilled crust.
3. Make the Whipped Cream Cheese Layer
This is what gives the dessert its rich, cloud-like texture.
Beat the heavy whipping cream in a cold bowl until stiff peaks form. Set aside.
In another bowl, beat the softened cream cheese with powdered sugar and vanilla until smooth and creamy. Fold the whipped cream gently into the cream cheese mixture using a spatula. The mixture should be airy, thick, and lump-free.
Spread this fluffy cream layer evenly over the pineapple layer.
4. Add the Crumb Topping
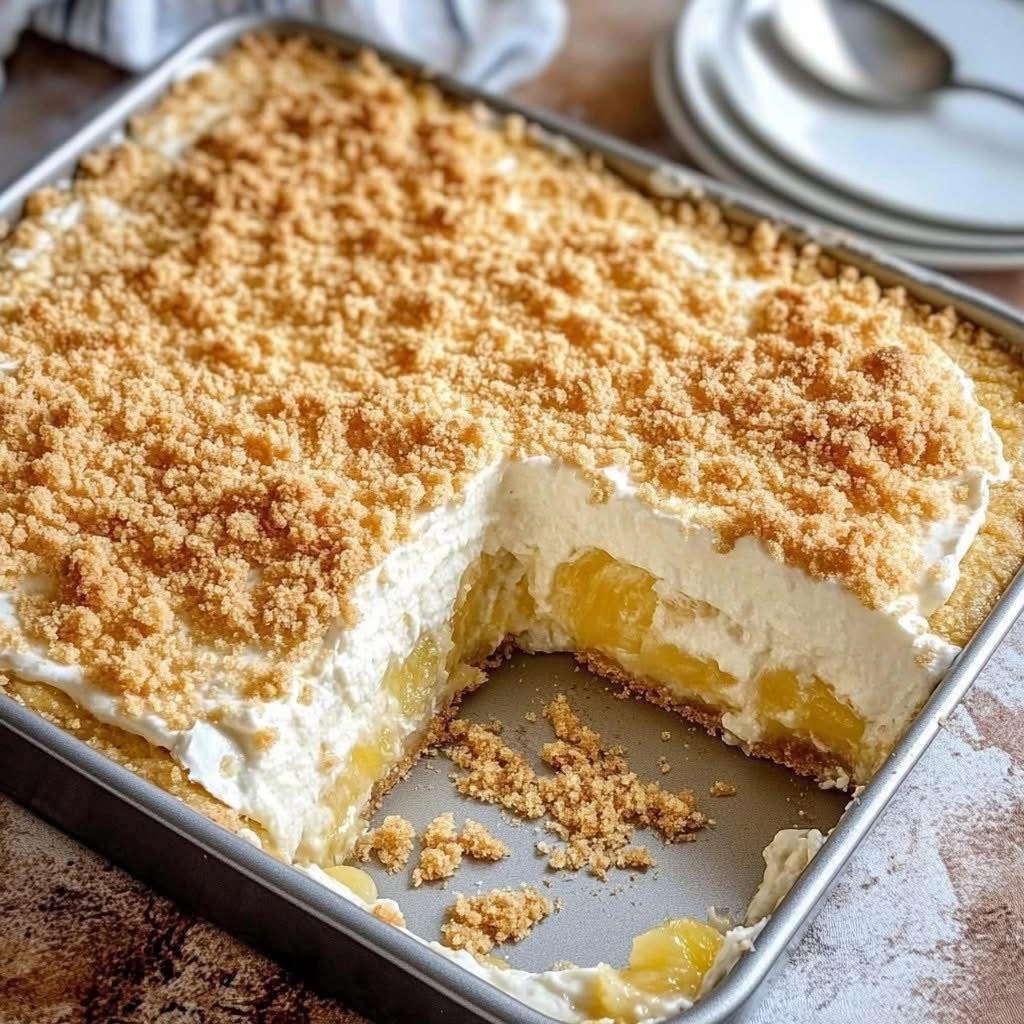
Sprinkle the reserved crumb mixture generously over the top. This adds a light crunch and completes the “crumb dream” look you see in the picture.
5. Refrigerate
Cover the pan and refrigerate for at least 4 hours, but overnight chilling is best. This helps the layers firm up and blend together for a clean slice.
Tips for the Best Pineapple Dream Dessert
Drain the Pineapple Well
If the pineapple is too wet, the dessert won’t set properly. Press through a sieve to remove excess moisture.
Use Cold Heavy Cream
Cold cream whips faster and holds structure better. You want stiff peaks for maximum fluff.
Chill Long Enough
The crust needs to firm, and the cream layer needs to settle. Overnight gives you that perfect bakery-style slice.
Pack the Crust Properly
Pressing the crust firmly prevents crumbling when you cut into the dessert.
Flavor Variations
1. Coconut Pineapple Dream
Add ½ cup shredded coconut to the pineapple layer and sprinkle some on top.
2. Lemon Pineapple Dream
Add 2 tablespoons of lemon juice and 1 teaspoon lemon zest to the cream layer for a citrus boost.
3. Strawberry-Pineapple Version
Add a thin layer of sliced strawberries between the pineapple and cream layers.
4. Nutty Crust Option
Replace half the graham crackers with crushed pecans or almonds for a richer flavor.
How to Serve
This dessert is best served chilled, directly from the refrigerator. Use a sharp knife to slice, wiping the knife between cuts for clean edges.
Pairs beautifully with:
- Iced tea
- Coffee
- Fresh fruit
- Summer lunch or barbecue meals
Storage Instructions
Refrigerator
Lasts 3–4 days covered.
Freezer
Freeze tightly wrapped portions for up to 2 months. Thaw in the fridge, not on the counter.