Ingredients for the Truffle Base
- 2 cups crushed cookies (graham crackers, digestive biscuits, or vanilla cookies)
- 1 cup creamy peanut butter
- ½ cup powdered sugar
- 1 teaspoon vanilla extract
- 3 tablespoons melted butter
- A pinch of salt
Ingredients for the Chocolate Coating
- 2 cups milk chocolate chips or chopped chocolate
- 1 tablespoon coconut oil or vegetable shortening (optional, makes a glossy finish)
Preparing the Truffle Filling
The creamy center of these truffle balls is what makes them irresistible. Begin by crushing your cookies until they become fine crumbs. You can use a food processor or seal them in a plastic bag and crush with a rolling pin. The fine texture helps the mixture bind smoothly and keeps the filling soft yet firm.
In a mixing bowl, combine the peanut butter, powdered sugar, melted butter, and vanilla extract. Mix until smooth. Then add the crushed cookies and a pinch of salt. The mixture should come together easily, forming a dough that you can roll with your hands. If it feels too sticky, add a little more cookie crumbs. If too dry, add an extra spoonful of peanut butter.
Once your mixture reaches the perfect consistency, roll it into small balls roughly the size of a tablespoon. Place them on a tray lined with parchment paper. At this stage, chilling is essential. Place the tray into your refrigerator or freezer for at least 30 minutes. This helps the balls firm up and prevents them from falling apart once you dip them into melted chocolate.
Creating the Smooth Chocolate Coating
The signature look of the truffle balls comes from a glossy, even layer of chocolate covering each one. To achieve this, place the chocolate chips or chopped chocolate into a microwave-safe bowl. Heat in 20–30 second intervals, stirring in between until fully melted. Add the coconut oil only if you want an extra shiny finish and smoother dipping consistency.
Once the chocolate has melted and become silky, take the chilled truffle balls from the freezer. Using a fork or dipping tool, gently lower each ball into the chocolate and turn them so every surface is coated. Lift carefully and allow excess chocolate to drip off before transferring the ball back onto parchment paper.
This part takes patience, but the results are worth it. You’ll notice the chocolate begins to harden quickly because the truffle balls are cold. That’s exactly what you want — a clean, firm coating with a flawless finish.
Letting the Truffles Set
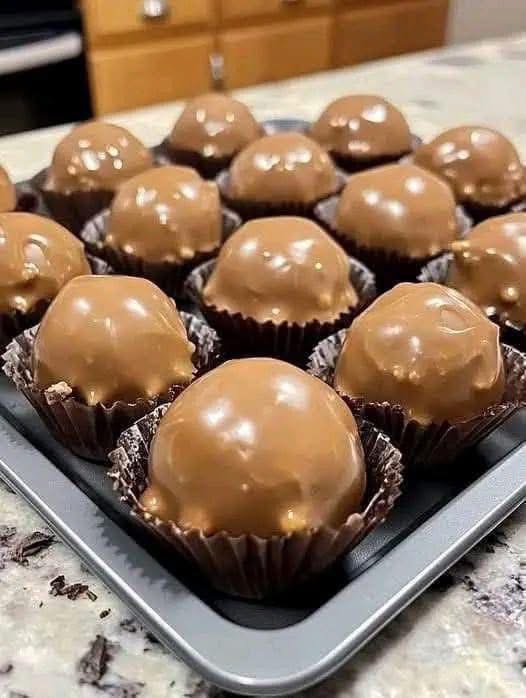
After dipping all the balls, place the tray back in the refrigerator for 10 to 15 minutes. The chocolate will fully solidify into a smooth shell. Once set, you can place each truffle into a paper candy cup, just like the ones in your photo. This not only makes them look professional but also keeps the chocolate from smudging when serving.
Why These Truffle Balls Are Special
These chocolate truffle balls achieve a perfect balance of sweetness, creaminess, and texture. The peanut butter filling has a rich, melt-in-your-mouth consistency, while the crushed cookies give it body. The chocolate coating offers a satisfying snap when you bite into it, followed by the silky center.
What sets this recipe apart is its simplicity. With just a handful of ingredients, you can create a dessert that looks like it belongs in a high-end pastry shop. They are ideal for gifting, holiday platters, family celebrations, or keeping at home for when you crave something indulgent.
Tips for Perfect Truffle Balls
- Use quality chocolate – Higher-quality chocolate melts smoother and tastes richer.
- Keep the filling chilled – Cold centers help the chocolate set quickly and neatly.
- Don’t skip the coconut oil – It’s optional, but it adds shine and smoother texture.
- Use gloves when rolling – This keeps the filling from sticking to your hands.
- Avoid moisture – Water can cause chocolate to seize. Make sure all utensils are dry.
These small steps dramatically improve your results and help you achieve that professional look.
Variations and Flavor Ideas
Once you master the basic recipe, you can customize it based on your preferences. Here are some delicious variations:
- Nutella Truffle Balls – Replace peanut butter with Nutella for a hazelnut flavor.
- Oreo Truffle Balls – Use crushed Oreo cookies and cream cheese instead of peanut butter.
- Coconut Truffle Balls – Add shredded coconut to the filling and use white chocolate for coating.
- Dark Chocolate Espresso Truffles – Mix espresso powder into the filling and coat with dark chocolate.
- Almond Crunch Truffles – Add crushed almonds to the filling for extra texture.
These transformations make the recipe highly versatile and suitable for different occasions.
Storing Your Truffle Balls
These chocolate truffle balls store beautifully and taste even better the next day. You can keep them:
- In the refrigerator for up to 10 days
- In the freezer for up to 3 months
If freezing, store them in an airtight container with parchment paper between layers to prevent sticking. When ready to serve, simply thaw them for 10–15 minutes.
Serving Suggestions
These truffle balls shine on dessert tables, gift boxes, and holiday platters. You can also drizzle them with white chocolate, sprinkle crushed nuts on top, or dust them with cocoa powder for an artistic touch. They pair wonderfully with coffee, tea, or a glass of milk.
With their elegant appearance, they make excellent treats for birthdays, anniversaries, weddings, or festive gatherings. Whether shared or enjoyed alone, they deliver a delightful, luxurious experience.
Final Thoughts
Homemade chocolate truffle balls are simple to prepare but incredibly impressive to serve. This recipe gives you a rich, smooth filling wrapped in a beautifully glossy chocolate shell — just like the stunning treats in your photo. The flavors blend perfectly, the texture is divine, and the presentation is irresistible.