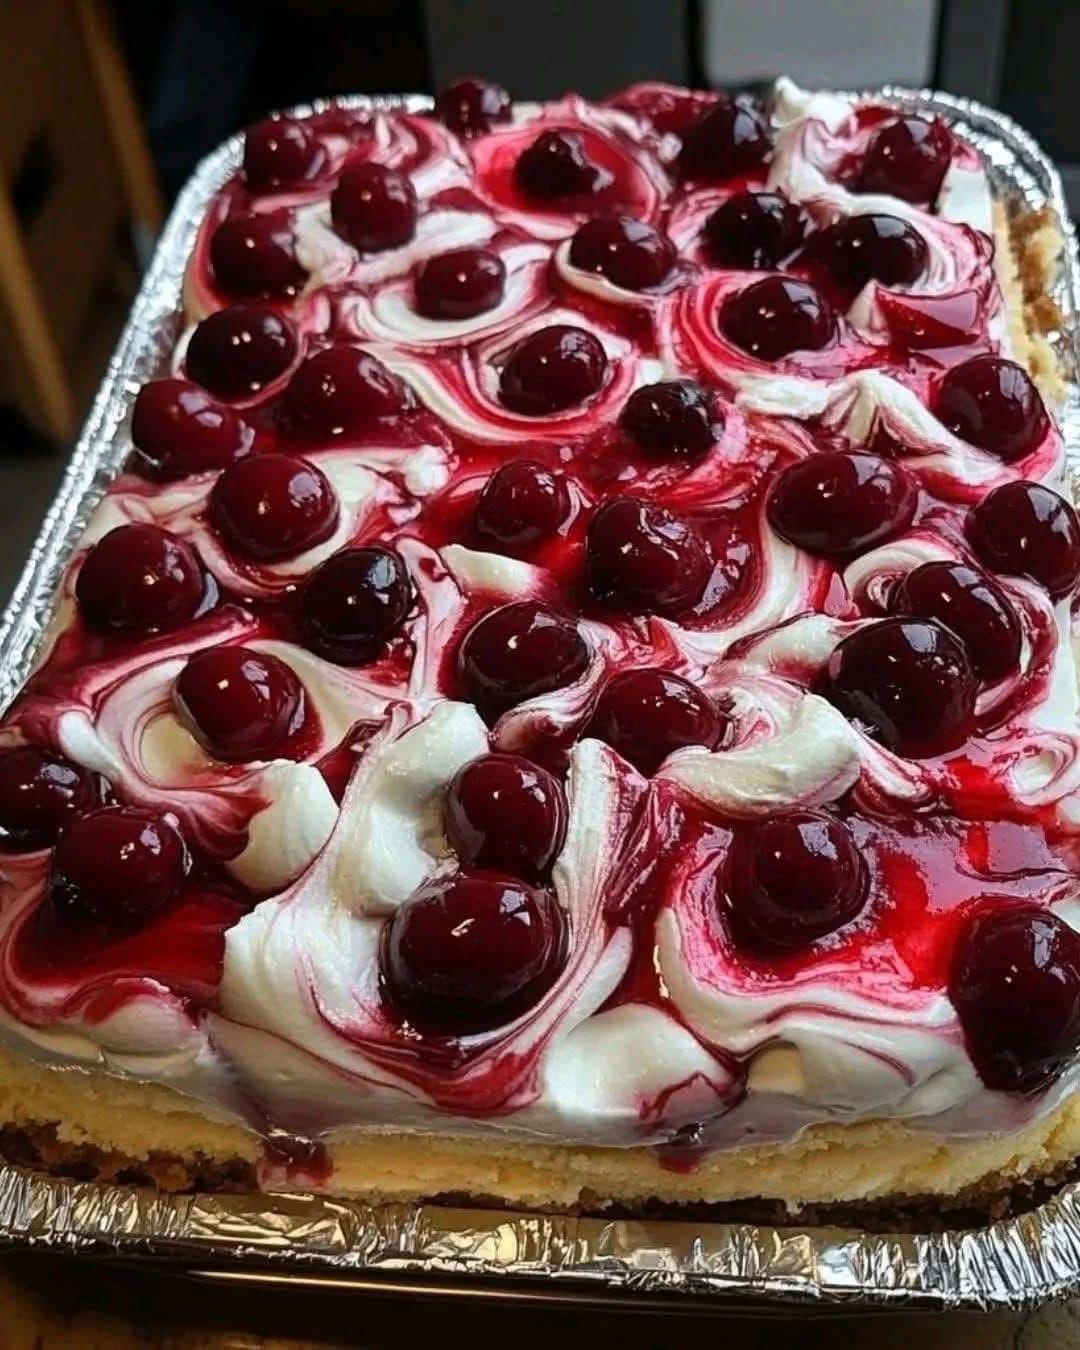
Cherry swirl cheesecake dessert is one of the most visually stunning and delicious treats you can prepare at home. The dessert shown in your image features a creamy cheesecake base topped with luscious whipped cream, rich cherry topping, and beautiful red-and-white swirls that create an elegant marbled effect. This recipe is perfect for parties, holidays, potlucks, or simply when you want a dessert that looks impressive with minimal effort. Its flavor combines the tanginess of cream cheese, the sweetness of cherries, and the lightness of whipped cream, making it a crowd-pleasing dessert for all ages.
This cherry swirl cheesecake dessert stands out because it marries a classic cheesecake flavor with the ease of a no-fuss topping. While traditional cheesecakes require long baking times and delicate water baths, this version is much simpler yet still provides the rich texture expected in a cheesecake. The base layer is firm and smooth, the middle layer is creamy and indulgent, and the top layer bursts with bright cherry flavor. The final result looks just like the dessert in your image, with a glossy red cherry finish and gorgeous swirled patterns that make the dish look as if it came straight from a high-end bakery.
To prepare this cherry swirl cheesecake, the first step is assembling the crust. Begin with about two cups of crushed graham crackers, digestive biscuits, or any firm cookie of your choice. Add half a cup of melted butter and two tablespoons of sugar to give the crust a richer flavor. Mix everything until the crumbs are evenly coated with butter. Press this mixture firmly into the bottom of a rectangular or square baking pan, like the one in your picture. Use the back of a spoon or the bottom of a measuring cup to flatten it tightly, ensuring a solid base that holds together once chilled or baked. Bake the crust for 8–10 minutes at 175°C (350°F), then set it aside to cool.
Next comes the creamy cheesecake filling. This layer is what gives the dessert its signature richness. In a large mixing bowl, beat three packs of softened cream cheese until completely smooth. The texture should be soft, velvety, and free of lumps. Add one cup of sugar and continue mixing until the sugar dissolves into the cream cheese. Then add three large eggs, one at a time, mixing gently after each addition. Overmixing can add too much air, which affects the final texture, so blend only until incorporated. Add one teaspoon of vanilla extract and half a cup of sour cream or Greek yogurt. This gives the cheesecake a pleasant tang that balances sweetness.
Pour the cream cheese filling over the cooled crust and spread it evenly with a spatula. Tap the pan gently on the counter to eliminate air bubbles and ensure the filling settles smoothly. Bake this layer at the same temperature for about 30–35 minutes or until the center is set but still slightly jiggly. Once baked, allow the cheesecake to cool completely before adding the topping. If you want the dessert to slice beautifully like the one in your image, chilling it for at least two hours is important. The colder the base, the easier it will be to swirl the toppings without sinking into the cheesecake.
For the stunning cherry swirl topping, start with a tub of whipped topping such as Cool Whip or freshly whipped cream. Spread a thick layer over the chilled cheesecake base. This adds a fluffy contrast to the dense cheesecake underneath. Once the whipped layer is evenly distributed, spoon cherry pie filling across the top. The cherries in the image appear glossy, plump, and vibrant red — exactly what canned cherry filling looks like. If you prefer something homemade, you can make your own cherry topping by simmering fresh or frozen cherries with a bit of sugar and cornstarch until thickened.
The swirl effect is what makes this dessert visually irresistible. After dolloping cherry filling on top of the whipped cream, use a skewer, small knife, or toothpick to gently drag the red cherry topping through the white cream in circular motions. Do not overmix — the goal is to create elegant red-and-white patterns, not blend everything into pink. The cherries should remain whole, sitting beautifully across the surface, just as seen in your photo. Each cherry adds both flavor and decoration, giving the dessert a striking appearance perfect for taking pictures or serving to guests.
Once the topping is swirled to your liking, refrigerate the dessert again for at least four hours, or preferably overnight. This chilling time allows the layers to firm up and creates clean slices when served. The longer it chills, the more the flavors meld together. When ready to serve, use a sharp knife dipped in hot water to cut through the layers smoothly. Each slice will reveal the buttery crust, creamy cheesecake interior, and bright cherry swirl topping — a beautiful combination that mirrors the dessert in your image.
One of the major benefits of this recipe is how customizable it is. You can switch the cherry topping for other fruits like strawberries, blueberries, raspberries, or mixed berry compotes. For a chocolate twist, drizzle melted chocolate over the whipped cream before swirling in the fruit topping. If you want added texture, sprinkle crushed nuts, white chocolate chips, or cookie crumbs on top. The base can also be changed — chocolate cookie crumbs, vanilla wafers, or Biscoff cookies all make excellent variations.