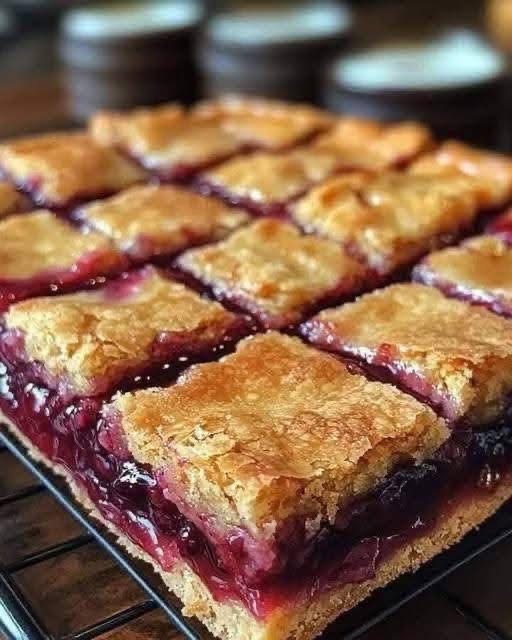
Cherry pie bars are one of those irresistible desserts that combine the nostalgic flavor of classic cherry pie with the convenience and simplicity of a bar cookie. The image you shared shows perfectly baked squares with a golden top crust, a vibrant, juicy cherry filling, and a firm buttery base that holds everything together beautifully. These cherry pie bars offer all the richness, warmth, and fruitiness of a homemade pie but in a format that is easier to slice, serve, and enjoy. Whether you’re preparing them for a family gathering, a holiday event, or simply craving a comforting dessert to enjoy with coffee or tea, this recipe offers a satisfying combination of sweetness, texture, and nostalgia.
One of the biggest advantages of cherry pie bars is how beginner-friendly they are. Even if you’re not an experienced baker, this recipe comes together quickly with basic pantry ingredients such as flour, sugar, eggs, butter, and a can of cherry pie filling. The crust itself resembles a soft cookie dough, creating a delicate but sturdy base that supports the fruit filling without becoming soggy. The subtle sweetness and buttery flavor make the crust a perfect partner to the tart cherries. The top layer bakes into a golden, slightly crisp cover that offers a beautiful contrast to the juicy red center.
To begin preparing cherry pie bars, preheat your oven to 175°C (350°F). Choose a rectangular baking pan, typically 9×13 inches, which gives enough space for the layers to bake evenly. Line the pan with parchment paper or grease it well with butter to ensure easy removal of the bars once cooled. A good release is essential because the cherry filling can be sticky, and the crust needs to remain intact for clean slicing.
Next, prepare the dough. In a large mixing bowl, cream together one cup of softened butter with one and a half cups of sugar until light and fluffy. This step creates the base texture of the crust, helping it bake into a tender, rich foundation. Once the mixture is fluffy, beat in four eggs, one at a time, ensuring each egg is fully incorporated before adding the next. Add one teaspoon of vanilla extract, which rounds out the flavor of the crust and adds a layer of sweetness that complements the cherry filling.
In a separate bowl, whisk together three cups of all-purpose flour, one teaspoon of salt, and, optionally, half a teaspoon of baking powder if you want a slightly lighter texture. Slowly add the dry ingredients into the butter mixture, mixing until just combined. The dough will be thick but spreadable. Spread about two-thirds of this dough evenly across the bottom of the prepared baking pan. The key is to press it gently using a spatula or your fingers so that it forms a uniform layer, ensuring even baking.
Once the base is ready, spoon your cherry pie filling over the crust. You can use about two cans of cherry pie filling for a generous, thick layer like the one shown in your image. Spread it evenly so that every bar has a good amount of fruit inside. The cherries provide a beautiful burst of color and flavor, and their juices melt into the bottom crust slightly as they bake, creating a deliciously cohesive dessert.
After spreading the filling, add the remaining dough on top. You do not need to cover the cherries completely. Instead, drop spoonfuls of dough across the surface, allowing some of the cherry filling to peek through. As the bars bake, the dough spreads slightly and turns golden, creating the beautiful cracked top crust seen in the picture. This method gives the bars their signature look and ensures a perfect balance of crust and fruit in every bite.
Bake the bars in the preheated oven for 35 to 40 minutes. You’ll know they’re done when the top turns a beautiful golden brown and the edges are lightly crisp. The filling will bubble slightly around the corners, indicating that it has heated through and thickened. Let the bars cool completely on a cooling rack before slicing. Cooling is essential because the filling needs time to set, and slicing too early can cause the bars to fall apart.
Once cooled, cut the cherry pie bars into clean squares or rectangles. You can make large bakery-style pieces or smaller bite-sized bars depending on your preference. The layers should be clearly visible: a buttery crust on the bottom, a thick cherry layer in the middle, and a golden, slightly crackled top. The aroma of cherry, vanilla, and baked pastry will fill the kitchen, making these bars incredibly inviting.
Cherry pie bars are perfect for serving at potlucks, picnics, or afternoon snacks. They travel well and stay fresh for several days when stored in an airtight container. You can warm individual pieces slightly in the microwave or enjoy them cold. For an extra touch of indulgence, serve them with a scoop of vanilla ice cream or a dollop of whipped cream. The cold creaminess contrasts beautifully with the sweet and tart cherry filling.
This recipe is also easy to customize. You can experiment with different fruit fillings such as blueberry, raspberry, strawberry, or mixed berry. Lemon zest can be added to the crust for brightness, or almond extract can be used instead of vanilla to complement the cherry flavor even more. For a crumb-like top, mix the remaining dough with a bit of extra flour and sugar before scattering it over the filling.
Overall, cherry pie bars offer the perfect combination of simplicity, flavor, and visual appeal. With their golden crust, vibrant fruit layer, and soft, buttery texture, they provide a delicious twist on the classic cherry pie while being easier to bake and enjoy. Whether you are experienced in baking or trying something new, these bars are guaranteed to become a favorite treat you’ll want to make again and again.