🛒 Ingredients
For the vanilla base
- 500 ml heavy whipping cream, very cold
- 1 can sweetened condensed milk, approximately 395 g
- 1 tablespoon pure vanilla extract
- ¼ teaspoon salt
- 2 tablespoons powdered sugar, optional
- 2 tablespoons full-fat milk
- 2 tablespoons milk powder, optional but highly recommended
For an even richer texture
You can also add:
- 2 tablespoons cream cheese, softened
- 1 tablespoon corn syrup or glucose syrup
These optional ingredients help create a smoother, softer texture and reduce the tendency of homemade ice cream to become extremely hard in the freezer.
🥛 1. Chill everything first
Before beginning, place your mixing bowl and whisk attachments in the refrigerator or freezer for approximately 10–15 minutes.
Make sure the heavy cream is very cold.
Cold cream whips much more easily and gives you a lighter final texture.
If you’re making this recipe during warm weather, keep the cream refrigerated until the exact moment you’re ready to whip it.
🍦 2. Prepare the condensed-milk mixture
Pour the sweetened condensed milk into a large bowl.
Add:
- Vanilla extract
- Salt
- Milk powder
- 2 tablespoons milk
If you’re using cream cheese, add it now as well.
Whisk everything together until smooth.
The salt is important even though we’re making a sweet dessert.
A tiny amount of salt balances the sweetness and makes the vanilla flavor taste more pronounced.
If you’re using glucose syrup or corn syrup, add it at this stage.
🌼 3. Add plenty of vanilla
Vanilla is the main flavor in this dessert, so don’t be afraid to use enough.
For a classic vanilla flavor, use 1 tablespoon pure vanilla extract.
If you have vanilla bean paste, you can replace the extract with approximately 1 tablespoon vanilla bean paste.
Vanilla bean paste will give the dessert beautiful tiny vanilla-speckled dots.
For an especially luxurious version, scrape the seeds from one vanilla bean and add them to the mixture.
🥄 4. Whip the cream
Pour the cold heavy cream into your chilled mixing bowl.
Whip on medium speed.
After a minute or two, the cream will begin to thicken.
Continue whipping until you reach medium peaks.
When you lift the whisk, the cream should form a peak that holds its shape but still looks smooth and creamy.
Don’t continue whipping until the cream becomes grainy.
If you over-whip it, you are essentially beginning to make butter.
The goal is fluffy whipped cream.
🍨 5. Combine the two mixtures
Take approximately one-third of the whipped cream and add it to the condensed-milk mixture.
Gently fold it in.
This first addition lightens the condensed-milk mixture.
Now add the remaining whipped cream.
Fold gently using a silicone spatula.
Use slow movements.
You don’t want to aggressively stir because you would remove the air that you just incorporated into the cream.
Continue folding until the mixture is evenly combined.
It should look thick, smooth, and extremely creamy.
❄️ 6. Prepare the container
Transfer the mixture into a freezer-safe container.
A shallow container is preferable to a very deep one because the mixture freezes more evenly.
Smooth the surface.
Cover tightly with a lid.
If your container doesn’t have a good lid, press a sheet of plastic wrap directly against the surface of the ice cream before covering it.
This helps reduce ice crystals.
🧊 7. Freeze
Place the container in the freezer.
Freeze for approximately 6–8 hours, preferably overnight.
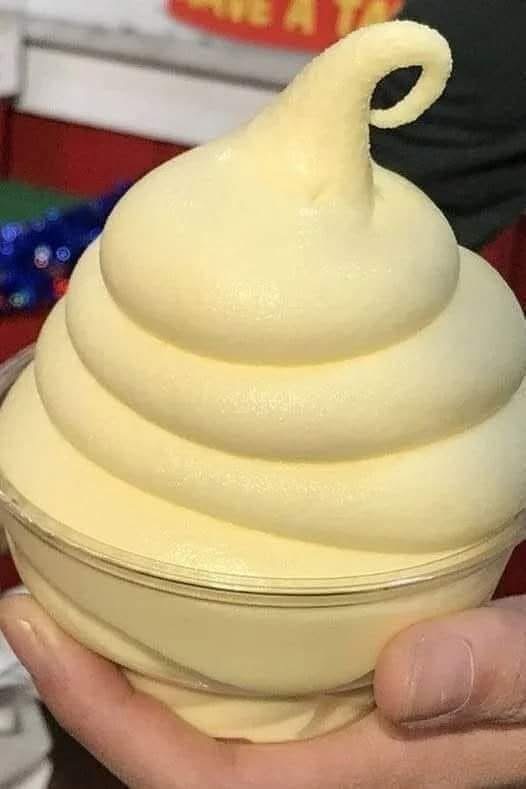
However, if your goal is specifically to reproduce the soft, piped appearance in the photograph, don’t wait until the mixture is rock hard.
You’ll eventually need it to be soft enough to pass through a piping bag.
🍦 8. Create the soft-serve texture
This is the trickiest part.
If your ice cream has frozen very firmly overnight, remove it from the freezer and allow it to sit at room temperature for approximately 10–20 minutes.
The exact time depends on your freezer and the size of your container.
You want the ice cream to become:
firm enough to hold a spiral but soft enough to pipe.
Don’t let it melt completely.
If it becomes liquid, return it to the freezer briefly.
⭐ 9. Prepare your piping bag
To create the spiral shape shown in the photograph, use a large piping bag.
A large open-star piping tip works particularly well.
A large round tip will produce a smoother spiral.
For a more traditional soft-serve appearance, use a large star tip.
Place the piping tip into the piping bag.
Fill the bag with the softened ice cream.
Don’t overfill the bag.
Working with smaller quantities gives you much better control.
🍦 10. Pipe the beautiful swirl
Place a dessert cup on a stable surface.
Hold the piping bag vertically.
Start in the center of the cup.
Apply steady pressure.
Pipe a circular base.
Continue moving around the same center while gradually moving upward.
As you build the dessert, make each layer slightly smaller than the previous one.
This creates the characteristic:
wide bottom → narrower middle → small top
shape.
At the very top, release pressure while pulling the piping bag upward.
This creates the little pointed tip.
For the exact appearance in your photo, make the final tip slightly curved.
🌀 The secret to a perfect spiral
Don’t move the piping bag too quickly.
If you move too quickly, the layers will be thin and uneven.
If you move too slowly, too much ice cream will come out and the swirl can collapse.
Try to maintain:
constant pressure + constant circular movement + gradual upward motion.
The ice cream should come out as a continuous ribbon.
❄️ 11. Freeze the finished swirls
Once you’ve piped the individual servings, place the cups on a tray.
Put them back into the freezer.
Freeze for approximately 30–60 minutes.
This firms the outside of the swirl while keeping the interior creamy.
If you’re serving them immediately, you can skip this step.
🍨 12. How to get the glossy appearance
The dessert in the photo has a very smooth, almost glossy surface.
Several things help create that effect.
Use enough fat
Full-fat heavy cream produces a much smoother texture than low-fat milk.
Don’t over-whip
Over-whipped cream can produce a rough, grainy appearance.
Use condensed milk
The sugar and milk solids contribute to a creamy texture.
Avoid large ice crystals
Freeze the mixture quickly and keep the container tightly covered.
Don’t repeatedly thaw and refreeze
Repeated temperature changes encourage larger ice crystals.
🍦 No-piping-bag version
If you don’t have a piping bag, you can still make a beautiful dessert.
Allow the ice cream to soften slightly.
Scoop it into a cup.
Use the back of a spoon to create a spiral.
Or transfer it to a zip-top freezer bag.
Cut one corner off the bag.
Squeeze the ice cream into the cup in a circular motion.
This won’t create quite as precise a swirl, but it works surprisingly well.
🍫 Chocolate version
You can easily turn this into chocolate soft-serve.
Add:
- 3 tablespoons unsweetened cocoa powder
- 50 g melted and cooled dark chocolate
to the condensed-milk mixture.
Whisk until completely smooth before folding in the whipped cream.
For an even more intense chocolate flavor, add a small pinch of instant espresso powder.
🍓 Strawberry version
For a strawberry variation, prepare approximately 200 g strawberries.
Wash and remove the stems.
Blend them into a smooth purée.
Cook the purée in a small saucepan over medium heat for several minutes to reduce some of its water.
Allow it to cool completely.
Fold it into the ice cream mixture.
You can also add small pieces of freeze-dried strawberries.
The result is a beautiful pink strawberry soft-serve dessert.
🍌 Banana version
For banana soft-serve flavor, use 2 very ripe bananas.
Mash or blend them until smooth.
Add them to the condensed-milk mixture.
A little cinnamon works beautifully with banana.
For a more indulgent version, add chopped toasted walnuts.
🍯 Honey vanilla version
Replace part of the condensed milk with a small amount of honey.
For example, add:
- 1 tablespoon honey
- 1 teaspoon extra vanilla
Honey gives the dessert a slightly floral flavor.
Don’t add too much because the condensed milk is already very sweet.
☕ Coffee version
For a coffee-flavored dessert, dissolve:
1–2 teaspoons instant espresso powder
in the 2 tablespoons of milk.
Mix this into the condensed milk.
Continue with the recipe as normal.
This creates a creamy coffee soft-serve that is particularly good with chocolate shavings.
🍪 Cookies-and-cream version
Crush approximately 100 g chocolate sandwich cookies.
Prepare the vanilla mixture.
Fold approximately three-quarters of the cookie crumbs into the ice cream.
Reserve the rest for topping.
When piping the dessert, sprinkle cookie crumbs between the layers.
This gives you a dramatic black-and-white appearance.
🥜 Peanut butter version
For peanut butter ice cream, add approximately:
3 tablespoons smooth peanut butter
to the condensed-milk mixture.
Warm the peanut butter slightly if necessary so it mixes easily.
You can also drizzle a small amount of melted peanut butter over the finished swirl.
Top with crushed peanuts.
🍦 How to make the swirl taller
If you want a very tall swirl like the one shown in the photograph, the ice cream needs to have enough structure.
The most important factors are:
- Very cold heavy cream
- Correct whipping
- Enough time in the freezer
- Softening only slightly before piping
- A large piping tip
- Steady pressure
- Immediate chilling after piping
If the swirl collapses, the ice cream is probably too warm.
Place the mixture back in the freezer for another 15–20 minutes, then try again.
If it is impossible to pipe, it has probably become too cold.
Allow it to soften slightly.
🥄 How to serve it
This dessert is delicious on its own, but you can make it more interesting with toppings.
Try:
- Chocolate sauce
- Caramel sauce
- Crushed cookies
- Chopped pistachios
- Toasted almonds
- Fresh strawberries
- Blueberries
- Shredded coconut
- Sprinkles
- Mini chocolate chips
- Crushed waffle cones
For a simple vanilla version, a tiny drizzle of caramel and a few toasted nuts are especially good.
🍓 Party cups
This recipe works beautifully for parties.
Prepare small transparent cups.
Pipe a small swirl into each.
Top with:
- One berry
- A tiny cookie
- Chocolate shavings
- A little caramel
Because the cups are individually portioned, they’re easy to serve.
You can prepare them ahead of time and keep them frozen.
Remove them approximately 5–10 minutes before serving so they soften slightly.
🧊 Storage
Keep the finished dessert tightly covered in the freezer.
For the best texture, consume it within approximately 1–2 weeks.
It may remain safe for longer when continuously frozen, but the texture and flavor can gradually deteriorate.
Avoid repeatedly thawing and refreezing the dessert.
If you are storing individual piped portions, place them in airtight containers or cover them very well.
⚠️ Important food-safety note
Because this recipe contains dairy, keep it refrigerated or frozen as appropriate.
Don’t leave the finished dessert sitting at room temperature for extended periods.
When serving at a party, put out smaller batches and keep the remaining portions frozen.
🍦 Complete Recipe Card
Creamy Vanilla Soft-Serve Style Ice Cream
Ingredients
- 500 ml heavy whipping cream
- 395 g sweetened condensed milk
- 1 tbsp vanilla extract
- ¼ tsp salt
- 2 tbsp milk
- 2 tbsp milk powder
- 2 tbsp cream cheese, optional
- 1 tbsp glucose/corn syrup, optional
Instructions
- Chill the mixing bowl and whisk.
- Combine condensed milk, vanilla, salt, milk, and milk powder.
- Add optional cream cheese and glucose syrup.
- Whisk until smooth.
- Whip the cold heavy cream to medium peaks.
- Fold one-third of the whipped cream into the condensed-milk mixture.
- Gently fold in the remaining whipped cream.
- Transfer to a freezer-safe container.
- Cover tightly.
- Freeze for 6–8 hours or overnight.
- Allow it to soften slightly before piping.
- Transfer to a large piping bag fitted with a star tip.
- Pipe a circular base into each cup.
- Continue upward in gradually smaller circles.
- Finish with a pointed swirl.
- Freeze the finished cups for another 30–60 minutes.
- Serve with your favorite toppings.
🌟 Final result
You’ll get a rich, smooth, creamy vanilla frozen dessert with a soft-serve-style texture. When piped through a large star nozzle, it can form the tall, layered spiral seen in your photograph.