A Stunning Citrus Dessert with Caramelized Beauty
There’s something magical about flipping a cake and revealing a glossy, jewel-like layer of caramelized fruit on top. The Upside-Down Orange Cake is one of those timeless desserts that never fails to impress. With its vibrant citrus slices, buttery caramel glaze, and soft, moist sponge, this cake is as beautiful as it is delicious.
Unlike traditional cakes that rely heavily on frosting, this one lets nature shine. The oranges become the decoration, the flavor, and the soul of the dessert—all in one.
In this complete guide, you’ll learn everything you need to create the perfect upside-down orange cake—from ingredient selection and baking techniques to variations, expert tips, and presentation ideas.
🌟 Why This Cake Is So Famous
Upside-down cakes have been beloved for generations, with the pineapple version being the most iconic. But orange upside-down cake brings a fresh, slightly tangy twist that feels more refined and elegant.
✔ Naturally Beautiful
No frosting needed—the caramelized oranges create a stunning top layer.
✔ Perfect Flavor Balance
Sweet caramel + citrus tang + buttery cake.
✔ Moist and Tender
Thanks to the fruit juices and syrup.
✔ Impressive Yet Simple
Looks gourmet but is surprisingly easy to make.
🍊 The Star Ingredient: Oranges
Oranges are the heart of this cake, and choosing the right ones makes all the difference.
🌿 Best Types of Oranges
- Navel oranges – Sweet and easy to slice
- Blood oranges – Deep red color for a dramatic look
- Valencia oranges – Juicy with balanced sweetness
🍽 Flavor Profile
Oranges bring:
- Bright citrus notes
- Natural sweetness
- Slight tartness
- Aromatic freshness
🛒 Ingredients You’ll Need
🍊 Topping (Caramelized Layer)
- 3–4 oranges, thinly sliced
- 1/2 cup sugar
- 1/4 cup butter
🧁 Cake Batter
- 1 1/2 cups all-purpose flour
- 1 teaspoon baking powder
- 1/2 teaspoon baking soda
- 1/4 teaspoon salt
🥛 Wet Ingredients
- 2 eggs
- 3/4 cup sugar
- 1/2 cup butter (softened)
- 1/2 cup milk
- 1 teaspoon vanilla extract
- Zest of 1 orange
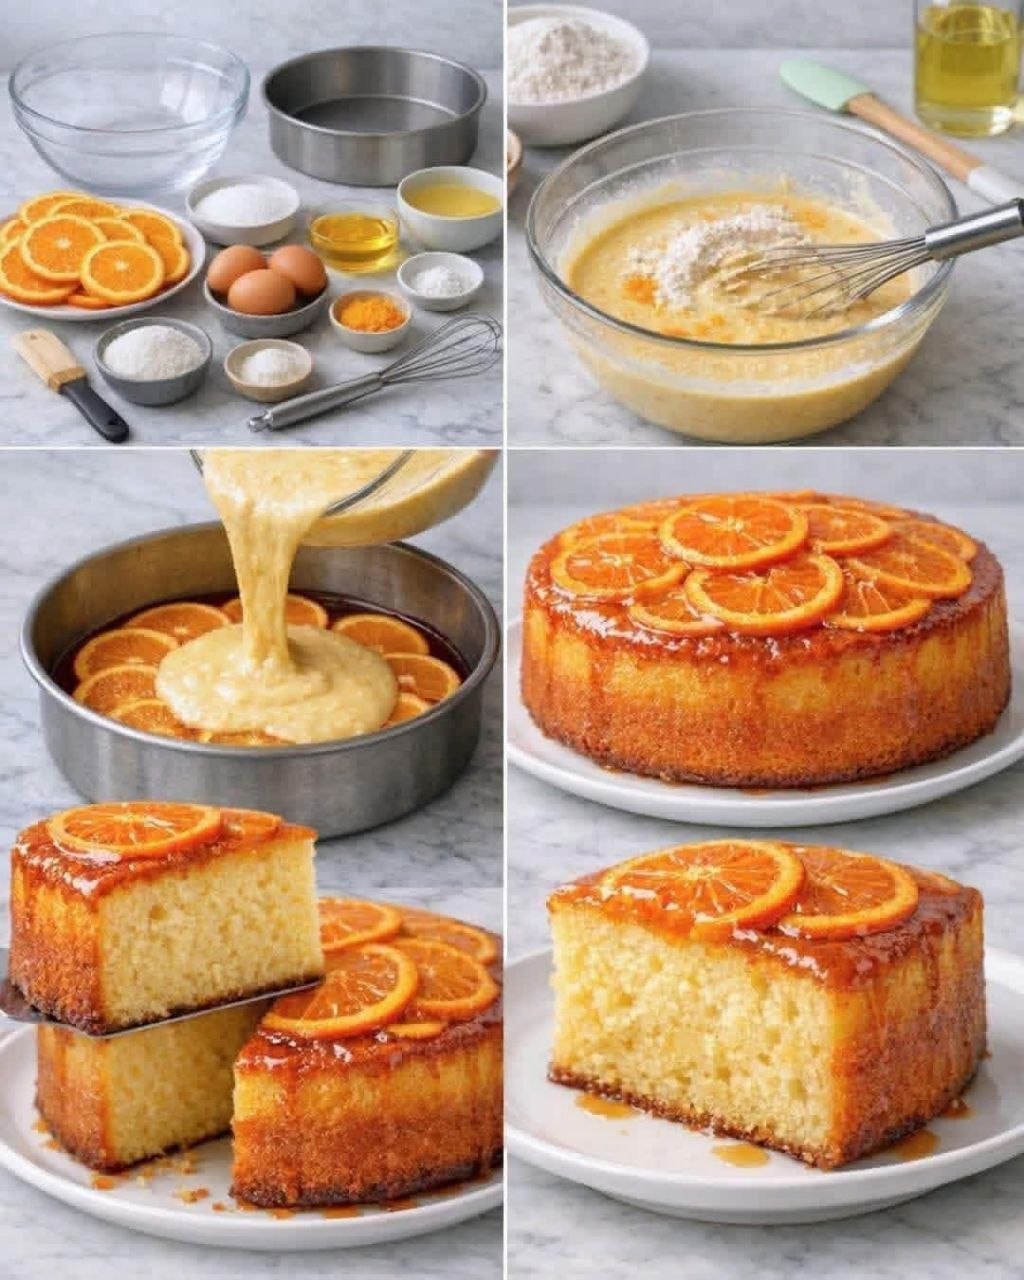
🥣 Step-by-Step Instructions
🔥 Step 1: Prepare the Pan
Preheat your oven to 180°C (350°F).
Grease a round cake pan and line the bottom with parchment paper.
🍯 Step 2: Make the Caramel Base
In a saucepan:
- Melt butter
- Add sugar
Cook until it turns golden and slightly thick.
Pour the caramel into the cake pan and spread evenly.
🍊 Step 3: Arrange the Orange Slices
Place orange slices over the caramel in a decorative pattern.
Overlap slightly for a beautiful finish.
👉 Tip: Remove seeds and slice thinly for best results.
🧁 Step 4: Prepare Dry Ingredients
In a bowl, whisk together:
- Flour
- Baking powder
- Baking soda
- Salt
🥛 Step 5: Mix Wet Ingredients
In another bowl:
- Beat butter and sugar until light and fluffy
- Add eggs one at a time
- Mix in vanilla and orange zest
🥄 Step 6: Combine Everything
Alternate adding dry ingredients and milk to the wet mixture.
Mix until smooth but do not overmix.
🍰 Step 7: Assemble the Cake
Pour the batter gently over the orange slices.
Spread evenly without disturbing the pattern.
🔥 Step 8: Bake
Bake for 35–45 minutes or until a toothpick comes out clean.
🔄 Step 9: Flip the Cake
Let the cake cool for 10–15 minutes.
Place a plate over the pan and carefully flip.
Lift the pan slowly to reveal the caramelized orange top.
🍽 Texture and Flavor Profile
This cake is:
- Moist and tender inside
- Sticky and glossy on top
- Sweet with a citrus tang
- Light yet rich
🍊 The Magic of the Upside-Down Method
The upside-down technique allows the fruit to cook in caramel, creating:
- Deep flavor
- Soft, melt-in-your-mouth texture
- Natural decoration
🔄 Variations You Can Try
🍫 Chocolate Orange Cake
Add cocoa powder for a rich chocolate-citrus combo.
🥥 Coconut Orange Cake
Add shredded coconut to the batter.
🍯 Honey Orange Cake
Replace sugar with honey for a floral sweetness.
🌰 Nutty Version
Add almonds or walnuts for crunch.
🍋 Citrus Mix
Combine oranges with lemons or grapefruits.
💡 Pro Tips for Success
✔ Slice Oranges Thinly
Ensures they cook evenly and look elegant.
✔ Don’t Overcook Caramel
It should be golden, not dark brown.
✔ Let Cake Rest Before Flipping
Prevents breaking.
✔ Use Parchment Paper
Helps release the cake easily.
✔ Add Zest for Extra Flavor
Enhances citrus aroma.
❌ Common Mistakes to Avoid
- Burning the caramel
- Using thick orange slices
- Flipping too early
- Overmixing batter
- Not greasing the pan properly
🍽 Serving Ideas
🍨 With Ice Cream
Vanilla ice cream pairs beautifully.
☕ With Coffee or Tea
Perfect afternoon treat.
🍯 With Syrup Drizzle
Add extra orange syrup for more moisture.
🎉 For Special Occasions
Serve as a centerpiece dessert.
🧊 Storage Tips
Room Temperature
Store covered for up to 2 days.
Refrigerator
Keeps for up to 5 days.
Freezing
Wrap slices and freeze for up to 2 months.
🧠 Nutritional Insights
🍊 Oranges
- High in vitamin C
- Boost immunity
- Add natural sweetness
🥛 Milk & Eggs
- Provide protein
- Contribute to structure
⚖️ Balanced Treat
A mix of indulgence and natural fruit goodness.
🎨 Presentation Tips
- Use blood oranges for dramatic color
- Garnish with mint leaves
- Serve on a white plate for contrast
- Add powdered sugar dusting
🌟 Why Everyone Loves This Cake
This cake stands out because it combines:
- Visual beauty
- Bold flavor
- Simple ingredients
- A touch of elegance
It’s the kind of dessert that makes people say “wow” before they even take a bite.
❤️ Final Thoughts
The Famous Upside-Down Orange Cake is more than just a dessert—it’s an experience. From arranging the orange slices to flipping the cake and revealing its glossy top, every step feels special.
It’s a recipe that brings joy, creativity, and delicious results every time. Whether you’re baking for a celebration or simply treating yourself, this cake is guaranteed to impress.
So grab some fresh oranges, preheat your oven, and get ready to create a dessert that’s as stunning as it is satisfying.