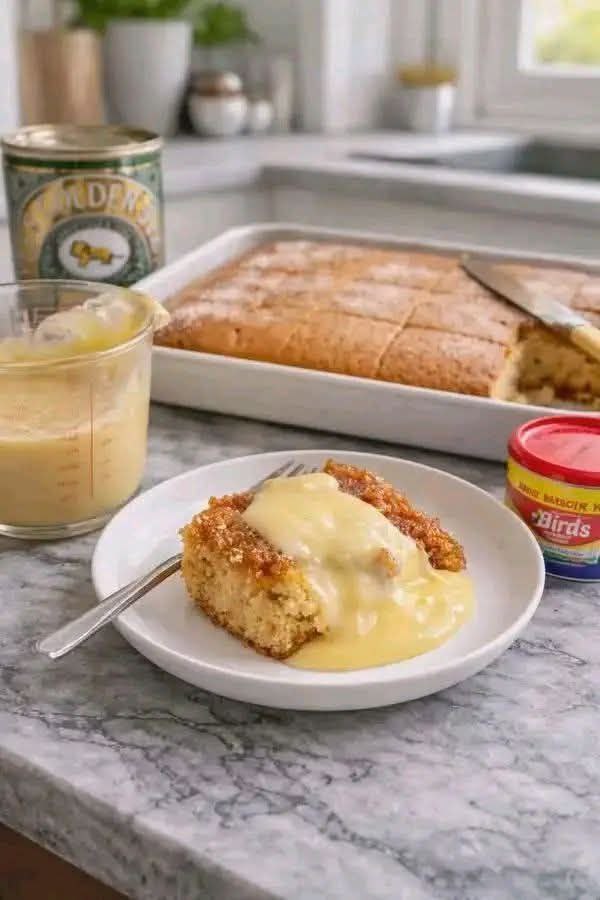
There is a specific kind of nostalgia that only a “School Baked Syrup Sponge Pudding” can evoke. The problem with many modern sponge recipes is that they try to be too light and airy, losing that dense, comforting “stodge” that defined the best school lunches. You want a pudding that is golden, moist, and capable of holding its own under a literal lake of thick, yellow custard.
This recipe is the definitive answer for those seeking that authentic British school dinner experience. It delivers a rich, buttery sponge with a deep, caramelized golden syrup topping that soaks into the cake as it bakes. It’s a humble, heart-warming dessert that turns a simple Wednesday night into a trip down memory lane.
The “Syrup-Soak” Method: My Kitchen Expertise
When I first recreated this at home, the syrup often sat stubbornly on top or made the bottom of the cake too soggy. The secret to the perfect school-style pudding is the multi-stage syrup application.
Instead of just pouring the syrup at the bottom, I’ve found that poking a few small holes in the bottom of the baked sponge while it’s still in the pan and adding a final “glossy” drizzle of warm syrup after flipping it is the game-changer. This ensures that the caramel flavor permeates the crumb without ruining the structural integrity of the cake. When you pour that hot Bird’s Custard over the top, the aroma of vanilla and toasted sugar is absolutely peak comfort.
📊 Structured Recipe Overview
- Preparation Time: 15 Minutes
- Baking Time: 35–40 Minutes
- Total Time: 55 Minutes
- Servings: 6–8
- Difficulty Level: Easy
🛒 Ingredients Section
- 3/4 cup (175g) Unsalted Butter: Softened to room temperature.
- 3/4 cup (175g) Golden Caster Sugar: For a slight caramel note in the sponge.
- 3 Large Eggs: Room temperature.
- 1 1/2 cups (175g) Self-Rising Flour: Sifted to ensure no lumps.
- 1/2 cup Golden Syrup: Divided (for the bottom of the tin and the final drizzle).
- 1 tsp Vanilla Extract: High quality for that nostalgic scent.
- 2 tbsp Milk: To reach the perfect “dropping consistency.”
- Custard: For serving (essential!).
🥣 Step-by-Step Instructions
1. Prepare the Syrup Bed
Preheat your oven to 350°F (180°C). Generously grease a deep baking dish or a classic pudding tin. Pour about 4 tablespoons of golden syrup into the bottom, spreading it evenly.
- Why: This creates that iconic sticky, caramelized “top” when the pudding is inverted.
2. Cream the Base
In a large bowl, cream together the softened butter and caster sugar until pale and fluffy. Add the eggs one at a time, beating well after each addition.
- Micro-Explanation: Room temperature eggs prevent the butter mixture from curdling, ensuring a more uniform crumb.
3. Fold and Adjust
Gently fold in the sifted flour and vanilla extract using a spatula. Add the milk 1 tablespoon at a time until the batter falls easily off the spoon (dropping consistency).
- Why: Folding instead of beating preserves the air bubbles, keeping the dense sponge from becoming a “brick.”
4. The Bake
Spoon the batter carefully over the syrup in the dish. Smooth the top and bake for 35–40 minutes.
- Visual Cue: The sponge should be golden brown, springy to the touch, and a skewer inserted into the center should come out clean.
5. The Inversion
Let the pudding sit for 5 minutes, then run a knife around the edge. Place a serving plate over the dish and quickly flip it over. Drizzle the remaining warm golden syrup over any “dry” spots on the top.
⚠️ Common Mistakes & How to Avoid Them
- Sponge Sticking to the Tin: Caused by under-greasing. Solution: Be aggressive with the buttering of the dish before adding the syrup.
- Batter Mixing with Syrup: If you pour the batter too fast, it displaces the syrup. Solution: “Dollop” the batter gently over the syrup rather than pouring it in one spot.
- Dry Sponge: Over-baking is the culprit here. Solution: Check the pudding at 30 minutes; as soon as it’s springy and the edges pull away slightly, it’s done.
🔄 Substitutions & Variations
- Jam Sponge: Replace the golden syrup with a thick layer of strawberry or raspberry jam for a “Jam Roly-Poly” style flavor.
- Ginger Twist: Add 1 tsp of ground ginger and a handful of chopped crystallized ginger to the batter for a warming winter version.
- Gluten-Free: Use a high-quality 1:1 gluten-free self-rising flour blend; the syrup moisture helps prevent the typical GF dryness.
- Storage: This pudding is actually better the next day. Store covered at room temperature and reheat in the microwave for 30 seconds to bring back the “molten” syrup.
💡 Pro Tips Section
- The Custard “Skin”: To prevent a skin from forming on your custard while the pudding bakes, place a piece of plastic wrap directly onto the surface of the liquid.
- Steam in the Oven: Place a small pan of water on the bottom rack of the oven while the pudding bakes. This creates a slightly humid environment that keeps the sponge incredibly moist.
🔍 Optimized FAQ Section
Q: Can I use Maple Syrup instead? A: You can, but it is much thinner than Golden Syrup and won’t produce the same thick, sticky glaze. If using maple, reduce it on the stove slightly first.
Q: Do I need a special pudding steamer? A: No! This recipe is specifically for a “Baked” version, which gives you those lovely caramelized edges that a steamed pudding lacks.
Q: Why did my syrup disappear into the cake? A: This usually happens if the batter is too thin. Ensure you follow the flour measurements exactly to keep the batter thick enough to “float” on the syrup.
Conclusion
The School Baked Syrup Sponge Pudding is a masterclass in simple, honest baking. It’s a dish that demands you sit down, grab a large spoon, and forget about the outside world for a few minutes.
Did you go for the extra-thick custard pour? I’d love to see your golden results! Leave a comment below with your favorite school dinner memory, share this with a fellow expat or nostalgia seeker, and Save this recipe for your next rainy afternoon!