1️⃣ Hook Introduction: The End of the “Swirl” Stress
Poaching an egg is often considered the final boss of breakfast cooking. We’ve all dealt with the messy vinegar water, the “whirlpool” that fails to keep the whites together, and the heartbreaking moment an egg disintegrates into a cloud of white ribbons. If you are looking for a way to get a perfectly set white and a liquid gold center without the stovetop drama, your air fryer is the answer.
This method delivers restaurant-quality poached eggs on toast with zero boiling water required. It is beginner-proof, incredibly consistent, and allows you to “poach” multiple eggs at once for a crowd.
2️⃣ Personal Experience Layer: The “Ramekin” Revelation
I used to avoid making eggs Benedict at home because I couldn’t time the water simmer correctly. My first air fryer attempt was a disaster because I didn’t use enough water in the individual cups, leading to a “fried” texture on top.
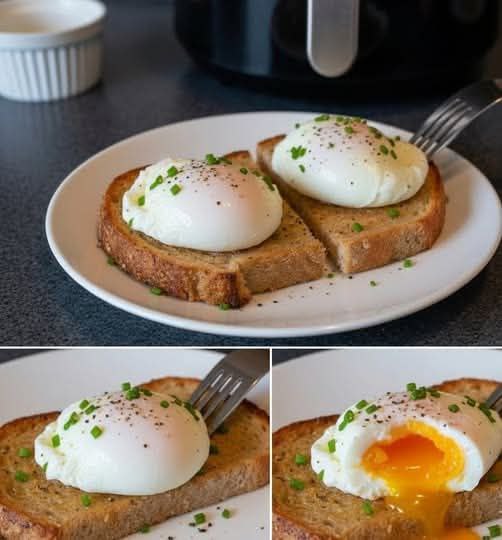
The breakthrough came when I realized that the air fryer essentially acts as a high-precision steam oven when you use pre-heated water in ramekins. This creates a gentle heat that cooks the whites through while insulating the yolk. When you slice into that egg and see the yolk flow perfectly over your bread, you’ll never go back to the stovetop.
3️⃣ Structured Recipe Overview
- Preparation Time: 2 minutes
- Cooking Time: 6–9 minutes (depending on desired yolk runniness)
- Total Time: 11 minutes
- Servings: As many as your air fryer can hold
- Difficulty Level: Very Easy
4️⃣ Ingredients Section
- Large eggs (Cold, straight from the fridge)
- 2–3 tablespoons of hot water per ramekin
- Non-stick cooking spray or a drop of olive oil
- For Serving: Toasted artisan bread
- Garnish: Fresh chives, cracked black pepper, and sea salt
5️⃣ Step-by-Step Instructions
Step 1: Prep the Vessels
Lightly grease small, oven-safe ramekins with cooking spray. Add 2 tablespoons of very hot water to each cup.
- Why? The water creates steam and prevents the egg from sticking to the bottom, ensuring that classic “poached” look.
Step 2: The Egg Drop
Carefully crack one egg into each ramekin, making sure the yolk remains intact.
Step 3: The Precision Cook
Preheat your air fryer to 180°C. Place the ramekins in the basket and cook for 6 to 9 minutes.
- Timing Guide: 6 minutes for a very runny yolk; 8 minutes for a “jammy” center; 9 minutes for a firmer set.
Step 4: The Release
Carefully remove the ramekins (they will be hot!). Use a small silicone spatula or a spoon to gently lift the egg out of the water.
Step 5: Plate and Season
Place the egg onto a piece of toasted bread. Garnish generously with fresh chives, salt, and pepper.
6️⃣ Common Mistakes & How to Avoid Them
- Skipping the Water: Without the water in the ramekin, you are just making a “baked egg,” which has a different, tougher texture.
- Not Greasing the Cup: Even with water, the proteins in the egg white can bond to the ceramic. A quick spray makes it slide right out.
- Using Warm Eggs: Cold eggs work better here as the yolk takes longer to heat up, giving the whites time to set completely before the yolk overcooks.
- Overcrowding: Ensure there is air gap between ramekins so the heat can circulate evenly.
7️⃣ Ingredient Substitutions & Variations
- The “Pesto” Poach: Add a teaspoon of pesto to the bottom of the ramekin before the water for an infused flavor.
- Spicy Twist: Sprinkle red chili flakes and a dash of hot sauce over the finished egg.
- Low-Carb: Serve the poached eggs over roasted air fryer cauliflower instead of toast.
8️⃣ Pro Tips Section
- The “Doneness” Poke: At the 6-minute mark, gently jiggle the basket. If the whites are still clear and sloshy, they need more time. If the whites are opaque white but the yolk still “wobbles,” they are perfect.
- Toast Synergy: Put your bread in the air fryer for the last 3 minutes of the egg’s cooking time to have both finish at the exact same moment.
9️⃣ Optimized FAQ Section
Q: Can I use silicone muffin liners instead of ramekins? A: Yes! Silicone liners work exceptionally well and are often even easier to “peel” away from the cooked egg.
Q: Why is my egg white still runny while the yolk is hard? A: This usually means the air fryer temperature was too high or the water in the ramekin wasn’t hot enough to start with. Stick to 180°C.
Q: Do I need to cover the ramekins? A: No. Leaving them open allows the air to circulate and cook the tops of the whites evenly.
🔟 Engagement-Oriented Conclusion
These Air Fryer Poached Eggs take the stress out of brunch, leaving you more time to enjoy your coffee. They are the perfect topping for homemade air fryer bread or a side to crispy potato slices.
Did you get that perfect yolk “pour” on your first attempt? I’d love to see your brunch spread! Tag me in your photos and tell me: are you a classic salt-and-pepper fan or do you go wild with the toppings? Save this recipe for your next lazy Sunday.