Ingredients
- 6–12 large eggs
- Water (enough to fully cover the eggs)
- Ice (for ice bath)
Optional:
- Salt (1 teaspoon)
- Vinegar (1 tablespoon)
Equipment
- Medium or large saucepan
- Slotted spoon
- Bowl filled with ice and water
- Timer
Step-by-Step Instructions
1. Choose the Right Eggs
Surprisingly, slightly older eggs (about 5–7 days old) are easier to peel than very fresh eggs. Fresh eggs tend to stick to the shell, making peeling frustrating. If you’re buying eggs specifically for boiling, don’t use the freshest batch.
2. Place Eggs in a Pot
Arrange the eggs in a single layer at the bottom of your saucepan. Avoid stacking them, as this can cause uneven cooking or cracking.
Add enough cold water to cover the eggs by about 2–3 cm (1 inch). Starting with cold water ensures even cooking.
3. Bring to a Boil
Place the pot on medium-high heat and bring the water to a rolling boil. Once the water starts boiling:
- Turn off the heat immediately
- Cover the pot with a lid
This method prevents overcooking and helps control the final texture.
4. Let Eggs Sit (Cooking Time)
Let the eggs sit in the hot water depending on your desired doneness:
- Soft-boiled (slightly runny center): 6–7 minutes
- Medium (creamy yolk): 9–10 minutes
- Hard-boiled (fully set): 11–12 minutes
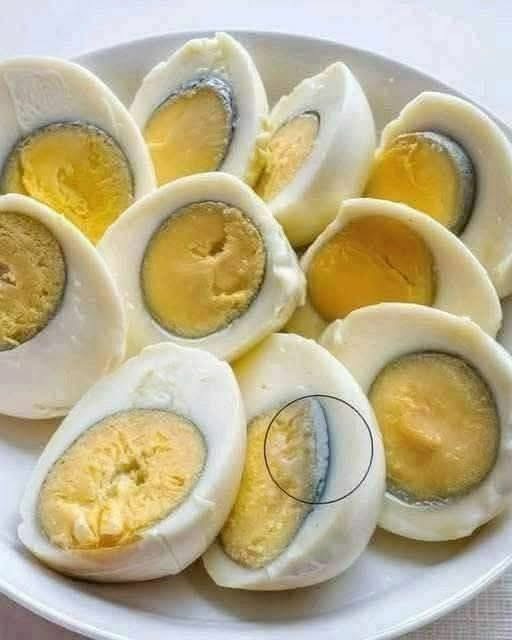
For the eggs shown in your image (firm whites and fully cooked yolk without dryness), aim for 10–11 minutes.
5. Ice Bath (Important Step)
Immediately transfer the eggs to a bowl of ice water using a slotted spoon. Let them sit for at least 5–10 minutes.
This step:
- Stops the cooking process
- Prevents the green ring around the yolk
- Makes peeling much easier
6. Peeling the Eggs
Gently tap the egg on a hard surface and roll it slightly to crack the shell. Start peeling from the wider end (where there is usually an air pocket).
For easier peeling:
- Peel under running water
- Or peel inside the bowl of water
Why the Green Ring Happens
The gray-green ring around the yolk is caused by a chemical reaction between sulfur (in egg whites) and iron (in yolks). This happens when eggs are overcooked or cooled too slowly.
To avoid it:
- Don’t boil too long
- Always use an ice bath
Tips for Perfect Eggs Every Time
Use Room Temperature Eggs
If you have time, let eggs sit out for 10–15 minutes before cooking. This reduces cracking.
Add Salt or Vinegar
- Salt may help prevent cracking
- Vinegar can help egg whites set quickly if a shell cracks
Don’t Overcrowd the Pot
Eggs need space for even heat distribution.
Use a Timer
Even 1–2 extra minutes can change the texture significantly.
Storage Tips
- Store unpeeled eggs in the refrigerator for up to 7 days
- Peeled eggs should be eaten within 2–3 days
- Keep them in a sealed container to avoid absorbing odors
Serving Ideas
Hard-boiled eggs are incredibly versatile:
1. Simple Snack
Sprinkle with salt, pepper, or paprika.
2. Egg Salad
Mash eggs with mayonnaise, mustard, salt, and pepper.
3. Salads
Add sliced eggs to green salads, tuna salads, or potato salads.
4. Sandwiches
Layer sliced eggs with lettuce and tomato.
5. Breakfast Plates
Serve with toast, avocado, or cheese.
Variations
Jammy Eggs
Cook for 7–8 minutes for a soft, creamy center—perfect for ramen or toast.
Deviled Eggs
Slice eggs in half, remove yolks, mix with mayo, mustard, and spices, then refill.
Spiced Eggs
After peeling, sprinkle with chili powder, cumin, or smoked paprika.
Common Mistakes to Avoid
Overcooking
Leads to dry yolks and green ring.
Skipping Ice Bath
Makes peeling harder and ruins texture.
Using Very Fresh Eggs
Difficult to peel cleanly.
Boiling Too Aggressively
Can crack shells and cause uneven cooking.
Nutritional Benefits
Eggs are packed with nutrients:
- High-quality protein
- Vitamins B12, D, and A
- Healthy fats
- Choline (important for brain health)
One large egg contains about:
- 70 calories
- 6 grams of protein
Final Thoughts
Making perfect hard-boiled eggs is easy once you understand the key steps: controlled cooking, proper timing, and rapid cooling. The image you provided shows slightly overcooked eggs (notice the gray ring), but with this method, you can achieve a bright yellow yolk, tender whites, and easy peeling every time.