Why You’ll Love This Recipe
There are so many reasons to keep this recipe on repeat.
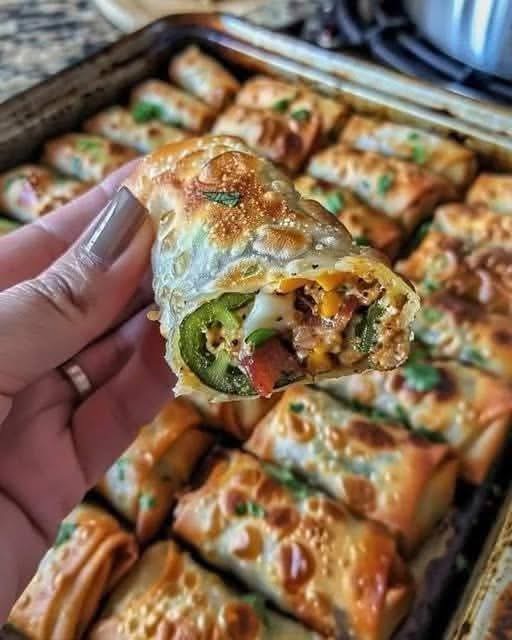
First, they’re baked instead of fried. That means less oil, less mess, and a lighter texture without sacrificing crunch.
Second, the filling is incredibly versatile. You can use chicken, beef, tuna, or just vegetables. You can even make them spicy or cheesy depending on your mood.
Third, they store and reheat beautifully. Make a big batch, freeze them, and bake whenever you need a quick snack.
And finally, they look amazing. Golden, glossy, and perfectly rolled — just like something from a bakery or café.
Ingredients You’ll Need
For the filling
- 2 cups cooked chicken breast, shredded or diced
- 1 small onion, finely chopped
- 1 red bell pepper, diced
- 1 green bell pepper, diced
- 1 carrot, grated
- 1 cup mushrooms, chopped (optional)
- 2 cloves garlic, minced
- 2 tablespoons olive oil
- 1 teaspoon salt
- 1 teaspoon black pepper
- 1 teaspoon paprika
- ½ teaspoon cumin
- ½ teaspoon chili flakes (optional)
- ½ cup chopped parsley or cilantro
- 1 cup shredded mozzarella or cheddar cheese
For wrapping
- 15–20 spring roll wrappers or thin pastry sheets (brick/warqa/phyllo)
For brushing
- 1 egg yolk + 1 tablespoon milk
OR - olive oil or melted butter
Cook the Flavorful Filling
The filling is the heart of these rolls. It should be juicy, well-seasoned, and not watery.
Heat olive oil in a large pan over medium heat. Add chopped onions and garlic first. Sauté until soft and fragrant.
Next, add bell peppers, carrots, and mushrooms. Cook for about 5 minutes until slightly tender but still colorful. You don’t want mushy vegetables — a little texture is perfect.
Add the chicken and all the spices. Stir well to coat everything evenly.
Cook for 3–4 minutes so the flavors combine beautifully.
Turn off the heat and mix in parsley and cheese.
Let the filling cool completely before wrapping. This is very important so the pastry doesn’t get soggy.
Choose the Right Wrappers
You can use different types depending on what you have:
Spring roll wrappers → crispy and light
Warqa/brick sheets → traditional and extra crunchy
Phyllo dough → flaky and buttery
Tortilla wraps → softer, burrito style
Thin sheets work best for maximum crispiness.
Keep them covered with a damp towel so they don’t dry out while you work.
How to Roll Them Perfectly
Place one wrapper on your surface like a diamond shape.
Add 2–3 tablespoons of filling near the bottom.
Fold the bottom over the filling tightly.
Fold both sides inward.
Roll up firmly until sealed.
It should look like a neat little log.
Don’t overfill or they may burst while baking.
Brush for Golden Crispiness
This step gives that beautiful bakery finish.
Place rolls on a lined baking tray.
Brush each one lightly with egg wash or olive oil.
This helps them turn golden, shiny, and crispy.
For extra flavor, sprinkle:
Sesame seeds
Parsley
Black seeds
Grated cheese
Totally optional but makes them look fancy.
Bake Until Crunchy
Preheat oven to 400°F (200°C).
Bake for 20–25 minutes or until:
Golden brown
Crispy edges
Beautifully toasted tops
Flip halfway for even browning if needed.
Your kitchen will smell amazing at this point.
Let them cool for 5 minutes before serving because the filling will be hot.
Texture and Flavor Experience
When you bite into one, you’ll notice layers of texture.
First comes the crispy crackle of the pastry.
Then the warm, savory chicken.
Then melty cheese stretching slightly.
Finally, the sweet crunch of vegetables and fresh herbs.
It’s the perfect balance of crispy, juicy, cheesy, and fresh.
Not heavy. Not greasy. Just satisfying.
Helpful Tips for Perfect Rolls
Always cool the filling before wrapping
Don’t overstuff
Roll tightly so they stay sealed
Brush well for crispiness
Bake on parchment to prevent sticking
If the wrapper tears, just double wrap — no problem.
Make Ahead and Storage
These rolls are amazing for meal prep.
You can assemble them and:
Refrigerate for 24 hours before baking
Freeze raw for up to 2 months
Bake directly from frozen — just add 5 extra minutes.
Once baked:
Store in fridge 3–4 days
Reheat in oven or air fryer (not microwave to keep crisp)
They taste just as good the next day.
Delicious Variations
This recipe is super flexible. Try different flavors:
Spicy version → add hot sauce or jalapeños
Cheesy version → add cream cheese or feta
Beef version → use seasoned ground beef
Tuna version → tuna + corn + mayo
Vegetarian → mushrooms + spinach + cheese
Pizza style → chicken + mozzarella + pizza sauce
You can literally create endless combinations.
Serving Ideas
Serve them warm with:
Garlic sauce
Ketchup
Sweet chili sauce
Ranch dip
Yogurt sauce
Harissa
They’re perfect for:
Ramadan tables
Family gatherings
Party appetizers
School lunchboxes
Picnics
Movie nights
Or honestly… just eating straight off the tray (no judgment 😄).
Final Thoughts
Crispy baked chicken and vegetable stuffed rolls are one of those recipes you’ll make once and then keep forever. They’re easy, affordable, customizable, and incredibly delicious.
You get all the crunch of fried snacks without the extra oil, plus a flavorful homemade filling that tastes fresh and comforting.
They look impressive but require simple ingredients and basic steps. That’s the kind of recipe we all need.
Make a big batch — because trust me — they vanish fast.