Ingredients (Serves 6–8)
For the beef
- 1.5–2 kg beef chuck roast (or blade roast / shoulder roast)
- 2 tablespoons olive oil
- 1½ teaspoons salt
- 1 teaspoon black pepper
- 1 teaspoon paprika
- 1 teaspoon garlic powder
- 1 teaspoon dried thyme or rosemary
- 2 tablespoons flour (optional, for thicker gravy)
Vegetables & aromatics
- 1 kg potatoes, peeled and chunked
- 2 large onions, sliced
- 4 garlic cloves, smashed
- 3 carrots, cut into chunks (optional but recommended)
- 2 celery stalks, chopped (optional)
For the braising liquid
- 2 cups beef broth or stock
- 1 cup water or extra broth
- 2 tablespoons tomato paste
- 2 tablespoons Worcestershire sauce
- 1 tablespoon soy sauce
- 1 bay leaf
- Fresh herbs (parsley or thyme sprigs)
🔥 Step-by-Step Instructions
Step 1 – Prepare the beef
Start by taking your beef roast out of the fridge about 20–30 minutes before cooking. Letting it come closer to room temperature helps it cook more evenly.
Pat the meat dry with paper towels. This step is important because moisture prevents good browning. And browning = flavor.
Now season generously with:
- salt
- pepper
- paprika
- garlic powder
- dried herbs
Massage the spices all over the meat so every side is coated.
Step 2 – Sear for maximum flavor
Heat olive oil in a large Dutch oven or heavy pot over medium-high heat.
Once hot, place the roast in carefully. Don’t move it for about 4–5 minutes. Let it develop a deep brown crust.
Flip and sear every side.
This step creates caramelization (called the Maillard reaction), which gives your gravy that rich, deep restaurant-style taste. Don’t skip this part — it’s the secret weapon.
Once browned, remove the beef and set aside.
Step 3 – Build the flavor base
In the same pot (don’t wash it — those brown bits are gold), add:
- onions
- garlic
- carrots
- celery
Cook for 5–7 minutes until softened and slightly golden.
Stir occasionally and scrape the bottom to release the browned bits. That’s pure flavor going into your sauce.
Add the tomato paste and cook for 1–2 minutes to deepen the taste.
Step 4 – Create the braising liquid
Pour in:
- beef broth
- Worcestershire sauce
- soy sauce
- water
Stir everything together.
Taste and adjust salt if needed.
Add the bay leaf and fresh herbs.
If you want thicker gravy, sprinkle flour and whisk well.
Step 5 – Slow braise
Place the seared roast back into the pot.
The liquid should come about halfway up the meat — not fully covering it.
Cover with lid.
Now choose your method:
Oven method (best)
Bake at 160°C (325°F) for 3–3½ hours.
Stovetop method
Simmer on very low heat for 3–4 hours.
Slow cooker method
Cook on LOW for 8 hours.
🥔 Add the potatoes
About 1½ hours before the roast is done, add the potatoes around the meat.
They will absorb the juices and become incredibly flavorful.
If you like crispy potatoes, you can roast them separately in the oven with olive oil and salt, then serve with the gravy.
Both methods are delicious — your choice.
⏳ How to know it’s done
The beef is ready when:
- A fork slides in easily
- Meat pulls apart effortlessly
- Internal temp around 95°C (203°F)
It should be super tender and juicy.
If it’s still tough, it simply needs more time. Slow cooking breaks down collagen.
🍲 Make the gravy
Remove the roast and vegetables.
Strain or skim excess fat if desired.
Simmer the liquid for 5–10 minutes to thicken.
For extra thickness:
- mix 1 tablespoon cornstarch + 2 tablespoons water
- add slowly while stirring
You’ll get a glossy, rich gravy perfect for pouring over everything.
🔪 Slice and serve
Let the beef rest 10–15 minutes.
Slice or shred.
Serve with:
- potatoes
- vegetables
- lots of gravy
- fresh parsley
Optional sides:
- crusty bread
- rice
- mashed potatoes
- green beans
- salad
💡 Pro Tips for Perfect Pot Roast
⭐ Choose the right cut
Chuck roast is best. It has fat and connective tissue that melt into tenderness.
Avoid lean cuts like sirloin — they’ll be dry.
⭐ Low and slow wins
High heat = tough meat
Low heat + time = melt-in-your-mouth
⭐ Don’t rush resting
Resting keeps juices inside the meat.
⭐ Even better next day
Pot roast tastes AMAZING reheated. Flavors deepen overnight.
🌿 Flavor variations
Want to change it up?
Try adding:
- mushrooms
- red wine instead of some broth
- balsamic vinegar
- rosemary and garlic heavy style
- spicy chili flakes
- Dijon mustard
You can easily customize.
🧊 Storage
Fridge:
Up to 4 days
Freezer:
Up to 3 months
Reheat gently with extra broth or gravy so it stays juicy.
❤️ Why this recipe works
This dish is comfort food science:
Searing → builds flavor
Slow cooking → tenderizes
Broth + herbs → deep aroma
Time → magic
It’s simple ingredients, but huge taste.
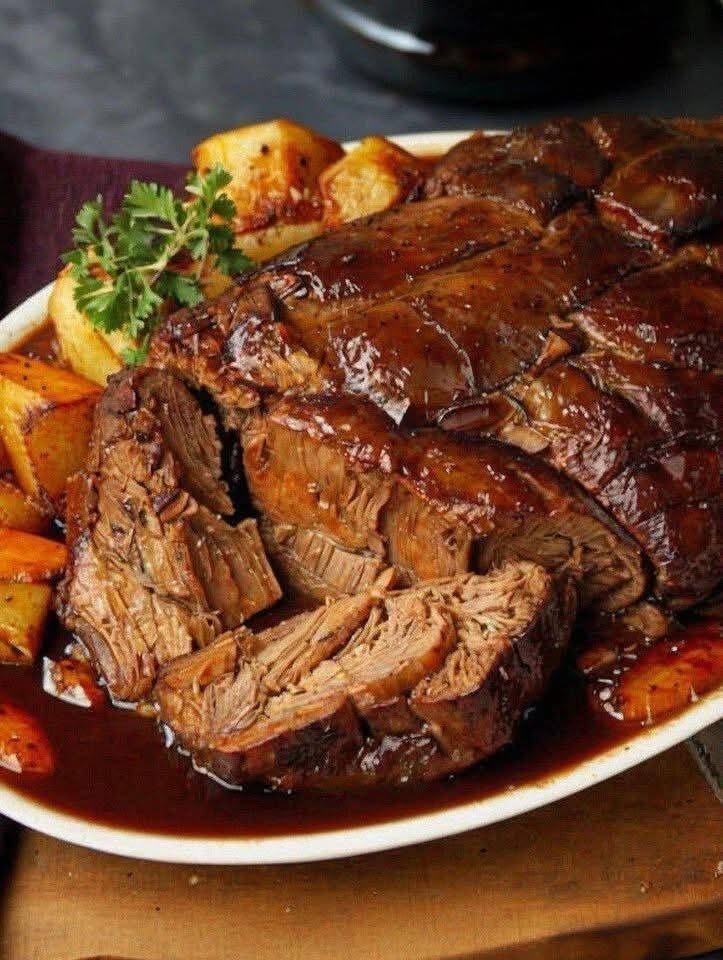
And honestly… nothing beats cutting into that soft, juicy roast like the one in your photo. That glossy sauce, those tender slices… pure happiness on a plate.